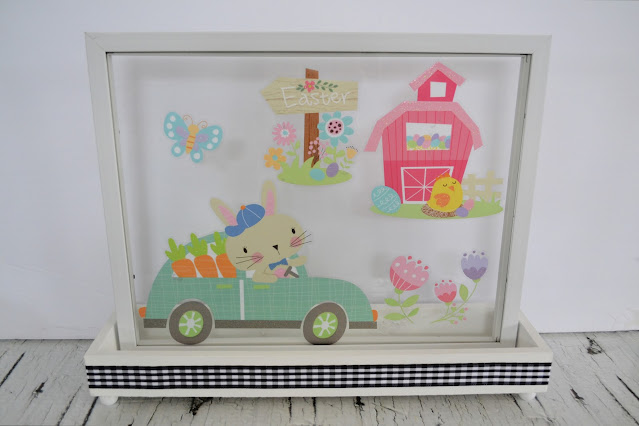
When looking for budget-friendly Easter decor, the dollar store is the first place to shop. The supplies are inexpensive, and it is super-easy to transform them into fantastic, high-end decor. Here are a few of my latest finds and DIYs.
1) This gorgeous bunny wreath is made using 100% dollar store supplies. It is soooo easy to make. Check out the full tutorial here.
2) The dollar store has many Easter basket options, but they look more high-end when you personalize them. I used my Cricut to add a name to the back, but you could easily using alphabet stickers. Get a closer look here.
3) The Easter eggs at the dollar store come in beautiful on trend colours. I love using them to decorate my little white (dollar store) tree. Cute, right? Check out my other ideas for these eggs here.
4) The wooden ornaments at the dollar store come is super-cute seasonal shapes. I love these bunnies for Easter. I used mine to make this wood bead garland, but I have other ideas you can check out here.
5) Dollar store window clings are inexpensive and perfect for DIYing. I like to create artwork by applying window clings to dollar store frames. Check out how easy it is to make your own here.
For a closer look at these products (and step by step instructions for the DIYs), check out the video below.
What do you think? Are you going to try any of these budget-friendly DIYs for Easter? I think the bunny wreath is my favourite, but they are all easy, inexpensive, and fun!
What's more fun than Valentine's DIYs? What about DIYs made with FREE (or super cheap materials? I have some fantastic options for kids and adults... and they are all easy and inexpensive! (I even made a video with all the step by step instructions.)
First up is a Valentine's Day garland made from an old cardboard box. Cut hearts from cardboard, tape a piece of a paper straw to the back, and string the hearts and beads on a piece of twine.
You can also use the cardboard hearts to make framed Valentine's Day artwork with kids. Glue popsicle sticks together to make a frame, glue a string to the top, add buttons to the ends of the piece of string, and glue a piece of cardstock onto the middle of the frame.
Then, decorate hearts to put inside of the frames.
Scrunch up 1 inch squares of tissue paper and glue to a cardboard heart until it is entirely covered.
You can also wrap a heart in yarn (securing periodically with glue).
Or you can just use a paint marker or Sharpies to decorate the cardboard heart.
Which one is your favourite? I suggest trying them all! :-)
Another simple DIY is this adorable floral canvas. I picked my favourite faux flowers at the dollar store, removed the stems, and used hot glue to attach them to the inside of a dollar store wooden canvas.
For a look at all these projects, check out the video here...
Thanks for checking out my latest easy and inexpensiveValentine's Day DIYs! Let me know which one is your favourite. Happy Valentine's Day!!!
♥ Gina Bell(aka East Coast Mommy)
If you are looking for more Valentine's Day inspiration, check out more than 30 Valentine's Day ideas here.
Is there anything better than a simple craft that looks complicated? I am absolutely obsessed with these twine wrapped Easter ornaments. They look so pretty on my little white tree (that is supposed to be for Christmas but works for other seasonal decorating too). With a few dollar store supplies, you can make a bunch of these eggs to hang from a tree, to turn into a garland, to display on a tiered tray or to pop into a basket.
Seriously... isn't this an adorable display?
I got all the supplies I needed at the dollar store. You'll need twine, ribbon, eggs, and a hot glue gun.
I started by using hot glue to make a twine handle. If you are going to be putting the eggs in a basket, you can skip this step.
Then, using hot glue, attach the thicker jute twine to the top of the egg and start wrapping.
Continuing wrapping and securing with hot glue until the entire egg is covered.
Carefully burn off the loose fibres.
Finish by embellishing with anything you like. I used some dollar store lace ribbon. I like the contrast between the rustic ribbon and the delicate lace.
You can use the same technique to cover eggs with yarn, ribbon or fabric too.
This really is a fun project and a delightful addition to Easter decor. Which do you prefer... the twine or the yarn? I really don't think I could choose. They are both adorable. Happy Easter!
Who doesn't love a festive (and inexpensive) piece of home decor for the holiday? I am currently obsessed with some of the cute Easter crafting supplies available at the dollar store. The little carrots and plastic bunnies are my current favourites. Today, I am sharing an adorable little Easter picture I made for just a few dollars.
To make the picture I made, you'll need: twine, scrapbook paper, alphabet stickers, tiny clothespins, carrot, plastic bunnies, and a cheap frame. Most of these items items came from the dollar store, but some of them came from my crafting stash. If you can't find the exact items, don't worry, you can use my picture as inspiration, and put your own spin at it. There are no rules when it comes to crafting! 😄
Start by inserting the scrapbook paper into the frame. I put mine on top of the glass so I could repurpose the frame at some point in the future.
Then, split the bunny (plastic chocolate egg) into two pieces, and attach to the paper with hot glue.
Use stickers to spell out "Happy Easter". (If you have a Cricut, you can use that instead, but I liked these colourful stickers that I found for $1.99.)
Finish by stringing twine across the top of the frame and attaching foam carrots with tiny clothespins.
Isn't it adorable? I love how it adds a bit of fun and whimsey to my Easter decor... and it was soooo cheap!
I hope I've inspired you to DIY something this holiday season. Feel free to switch up the colours and embellishments. Have fun with it!
Summer is the perfect time for crafting. It's an excellent way for ALL members of the family to exercise their creative muscles and spend time together. Today, I am sharing OVER 30 summer crafts for ALL ages, and I've included helpful links and templates too!
I've divided the crafts into three categories (younger kids, older kids, and adults), but some of the crafts are fun for multiple age groups. Take a look and let me know what you think!
Summer Crafts for Younger Kids
1) Paper Fan - Paper fans are easy to make, and they are fun to play with after they are made. Kids will love this simple craft, and you can download the paper fan template for free here.
2) Paper Popsicle - I love this simple little paper popsicle craft. Tape a popsicle stick onto the back of a piece of cardstock, and decorate with markers and stickers. It doesn't get much easier than this cool treat!
3) Toilet Roll Binoculars - Toilet roll binoculars are fun to create, and they are perfect for taking along on summer sight-seeing adventures. Find the "how to" here.
4) Campfire Scene Artwork - Artwork that includes a photo of the child is extra special. Check out how my sun made this simple campfire scene artwork here.
5) Handprint Campfire - Handprint crafts are super-cute, and this one is perfect for summer. You can find the full instructions for this adorable handprint campfire here.
6) Paper Bag Kites - Paper bag kites are easy to make, and they are really fun to play with after they have been completed. This was always a favourite craft with my boys.
7) Under the Sea- Young kids will adore making these sweet "under the sea" crafts. You can find the details for these three fish crafts here.
8) Windsock - You just need a few simple crafts supplies to make this adorable windsock... and kids will love it. Find the full instruction for this fantastic craft for kids here.
9) Suncatcher - This one simple crafts involves glue, so young kids will love it. Pour a thin layer of white glue into a plastic lid, add some "treasures", and allow to dry completely. Peel out the suncatcher, attach a string, and hang it in a window.
10) Magnet Movers - This is a fun little activity for little ones, and it's simple to make. Start by drawing a road on a piece of paper. Then, take two "attracting magnets" -- attaching one to a pom pom creature and one to a folded paper "handle". Put the creature on the top of the paper and the other magnet on the bottom of the paper. The kids will have a great time moving the pom pom creatures around "like magic".
11) Noisemaker / Kazoo - This craft is perfect for kids because they love things that make noise. To make it, have the kids decorate a toilet paper roll, and then secure some wax paper to the top with an elastic. "Hum" into it, and have fun!
12) Celebrating Frog - This is a craft and a celebration all in one! Draw a basic frog face shape onto a piece of card stock, color it, add some eyes, and cut it out. Then, cut a slit for a party favor "tongue". Simple and silly!
13) Handprint Art - The possibilities for handprint art are endless, but this little crab is adorable. Cover two little hands in red paint, press to paper and add a couple of googly eyes. Cute, right?
Summer Crafts for Older Kids
14) Felt Finger Puppets - Felt is a perfect material for young people learning to sew. It is cheap and super-easy to work with. Making finger puppets is wonderful sewing projects for beginners. They can be given as gifts or donated to a children's hospital! You can find a full tutorial for making felt finger puppets here.
15) Pom pom crafts - Pom poms are a simple yarn craft with several possibilities for further crafting. Pom poms can be played with "as is" or they can be turned into yarn animals, wreaths, flowers, and more. Find the step by step instructions for crafting pom poms here.
16) Nature Inspired Picture Hanger - What starts with a trek through the woods collecting branches, turns into a fun piece of bedroom decor. Wrap a stick with yarn, tie on a yarn hanger, use hot glue to attach two clothespins, and hang a favourite photo.
17) God's Eye Craft - This simple weaved ornament is the perfect summer craft. You can make them with yarn and popsicle sticks (or twigs), and you can find the full step-by-step tutorialhere.
18) Friendship Bracelets - This was one of my favourite crafts when I was a little girl. They are simple to make, and they are fun to wear. If you google "friendship bracelets", you can find tons of easy-to-follow video tutorials.
19) Painted Rocks - Painted rocks are fantastic because the materials are inexpensive, and the design possibilities are endless. They are fun for decorating a garden or leaving on a trail for strangers to find and enjoy.You can find a beginner's guide to painted rocks here.
20) Boho Wreath - This wreath isn't difficult to make, but it's a super-cute piece of decor that tweens/teens can make for their rooms. Find the full step-by-step instructions here.
21) "No sew" Jersey / T-Shirt Bags - Old t-shirts that are destined for the donation bin can easily be turned into "no sew" bags. Find the full step by step instructions for crafting your own bag from a jersey or t-shirt here.
22) Toilet Roll Weaving - Toilet roll weaving is simple... and totally addictive. You can use a toilet roll, yarn and popsicle sticks to weave a snake, necklace, bracelet or rug. Once you start this fun craft project, you won't be able to stop. You can find the step by step tutorial for toilet roll weavinghere.
23) Tassel bookmarks - Paper bookmarks are fun, but bookmarks with easy-to-make yarn tassels are even better. Find the full step by step instructions for creating these cute bookmarkshere.
24) 3D handprint art - Simple handprint artwork can be created with only paper and markers. You can find the step by step instructions here.
25) Jersey Painting - Sporty kids will love creating these jersey paintings to hang in their rooms. They are easy to customize to any name / number / team colours. Find the step-by-step instructions here.
26) Simple beaded key chain - Dollar store beads can be strung and attached to key rings to create a variety of beaded key chains. You can also add words and messages to wooden beads with a Sharpie. Make a bunch of these to hang from backpacks or give as gifts.
27) Placemat Wreath - This is one of my favourite summer DIYs. It's a simple idea, but the result is super-cute. All you need is a dollar store pizza pan, a placemat, some nautical rope, and the instructions you can find here.
You can also try this cheery version. Find the full instructions for the HELLO SUNSHINE wreath here.
28) DIY Planter - I was inspired to make this planter when I saw a similar one selling online for $140. I gathered up some dollar store supplies and make this one for only $10. Check out both versions and the step-by-step instructions here.
29) Turquoise Grapevine Wreath - I made this wreath several years ago, but it's still one of my favourites. I love the bright colours and the simple design. You can find out how to make your own version here.
30) DIY Lemonade Tray and FREE Printable Picture - Yellow is the perfect colour for summer, and lemons are a great source of crafting inspiration. I am absolutely in love with this lemonade tray and free print. Find the instructions and get your freebie here.
31) Summer Themed Tiered Tray - I love having a tiered tray and trading out all the displayed items for each season / holiday. For summer, it's easy to DIY items using dollar store supplies. Find the details for the items on the summer themed tiered tray (below) here.
32) Summer Flower Arrangement- Creating a flower arrangement using dollar store supplies is a fantasstic way to create high-end home decor on a budget. Find the DIY details here.
Are these summer crafts fun? I love coming up with fun crafts that using inexpensive (and easy to find) supplies. I hope I've inspired you to stock up on craft supplies and have some fun getting creative this summer!