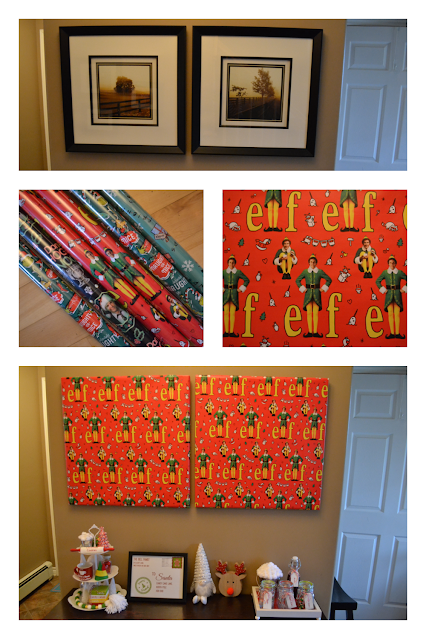
I recently found a large frame at the Dollar Store, and I knew I wanted to use it to create a large decor piece for the holidays. I am thrilled with how the print I designed turned out, and YOU can download your own copy FOR FREE below.
To download a copy of this "ELF" inspired print: click on the picture below, right-click, save it to your computer, and print it like a regular 11x14 print.
I printed mine at my local copy store for less than $1, and it looks great in my dollar store frame. It's a fantastic piece of Christmas artwork for only a few dollars!!!
Take a closer peek at my print (and a few of my other NEW dollar store DIYs and finds) here:
What do you think? Are you planning to download a copy of this Elf Movie print? I hope you like it as much as I do!
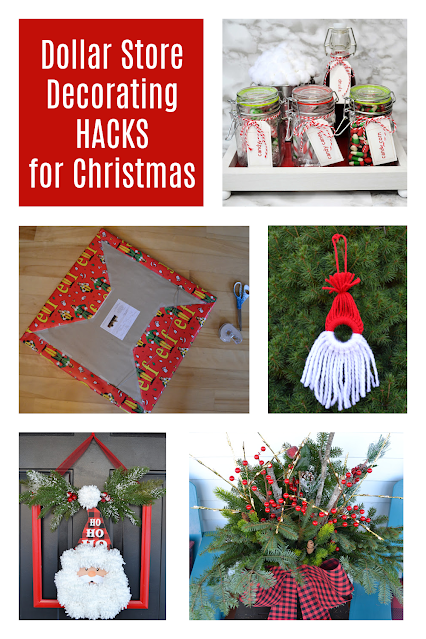
Is there anything more satisfying than creating unique holiday decor on a budget? I love finding simple ways to add festive flair to my home, and today I'm share my favourtie dollar store holiday decorating HACKS.
Update something cheap to look high end - The dollar store has many inexpensive decor pieces that can easily be upgraded to look more high end.
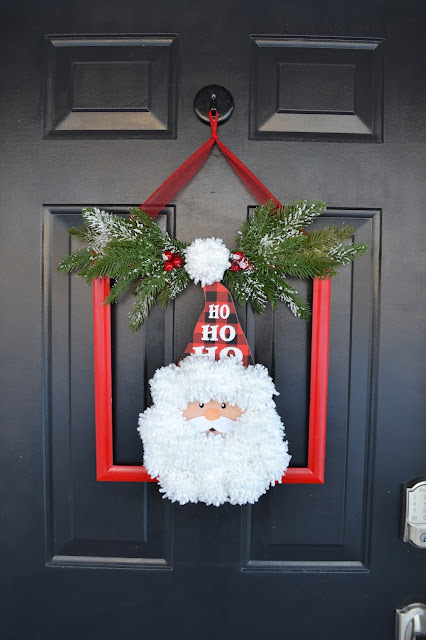
For example, I found a cheap dollar store square frame, and I painted it with shiny red spray paint. Then, I added a fun Santa decoration I found at the dollarstore (with hot glue). I finished by using hot glue to attach dollar store greenery and pom poms. Isn't my Santa wreath adorable? You'd never guess it only cost me a couple of dollars to make!
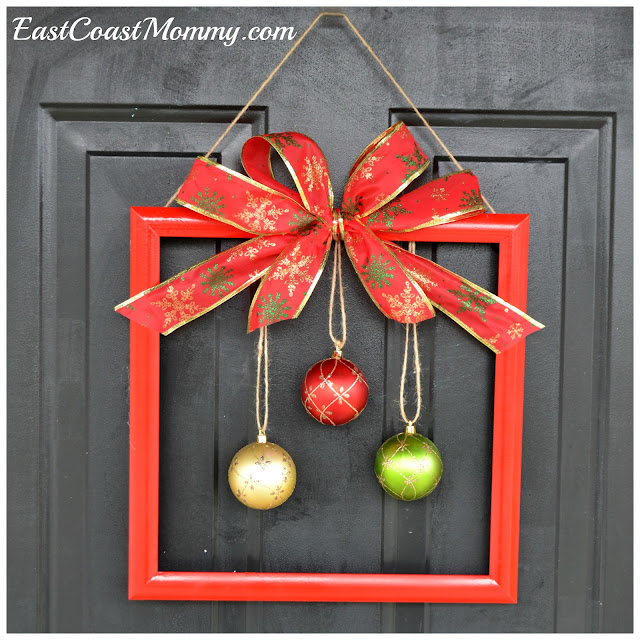
You could also use the frame to make an ornament wreath. Just hang a couple of ornaments from twine, and use hot glue to add a bow and hanger.
Think outside the box - It's always fun to find everyday items at the dollar store and use them in a unique way.
For example, this year the dollar store had some super-fun Christmas movie themed wrapping paper, so I used it to wrap pictures I already had hanging in my hallway. I love the big impact this simple DIY has!
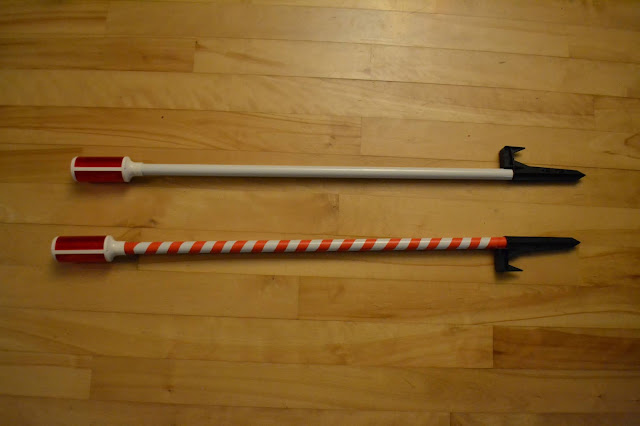
I also wrapped my plain white driveway markers with red electrical tape to get a North Pole / candy cane effect. It was a simple way to add a festive flair to the outside of my home.
Use what you have - Sometimes the best way to come up with something great is to use what you already have and add some dollar store items to make it better / different.
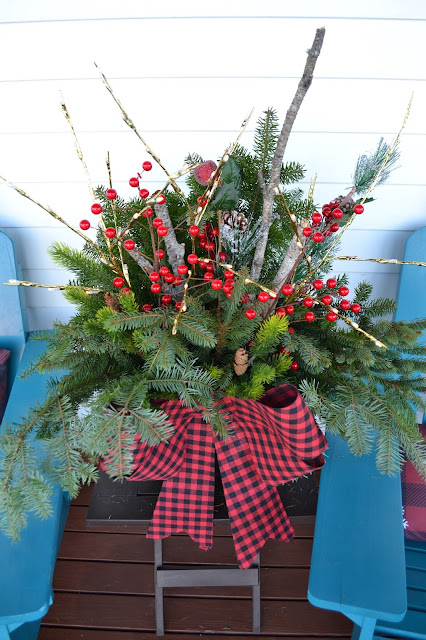
For example, I recently made a Christmas arrangement with branches and boughs from the trees in my yard. Then, I added a dollar store bow and a couple of dollar store stems. I love how it turned out, and it only cost a few dollars!
Make ornaments and decorations from dollar store supplies - The dollar store has countless supplies for making ornaments and decorations. Browse blogs and Pinterest for inspirations, grab some supplies, and get busy.
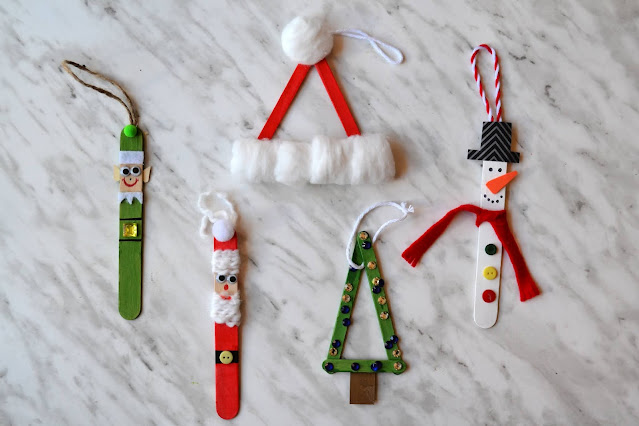
How cute are these ornaments made from dollar store popsicle sticks and craft paint?
You can find all the details for inexpensive "Elf Movie" decor here.
And this adorable Santa ornament is made with a wooden ring from the dollar store. Cute, right?!? You can find the step by step instructions here.
Dollar store decorating doesn't need to look cheap... especially if you pair dollar store items with a little creativity. Do you have a favourite dollar store decorating HACK? I hope I've inspired you to try a couple of mine.
I am loving the boho trend that is popular right now, and it's popping up in a lot of my Christmas decor this year. It's cozy, unique, budget friendly and super cute. Check out three of my favorite DIY boho decor pieces below.
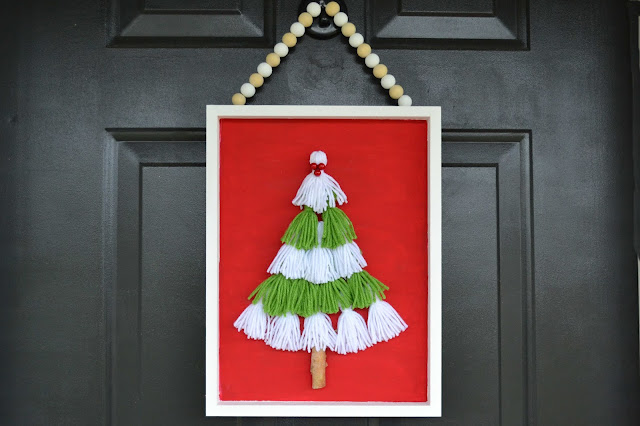
1) Tassel tree picture - How cute is this tassel tree picture that I made using a dollar store wooden canvas? I painted the inside of the frame red, taped it off, and painted the outside white. Then, I made tassels, glued them to the frame, and added embellishments and a beaded hanger. It's adorable, only cost a few dollars to make, and looks really high end. Find the full tutorial here.
And check out this "how to" video on YouTube.
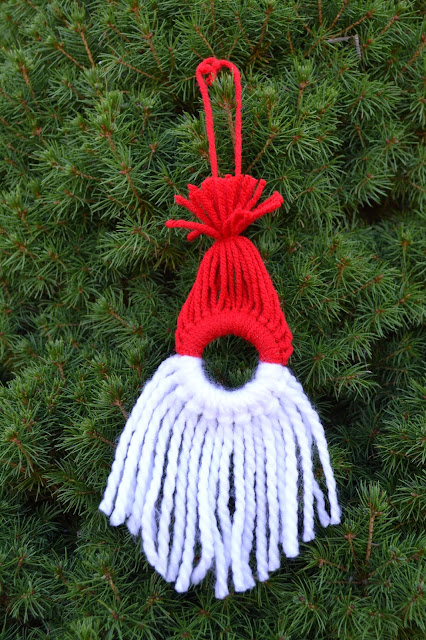
2) Santa ornament - This is a fantastic boho craft that is fun for kids and adults. If you can cut and loop a piece of yarn, you can easily make this simple Santa. Find the step by step instructions here.
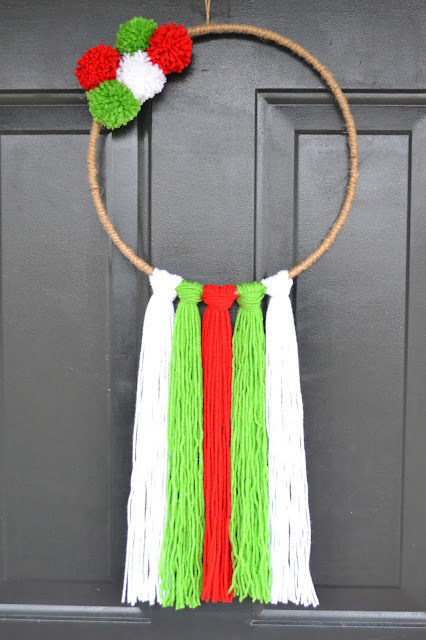
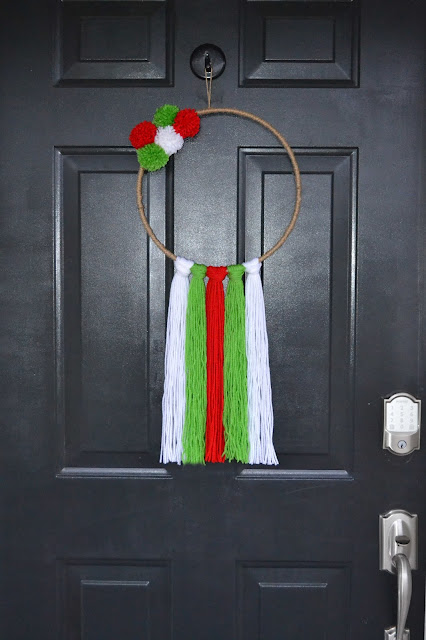
3) Yarn and Pom Pom Wreath - I love the simplicity of this red, white, and green wreath. The bottom is made with strips of yarn looped around a jute covered ring, and then pom poms are added to the top. Colours are totally customizable, and you don't need to be super-crafty to make this. It would be fun to make with a group of family or friends too! You can find all the step by step instructions here.
Are you a fan of boho decor? I think it's a fun and unique way to decorate for Christmas. Which of these three projects is your favourite? I think the tassel tree is mine, but I really do love them all!
I am loving the boho home decor trend that is really popular right now... and I thought it would be fun to incorporate it into my Christmas decor this year. How cute is this simple boho Christmas tree picture made from a dollar store canvas?
I started with:a wooden dollar store canvas, yarn, dollar store paint (in red and white), and a wood piece / stick.
Then, I painted the inside of the canvas red, let it dry, taped it off, and painted the frame white. You can use any colours you want, but I liked the red and white.
Then, make a bunch of tassels, and glue them to the canvas. If you have never made tassels before, check out the easy to follow video here.
Finish by adding a hanger to the back. I used a bead garland, secured with hot glue and popsicle sticks... but a piece of twine would work too.
How cute is this???
If you need a bit more help, check out the "how to video" here.
Are you a fan of boho Christmas decor? I think this Christmas tassel tree is adorable, and it looks great hanging on my door. Let me know if you make one!
Gnomes are super trendy right now, and what could be cuter than a"GNOME for the holidays"Christmas ornament? I love a good pun, and I am really loving the adorable gnome ornaments I made for my friends and family this year. Today, I'm sharing thestep by step instructions(and thetemplatesyou need) to make thissuper-cute felt Christmas ornament.
First, download and print the templates I created. Click on the photo below, right-click, and print it like a regular 8x10 photo. You can also insert it into a Word document and print it that way.
Cut a hat from red felt, a beard from white felt, a shirt from grey felt, and a nose from pink felt.
Then... (per the picture below) sew the beard to the to the shirt, and the hat to the beard. Finish the front of the gnome by sewing on the nose and button at the top.
To make the back of the gnome, trace the assembled pieces onto a piece of red felt, and cut out. Sew a hanger to the back piece, and then sew the front and back pieces together.
Isn't it adorable?
I can't wait to send out these darling gnomes with my Christmas cards this year. I hope you make a few for your friends and family too!
I love inexpensive seasonal decor,don't you? Earlier this year, I made fun Springand Fall "Boho" wreaths, and I knew I had to make another one using Christmas colours. When you see how easy this wreath is to make, you're going to immediately hop in your car to get the supplies you need to make it. Check out the photos and step by step instructions for this gorgeous BOHO Christmas yarn wreath below.
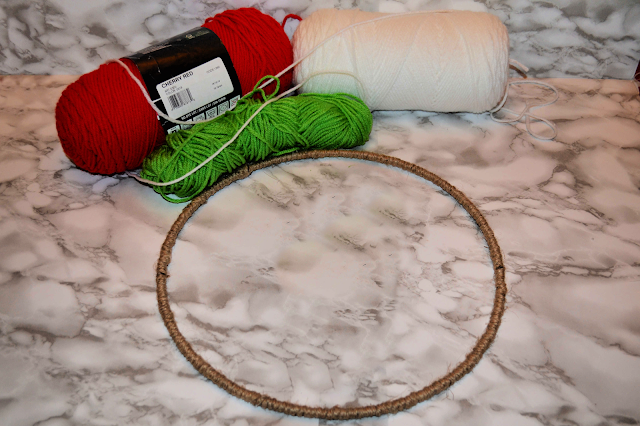
Start by getting the supplies you need: yarn in Christmas colours, a wire wreath frame, and twine.
Then:
1) Use a plain gold wire wreath frame, or wrap a wire wreath frame with twine (securing periodically with hot glue).
2) Wrap yarn around a piece of cardboard (the length that you want your hanging to be). My cardboard was 20 inches, and I wrapped it around 15 times.
3) Cut one end of the wrapped yarn and loop the strands over the wreath frame and pull through... per the photos below. Repeat 5 times with whatever colours you want to use.
4) Trim the bottom of the yarn with sharp scissors.
5) Embellish the top of the frame with pom poms. (I tied mine on, and then secured with hot glue.)
Note: If you have never made pom pom befores, you can check out the video here.
That's it! I just love how it turned out. Don't you?
I love a good DIY piece of home decor, and I love that you can customize this Boho yarn wreath using whatever colour yarn you desire. What colours will you use to make your own unique piece of Christmas decor?
Sometimes the simpliest entertaining ideas are the best. Don't you agree? Recently, I bought a few supplies at the dollar store and set up a cute little DIY hot chocolate station in my house. It was SO easy, and my family loves it. Today, I'm sharing all the details, including a FREE sign you are going to love!
I started with three jars, a tray, some bells, twine, mugs, cookies, marshmallows, candy canes, and hot chocolate. (You can use whatever you find in your local dollar store.)
Then, I used the twine to add some bells to the jars, and filled the jars with goodies.
Once the jars were filled, I placed them on a cheap dollar store tray.
To finish things off, I designed a cute little sign to display next to my tray. I popped it in a white dollar store frame, and it looks super-cute.
To download the sign I designed (for free): click on the picture below, right-click, save it to your computer, and print it like a regular 8x10 photo.
Doesn't it look adorable when it's all displayed together?
Our family is going to get a lot of enjoyment out of this hot chocolate bar this holiday season. I hope you like it as much as we do!
I love hanging a homemade wreath on my front door. The best part about a DIY wreath is that you can create a unique piece of decor at a great price. Today, I am sharing my latest creation. It's a darling "super soft" DIY pom pom winter wreath (with bottle brush tree accents) that is surprisingly easy to make!
Isn't it gorgeous? And I swear, the picture doesn't do it justice. I totally wish you could touch it too. I made it with "velvet" yarn, and it is sooo soft. My kids touch it every time they walk by it. lol
I started with a styrofoam wreath form, and I wrapped it in yarn (securing it periodically with hot glue). Then I covered it in homemade pom poms.
To make simple pom poms. Wrap yarn around your fingers, slip the yarn off your fingers and tie it in the middle, cut the loops, and trim to shape. It's that easy! You can also check out the video here.
Then, you use the long ends of yarn (that you used to tie the middle of the pom pom) to secure the pom pom to the wreath. Just keep making and adding pom poms until you are happy with the look of the wreath.
I finished the wreath by using some hot glue to add three inexpensive bottle brush trees to the wreath. (I got my bottle brush trees at the dollar store, but you can get them at Walmart, Amazon, or a craft store.) Don't you love it?
This would be a great wreath for the holidays, but the "winter" feel would make it wonderful for after Christmas too. What do you think? ♥ Gina Bell(aka East Coast Mommy)
Disclosure: I received compensation from Schlage for including their lock in this post; however, I be assured that the opinions expressed in this blog are 100% my own.
What's better than a beautiful front door during the holidays? It's such a great way to greet guests and welcome them to your home this time of year. Today, I am sharing my holiday door... including a tutorial for a lovely, inexpensive DIY wreath and some info on my new front door hardware. And... as a bonus... I'm sharing a fun idea for interior doors too!
And, not only is our new handle beautiful, it is also functional. The smart, keyless entry is perfect for my busy family and my three boys (who are now sometimes coming home without a parent).
No more worrying whether the front door is locked. With a Schlage smart lock, you can enjoy peace of mind and freedom from keys. And, with the Schlage Home App, I can even receive a notification once my boys get home from school. It's so easy!
Here's what our handle looks like on the inside of our door (left) and the outside of our door (right). (We went with the Schlage Encode in Camelot with Satin Nickel finish.)
Our new handle looked so beautiful that it inspired me to craft a simple "Jingle Bell" wreath for my front door. I started with a foam wreath form and wrapped it in red yarn (securing it with hot glue periodically). Then, I hung dollar store bells from pieces of twine and attached them to the wreath with hot glue. I finished with a piece of glittery gold ribbon tied in a bow. I love the simplicity of this wreath and the fun "jingle" sound it makes every time the front door opens.
With my new hardware, my Christmas garland, and my new wreath, my front door is looking fantastic... don't you think?
And don't forget about interior doors too. With a little bit of construction paper, painter's tape, cotton, and a red ball ornament, I created this adorable holiday vignette.
This Christmas, I highly recommend taking a little time to create a welcoming entrance to your home. Consider updating your hardware with a beautiful and functional handle from Schlage, and get a little creative with your DIY decor. Let me know if you have any questions. I'm so happy I decided to dress up my doors for the holidays, and I hope I inspired you to do it too! ♥ Gina (aka East Coast Mommy)

.png)

.jpg)