Showing posts with label wreath. Show all posts

5 Simple (and Adorable) DIY Easter Wreaths

I love an adorable holiday DIY, and I always enjoy having a cute wreath on my door for Easter. I always opt for "cheap and cheerful" options that are easy to make. Today, I am sharing 5 of my favourite simple (and adorable) DIY Easter wreaths.


*** Click on the links for all the step by step instructions and more pictures. ***


1) Burlap Bunny Wreath - This bunny wreath is made using embroidery hoops and burlap. It's delicate and delightful! Find the full instructions for making this burlap bunny wreath here.


2) Plastic Egg Easter Wreath - This colourful wreath is perfect for brightening up a front door after a long grey winter. The plastic eggs are from the dollar store, so it's an excellent budget friendly option. Find the full instructions for making this plastic egg Easter wreath here.


3) Simple Felt Flower Easter Wreath - This wreath uses handmade felt flowers (in fun Spring colours), and a simple dollar store "add on". You can also remove the centre to use the wreath after Easter has passed. Find the full instructions for this versitile felt flower Easter wreath here.


4) Simple Chick and Grapevine Easter Wreath - It doesn't get easier (or cheaper) than this simple wreath. This is the perfect DIY for people that aren't super-crafty. So simple and fun! Find the full instructions for the simple chick and grapevine Easter wreath here.


5) Chicks on a Branch - This simple wreath alternative is easy to make and super fun. It's a great project to get kids involved with too. Find the full step by step instructions for the "chicks on a branch" Easter wreath here.


BONUS: And isn't this bunny wreath the cutest? Check out how easy it is to make here.


And check out the easy-to-follow "how to" video here:


I love all these wreaths, don't you? There is something really special about creating your own unique holiday decor. I hope you take the time to make one of these easy wreaths to brighten up your space this year. 

Happy Easter!


Gina Bell
 (aka East Coast Mommy)


Find MORE fun Easter ideas here.

DIY Christmas BOHO Yarn Wreath

I love inexpensive seasonal decor, don't you? Earlier this year, I made fun Spring and Fall "Boho" wreaths,  and I knew I had to make another one using Christmas colours. When you see how easy this wreath is to make, you're going to immediately hop in your car to get the supplies you need to make it. Check out the photos and step by step instructions for this gorgeous BOHO Christmas yarn wreath below.


Start by getting the supplies you need: yarn in Christmas colours, a wire wreath frame, and twine.


Then:


1) Use a plain gold wire wreath frame, or wrap a wire wreath frame with twine (securing periodically with hot glue).


2) Wrap yarn around a piece of cardboard (the length that you want your hanging to be). My cardboard was 20 inches, and I wrapped it around 15 times.


3) Cut one end of the wrapped yarn and loop the strands over the wreath frame and pull through... per the photos below. Repeat 5 times with whatever colours you want to use.


4) Trim the bottom of the yarn with sharp scissors.


5) Embellish the top of the frame with pom poms. (I tied mine on, and then secured with hot glue.)

Note: If you have never made pom pom befores, you can check out the video here.


That's it! I just love how it turned out. Don't you?


I love a good DIY piece of home decor, and I love that you can customize this Boho yarn wreath using whatever colour yarn you desire. What colours will you use to make your own unique piece of Christmas decor?


Gina Bell (aka East Coast Mommy)


DIY Argyle Fall Wreath

I love an inexpensive Fall craft, don't you? And it's even better if you end up with a gorgeous piece of Fall decor. Today, I am sharing the instructions for this simple (and cozy) DIY argyle Fall wreath. You are going to want to make this one!


To make this wreath, you'll need some felt in Fall colours. I used a maple leaf cookie cutter to trace out Fall leaves in red, orange, and yellow.


Then, you need to wrap a wreath form in white yarn (securing periodically with hot glue).


Attach the leaves to the wreath with a bit of hot blue, and then wrap twine around the wreath to create an argyle pattern.

Finish by adding a piece of ribbon for hanging.


Cute, right?!? I love how this cozy wreath looks hanging on my black door.


It doesn't take a huge investment to transform your porch from summer to Fall. You just need a few inexpensive supplies and a little imagination.

Happy Fall!


Gina (aka East Coast Mommy)

EGGcellent Ways to Decorate Your Front Door for Easter

Disclosure: I received compensation from Schlage for including their lock in this post; however, be assured that the opinions expressed in this blog are 100% my own... and I know you are going to love my new DIY wreaths.

If you read my blog regularly, you know that I love to decorate my front door for the holidays. So, with Easter just around the corner, I have TWO new DIY wreath projects to share with you. I also have a fantastic giveaway (worth $349), so make sure you read to the very end.


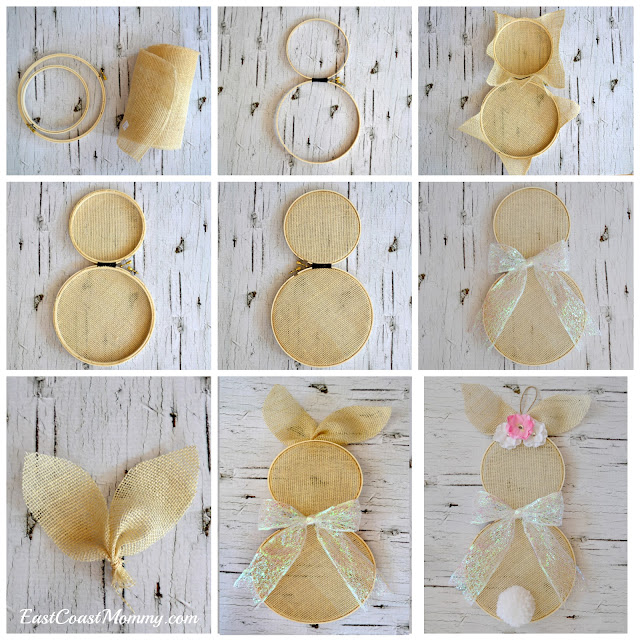
The first project I have for you is an adorable burlap bunny made from embroidery hoops. I absolutely love the simplicity of this one, don't you?


To make a burlap Easter bunny from embroidery hoops:

1) Use strong tape to attach the smaller hoop to the larger hoop. (I used electrical tape because it is a little bit stretchy.)

2) Insert burlap into the hoops.

3) Trim the burlap.

4) Use hot glue to attach a ribbon to the neck (and hide the tape).

5) Cut ears from burlap, and use an elastic to create ears.

6) Use hot glue to attach ears to the bunny.

7) Use hot glue to attach a twine hanger, flower embellishments, and a pom pom tail.


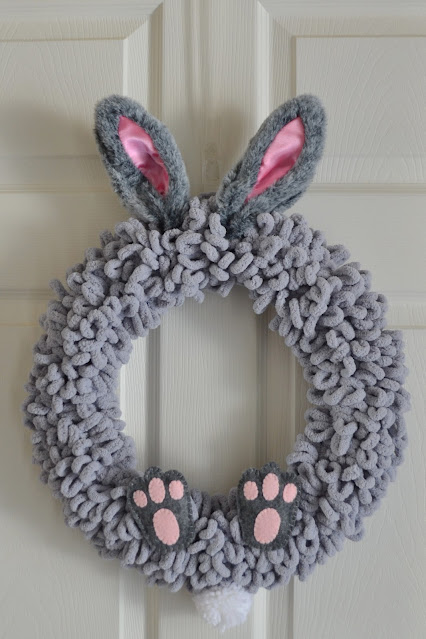
Isn't my burlap bunny adorable hanging on the interior of my home?


And here it is hanging on the outside of my front door.


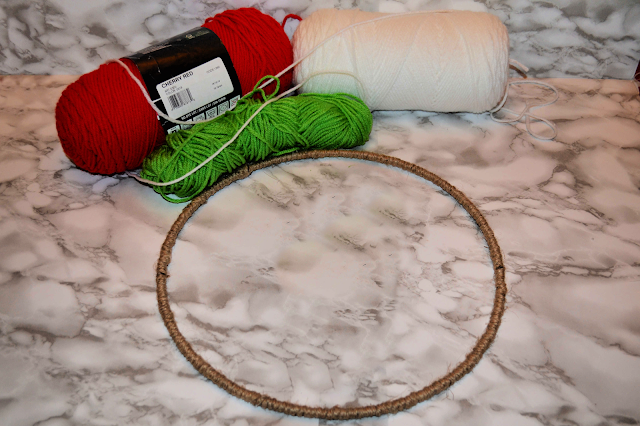
I also made this colourful Easter egg wreath from plastic eggs I purchased at the dollar store.


To make a plastic Easter egg wreath:

1) Use hot glue to attach eggs to the exterior of a wreath form.

2) Use hot glue to attach additional layers until the entire wreath is covered.


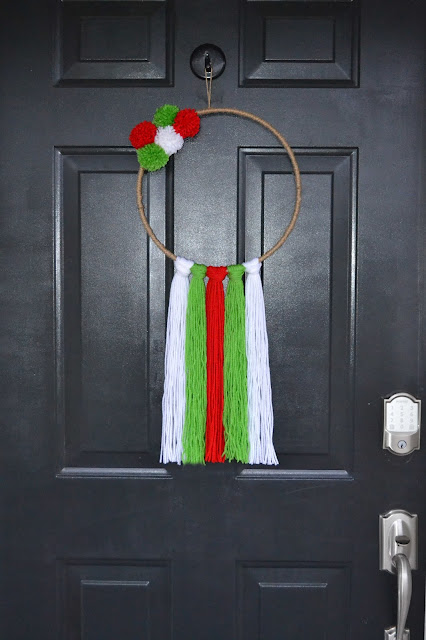
Doesn't my Easter egg wreath look great hanging on my front door? I love the way the bright colours contrast with my black door and satin coloured hardware.


Both of my new wreaths look fantastic with my new Schlage Encode handle (which is not only beautiful, but also functional). The smart, keyless entry is perfect for my busy family and my three boys (who are now sometimes coming home without a parent). 

No more worrying about whether the front door is locked. With a Schlage smart lock, you can enjoy peace of mind and freedom from keys. And, with the Schlage Home App, I can even receive a notification once my boys get home from school. It's so easy!


And... I have some great news! Schlage Canada has offered to give one of their Schlage Encode locks to one of my readers (in your choice of style and finish). This prize has a retail value of $349! Pretty awesome, right?
Just fill out the form below to enter.


I hope you take the time to enter this fantastic contest... and I encourage you to try making one of these easy and inexpensive Easter wreaths for your home. You'll be glad you did. Happy Easter!


Gina (aka East Coast Mommy)


Showing Your Home some LOVE for Valentine's Day

Disclosure: I received compensation from Schlage for including their lock in this post; however, be assured that the opinions expressed in this blog are 100% my own... and I know you are going to love my new DIY wreaths.

If you follow my blog, you already know that I really enjoy decorating my home for holidays and that I love easy and inexpensive DIY decor. With Valentine's Day fast approaching, today I'm sharing a few of my favourite ideas for showing my home some love for Valentine's Day.


In 2012, I made this felt rosette wreath for Valentine's Day, and since then, it has been hanging on my front door annually. However, a few months ago, my husband installed a gorgeous new Schlage handle on our front door. It is now the perfect showcase for DIY wreaths, so I thought it would be fun to craft something new this year.


I ended up creating two NEW DIY wreaths, and I love them both.

The first wreath I made for the exterior of my door is reminiscent of an argyle sweater. I love the simplicity of this cozy wreath, don't you?


To make this argyle sweater wreath (from yarn and felt):

1) Wrap a foam wreath form in white yarn (securing it periodically with hot glue).
2) Cut hearts from various colours of felt.
3) Use hot glue to attach the felt hearts to the wreath.
4) Creat an argyle looking pattern by wrapping yarn in one direction... and then wrapping yarn in the other direction (securing periodically with hot glue).


I also made a simple wreath for the interior of my door. I wrapped a metal ring in twine, made handmade felt flowers (using online tutorials), and secured the flowers to the wreath with hot glue. This simple wreath looks fantastic hanging on my blue door.


My new wreaths look great with my new Schlage Encode handle (which is not only beautiful, but also functional). The smart, keyless entry is perfect for my busy family and my three boys (who are now sometimes coming home without a parent). 


No more worrying about whether the front door is locked. With a Schlage smart lock, you can enjoy peace of mind and freedom from keys. And, with the Schlage Home App, I can even receive a notification once my boys get home from school. It's so easy!


What do you think of my two NEW wreaths? Which one do you like best?


This Valentine's Day, I highly recommend taking a little time to create a LOVEly entrance to your home. Consider updating your hardware with a beautiful and functional handle from Schlage, and get a little creative with your DIY decor. Let me know if you have any questions. I'm so happy I decided to show my home some LOVE for Valentine's Day, and I hope I inspired you to do it too!


Gina (aka East Coast Mommy)

Gorgeous WINTER WREATH with Bottle Brush Tree Accents

I love hanging a homemade wreath on my front door. The best part about a DIY wreath is that you can create a unique piece of decor at a great price. Today, I am sharing my latest creation. It's a darling "super soft" DIY pom pom winter wreath (with bottle brush tree accents) that is surprisingly easy to make!


Isn't it gorgeous? And I swear, the picture doesn't do it justice. I totally wish you could touch it too. I made it with "velvet" yarn, and it is sooo soft. My kids touch it every time they walk by it. lol


I started with a styrofoam wreath form, and I wrapped it in yarn (securing it periodically with hot glue). Then I covered it in homemade pom poms.


To make simple pom poms. Wrap yarn around your fingers, slip the yarn off your fingers and tie it in the middle, cut the loops, and trim to shape. It's that easy! You can also check out the video here.


Then, you use the long ends of yarn (that you used to tie the middle of the pom pom) to secure the pom pom to the wreath. Just keep making and adding pom poms until you are happy with the look of the wreath.


I finished the wreath by using some hot glue to add three inexpensive bottle brush trees to the wreath. (I got my bottle brush trees at the dollar store, but you can get them at Walmart, Amazon, or a craft store.) Don't you love it?


This would be a great wreath for the holidays, but the "winter" feel would make it wonderful for after Christmas too. What do you think?


Gina Bell
 (aka East Coast Mommy)


Dressing up your Doors for the Holidays

Disclosure: I received compensation from Schlage for including their lock in this post; however, I be assured that the opinions expressed in this blog are 100% my own.

What's better than a beautiful front door during the holidays? It's such a great way to greet guests and welcome them to your home this time of year. Today, I am sharing my holiday door... including a tutorial for a lovely, inexpensive DIY wreath and some info on my new front door hardware. And... as a bonus... I'm sharing a fun idea for interior doors too!


A few weeks ago, I received a beautiful new Schlage door handle and Schlage Encode™ Smart WiFi Deadbolt. This weekend, my husband installed them (in about 20 minutes), and we both LOVE how fantastic they look!


And, not only is our new handle beautiful, it is also functional. The smart, keyless entry is perfect for my busy family and my three boys (who are now sometimes coming home without a parent). 

No more worrying whether the front door is locked. With a Schlage smart lock, you can enjoy peace of mind and freedom from keys. And, with the Schlage Home App, I can even receive a notification once my boys get home from school. It's so easy!

Here's what our handle looks like on the inside of our door (left) and the outside of our door (right). (We went with the Schlage Encode in Camelot with Satin Nickel finish.)


Our new handle looked so beautiful that it inspired me to craft a simple "Jingle Bell" wreath for my front door. I started with a foam wreath form and wrapped it in red yarn (securing it with hot glue periodically). Then, I hung dollar store bells from pieces of twine and attached them to the wreath with hot glue. I finished with a piece of glittery gold ribbon tied in a bow. I love the simplicity of this wreath and the fun "jingle" sound it makes every time the front door opens.


With my new hardware, my Christmas garland, and my new wreath, my front door is looking fantastic... don't you think?


And don't forget about interior doors too. With a little bit of construction paper, painter's tape, cotton, and a red ball ornament, I created this adorable holiday vignette.


This Christmas, I highly recommend taking a little time to create a welcoming entrance to your home. Consider updating your hardware with a beautiful and functional handle from Schlage, and get a little creative with your DIY decor. Let me know if you have any questions. I'm so happy I decided to dress up my doors for the holidays, and I hope I inspired you to do it too!


Gina 
(aka East Coast Mommy)

Don't miss any of the fun....