Showing posts with label summer decor. Show all posts

GORGEOUS Summer Decor DIYs... made using dollar store supplies and a FREE download

If you love SUMMER, FREE things, CHEAP decor, and craftting... this post is for you! Today, I'm sharing gorgeous summer decor DIYs that I made using dollar store supplies, and I am sharing a summer print that you can download for free.


First up... is this beautiful piece of porch decor I made using dollar store supplies.


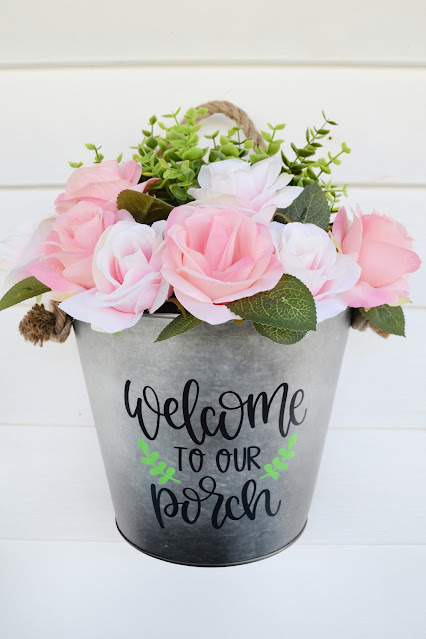
I started with this galvanized planter that I found at my local Dollarama. 


I used my Cricut to add a decal to the front, but you could leave it plain, paint the front, or add stickers. It's totally up to you.


I finished by inserting floral foam into the bucket and inserting dollar store florals and greenery. Cute, right?!? For a closer look, you can check out the YouTube video here.


It looks great on my porch next to the dollar store bird house planter I made last year.


Next up... is this FREE summer downloadable print I designed for you. 

To get your copy: click on the photo below, right-click, and save it to your computer. Then, print it like a regular 8x10 photo.


You can display it on a dollar store clipboard embellished with ribbon and paper flowers.


Or, you can pop the picture is a dollar store frame (or a frame you already have). I have a frame in my house dedicated to seasonal and holiday prints, and I just switch out the photo periodically.


The last project I have to share today is a fun way to upgrade a wooden dollar store shelf. The dollar store has tons of these shelves with words on them. 

I painted mine with white chalk paint, added some wooden beads for feet, and secured a bit of ribbon around it with hot glue. I styled mine with dollar store greenery and lemons.

You can get a closer look at the "before" and "after" here.


Look how cute the tray looks with the free print. No one would guess that this summer decor came from the dollar store!


I also made a short little video showing how I made ALL these projects. Check it out below!


What do you think of these dollar store DIYs? Which one is your favourite? If you would have done something different, let me know in the comments below. I'm always looking for inexpensive home decor ideas.


Gina Bell
 (aka East Coast Mommy)


You can find more budget friendly DIY ideas here.

DIY Summer Decor... made from inexpensive supplies

What is better than fun and festive summer decor? Answer: fun and festive summer decor ON A BUDGET. Over the years, I have created some fantastic items using dollar store supplies and inexpensive finds, and today, I am sharing a few of my favourites.


Placemat Wreath - This is one of my favourite summer DIYs. It's a simple idea, but the result is super-cute. All you need is a dollar store pizza pan, a placemat, some nautical rope, and the instructions you can find here.


You can also try this cheery version. Find the full instructions for the HELLO SUNSHINE wreath here.


DIY Planter - I was inspired to make this planter when I saw a similar one selling online for $140. I gathered up some dollar store supplies and make this one for only $10. Check out both versions and the step-by-step instructions here.


Turquoise Grapevine Wreath - I made this wreath several years ago, but it's still one of my favourites. I love the bright colours and the simple design. You can find out how to make your own version here.


YELLOW Summer Decor (made mostly from dollar store supplies) - Yellow is the perfect colour for summer, so lemons and yellow flowers are a great source for decor inspiration. You can check out FOUR fantastic YELLOW summer decor DIYs here.


I hope I've inspired you to gather up some inexpensive supplies and create your own, unique Summer decor. I love all these DIYs, don't you?


Gina Bell (aka East Coast Mommy)


And check out my Summer survival hacks post here.

Simple Patio Update... a huge transformation for just a few dollars

Don't we all have a list of things in our home that need attention? I've been looking at my dreary and faded back door patio door and light fixture for years, but it's never made it to the top of my "to do" list... until now. A couple weeks ago, my husband and I decided to tackle this little project, and I couldn't be happier with the result! Today, I'm sharing how I transformed my patio door and light fixture for just a few dollars, and I'm sharing my tips and tricks for doing it in your own space.


As you can see from this before picture, my light fixture was faded (and had turned a weird "pinkish" colour), and my doors were boring and dingy.


I started by tackling my light fixutre. I didn't want to get into removing my light fixture, dealing with wires, and worrying about getting spray paint on the glass... so, I decided to use exterior paint and an artist brush.


I used black exterior paint I had leftover from painting my front door a few years ago. Then, after a good cleaning and a quick sanding, I used an artist brush from the dollar store to paint the fixture.


I used a little painter's tape to protect my house, but I did everything else freehand (without tape).


Didn't it turn out great?


Then, I decided to tackle my door.  I removed the hardware, and I taped all the areas I wanted to protect.


I used a combination of a brush and a foam roller. (FYI... I started with a dollar store roller, and didn't love the texture it was leaving on the door, so my husband went to the hardware store and got a higher quality version.)


I used a brush to do the edges, and smoothed it out with the roller. It worked really well. I ended up doing two coats to make sure I had good coverage.


After the paint on the door was dry, I removed the tape and replaced the hardware.

Doesn't it look great? In case you are wondering, we used was called Flirtatious.


I think paint is a wonderful, budget-friendly way to transform a space. Since I completed this project, I also painted 4 more exterior lights and the door going into my garage. 

I'm in love with cheerful yellow colour. What do you think?


Gina Bell (aka East Coast Mommy)


You might also be interested in my interior door painting tips and tricks here.

Budget-Friendly YELLOW Wreath for Summer... made from a $3 placemat

When it comes to budget-friendly DIY decor, sometimes it helps to think outside the box. Recently, I made a fun "flamingo" wreath using a $3 Walmart placemat, and I loved it so much that I decided to make a cheery yellow version. Now I can't decide which one I like more!


Here's the one I made a few weeks ago. I love how whimsical and fun it is, don't you? (You can find all the instructions for my flamingo wreath here. 


Now you can see why I wanted to make another one. 


Here's how I made my budget-friendly, cheery yellow wreath:


1) I started with this fun lemon placemat that I purchased at Walmart for only $3. I also used a dollar store pizza pan, hot glue, and dollar store jute rope. 


2) Then, I used my cricut to write out "Hello Sunshine". If you don't have a cricut, you could use alphabet stickers from the dollar store to spell out the words.


3) Attach the words "Hello Sunshine" to the placemat.


4) Use hot glue to attach the placemat to the pizza pan. (You can use stronger glue if you are worried about the hot glue melting in the heat.)


5) Use hot glue to wrap the jute twine around the edges of the placemat. (I wrapped it 4 times to make sure the pizza pan wasn't visible at all.)


6) Add a piece of twine to the back of the pizza pan using duct tape... and you are ready to display your gorgeous, budget-friendly, yellow summer wreath.

Note: The placemat I used is made of polypropolene, so it's naturally durable and resistent to water. I have mine under a covered porch, so I didn't spray it with any type of sealer... but you could if you wanted to.


For another look... check out the "how to video" I made here.


I love the pop of colour this wreath adds to this little seating area on my deck. What do you think?


I love how easy it was to make this cheap and cheerful wreath. If you see a cute placemat, I hope you consider turning it into summer decor. It really is an easy and inexpensive way to decorate a porch or patio.


Gina Bell (aka East Coast Mommy)


You might also like the summer DIY decor ideas here.

Simple (budget-friendly) YELLOW Summer DIYs

The first step to creating inexpensive decor that looks high-end is to select a cohesive colour palette... and yellow is the perfect choice for summer. Today, I am sharing budget-friendly summer decor DIYs that are easy to make and look fantastic.


*** Check out the fantastic ideas below, and click on the links for additional information. ***


Free lemonade print - This lemonade print is super-cute and couldn't be easier to make. I spray painted a dollar store frame yellow, and then I designed a simple lemonade print to put inside. It's cheerful and fun... and you can download your own copy for free here.


Serve yourself lemonade tray - The perfect companion to the lemonade sign is this simple "serve yourself lemonade" tray. The tray is actually a dollar store picture frame with wooden balls glued to the bottom. Pretty clever, right? Find all the info you need to make your own here.


Tiered tray - Decorating a tiered tray for different seasons and occasions is easy and fun. I love how cheerful and bright my summer tiered tray turned out. The birdhouse on the top was a plain wooden house I found in the dollar store craft section. I painted it yellow, and added brown "wood grain" contact paper to the room. I also love my jar of yellow and white dollar store buttons, my dollar store greenery and yellow flowers, and the book stack I made from scraps of wood.


Flower arrangement - What is summer decor without flowers? I found this "flowers & garden" tin at the dollar store and knew it would make a lovely summer garden arrangement. I inserted a piece of floral foam, covered the foam with moss, and inserted dollar store flowers. I think it looks really high-end, and it only cost me a couple of dollars. What do you think?


And look how cute it looks when you display it all together.


If you want a closer look at my projects, check out this video.


This simple yellow wreath is fantastic too. Can you believe it was made with a dollar store pizza pan and a $3 placemat from Walmart?!?! You can find the full step by step instructions here.


I alsolutely love my NEW summer decor, and I can't believe it only cost me a few dollars. Which summer DIY is your favourite? I love the tiered tray, but my kids would definitely pick the lemonade tray. 😄


Gina Bell (aka East Coast Mommy)


You might also like the DIY planter I made using dollar store supplies here.


Don't miss any of the fun....