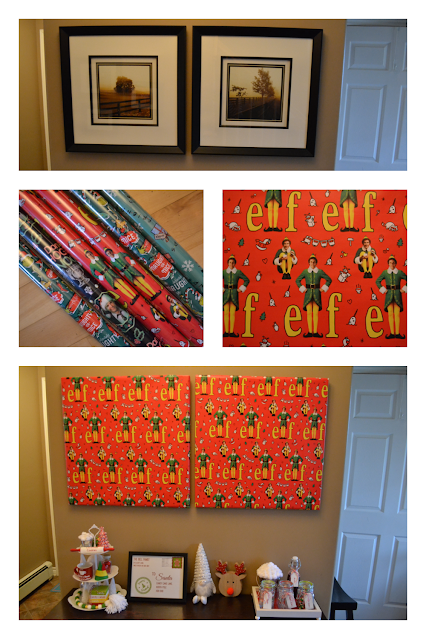
I recently found a large frame at the Dollar Store, and I knew I wanted to use it to create a large decor piece for the holidays. I am thrilled with how the print I designed turned out, and YOU can download your own copy FOR FREE below.
To download a copy of this "ELF" inspired print: click on the picture below, right-click, save it to your computer, and print it like a regular 11x14 print.
I printed mine at my local copy store for less than $1, and it looks great in my dollar store frame. It's a fantastic piece of Christmas artwork for only a few dollars!!!
Take a closer peek at my print (and a few of my other NEW dollar store DIYs and finds) here:
What do you think? Are you planning to download a copy of this Elf Movie print? I hope you like it as much as I do!
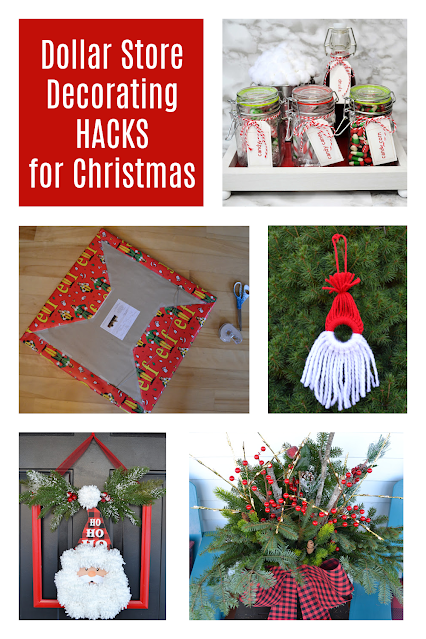
Is there anything more satisfying than creating unique holiday decor on a budget? I love finding simple ways to add festive flair to my home, and today I'm share my favourtie dollar store holiday decorating HACKS.
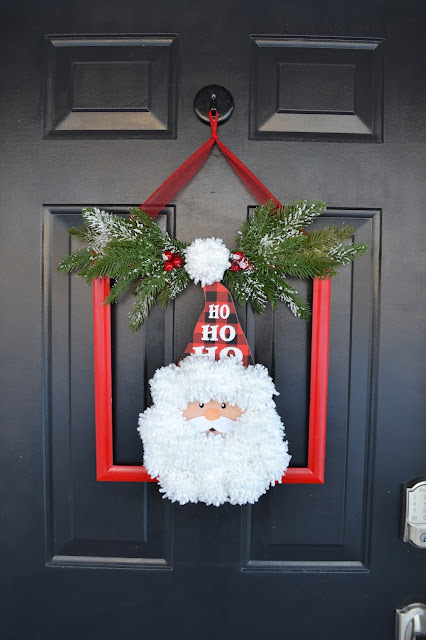
Update something cheap to look high end - The dollar store has many inexpensive decor pieces that can easily be upgraded to look more high end.
For example, I found a cheap dollar store square frame, and I painted it with shiny red spray paint. Then, I added a fun Santa decoration I found at the dollarstore (with hot glue). I finished by using hot glue to attach dollar store greenery and pom poms. Isn't my Santa wreath adorable? You'd never guess it only cost me a couple of dollars to make!
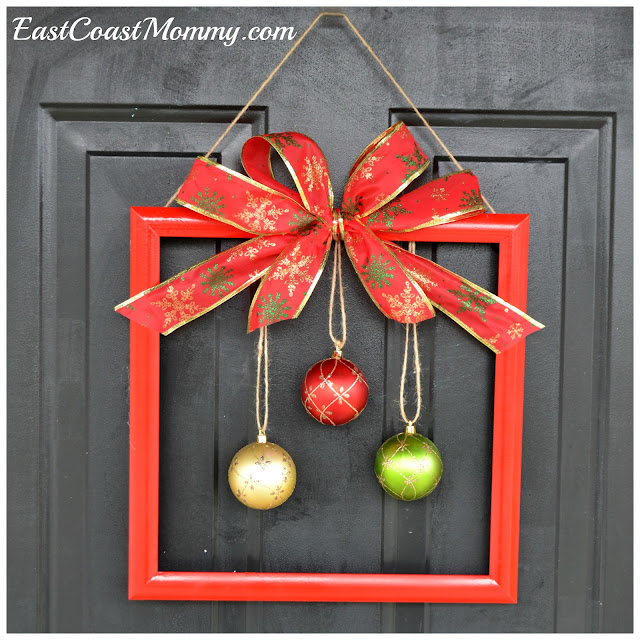
You could also use the frame to make an ornament wreath. Just hang a couple of ornaments from twine, and use hot glue to add a bow and hanger.
Think outside the box - It's always fun to find everyday items at the dollar store and use them in a unique way.
For example, this year the dollar store had some super-fun Christmas movie themed wrapping paper, so I used it to wrap pictures I already had hanging in my hallway. I love the big impact this simple DIY has!
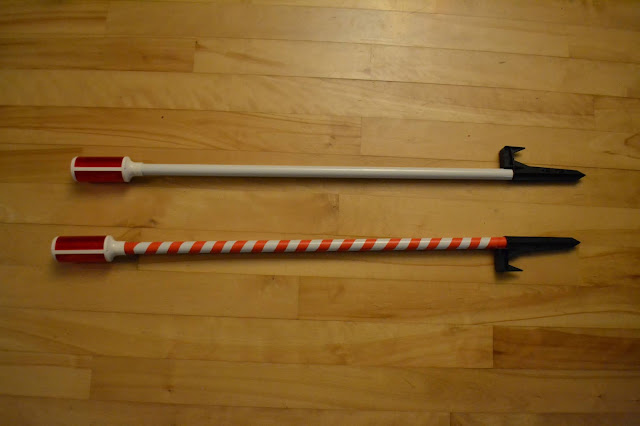
I also wrapped my plain white driveway markers with red electrical tape to get a North Pole / candy cane effect. It was a simple way to add a festive flair to the outside of my home.
Use what you have - Sometimes the best way to come up with something great is to use what you already have and add some dollar store items to make it better / different.
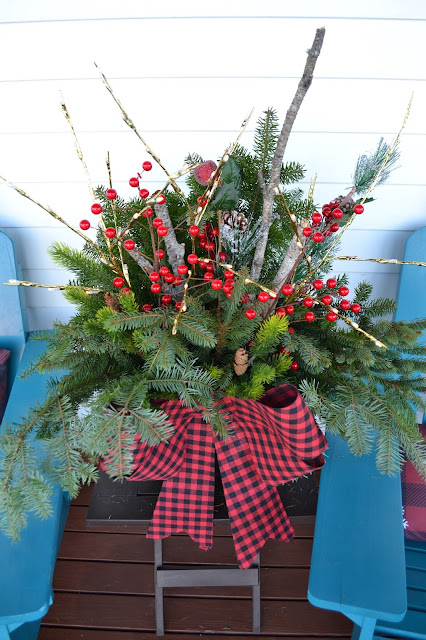
For example, I recently made a Christmas arrangement with branches and boughs from the trees in my yard. Then, I added a dollar store bow and a couple of dollar store stems. I love how it turned out, and it only cost a few dollars!
Make ornaments and decorations from dollar store supplies - The dollar store has countless supplies for making ornaments and decorations. Browse blogs and Pinterest for inspirations, grab some supplies, and get busy.
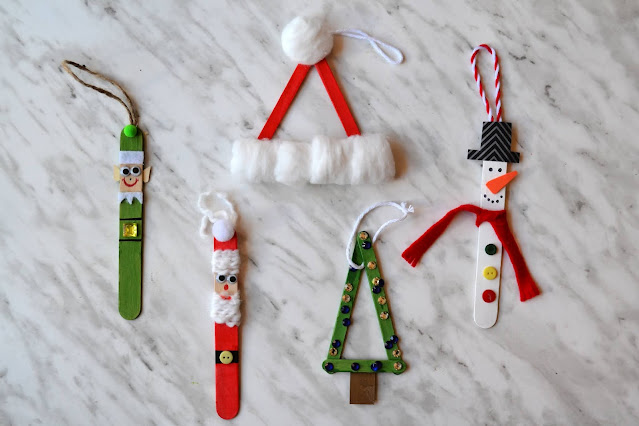
How cute are these ornaments made from dollar store popsicle sticks and craft paint?
You can find all the details for inexpensive "Elf Movie" decor here.
And this adorable Santa ornament is made with a wooden ring from the dollar store. Cute, right?!? You can find the step by step instructions here.
Dollar store decorating doesn't need to look cheap... especially if you pair dollar store items with a little creativity. Do you have a favourite dollar store decorating HACK? I hope I've inspired you to try a couple of mine.
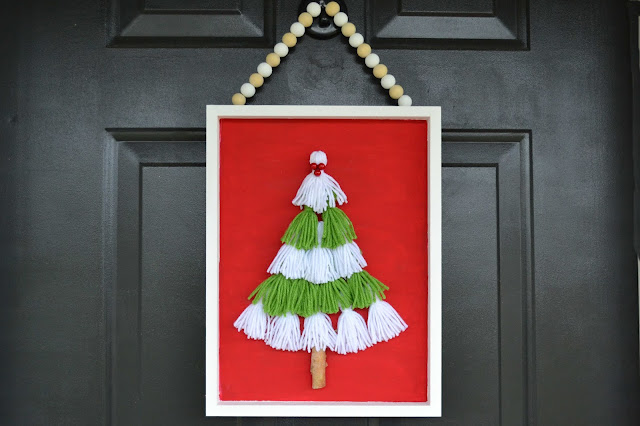
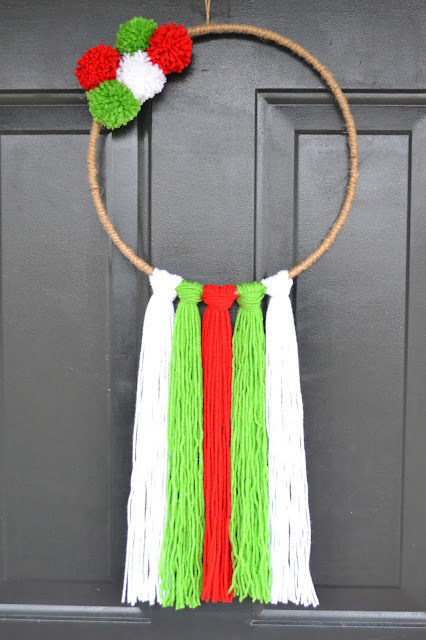
I am loving the boho trend that is popular right now, and it's popping up in a lot of my Christmas decor this year. It's cozy, unique, budget friendly and super cute. Check out three of my favorite DIY boho decor pieces below.
1) Tassel tree picture - How cute is this tassel tree picture that I made using a dollar store wooden canvas? I painted the inside of the frame red, taped it off, and painted the outside white. Then, I made tassels, glued them to the frame, and added embellishments and a beaded hanger. It's adorable, only cost a few dollars to make, and looks really high end. Find the full tutorial here.
And check out this "how to" video on YouTube.
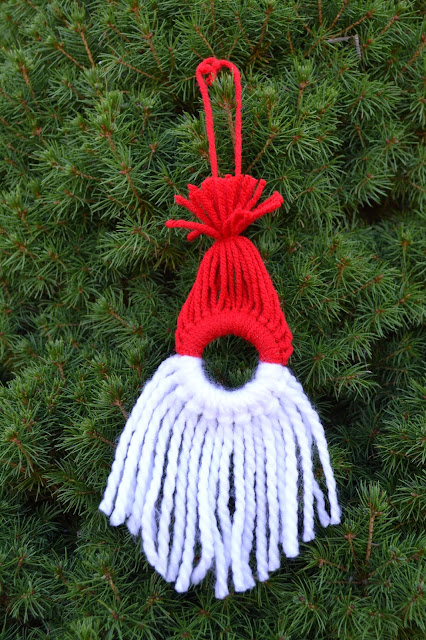
2) Santa ornament - This is a fantastic boho craft that is fun for kids and adults. If you can cut and loop a piece of yarn, you can easily make this simple Santa. Find the step by step instructions here.
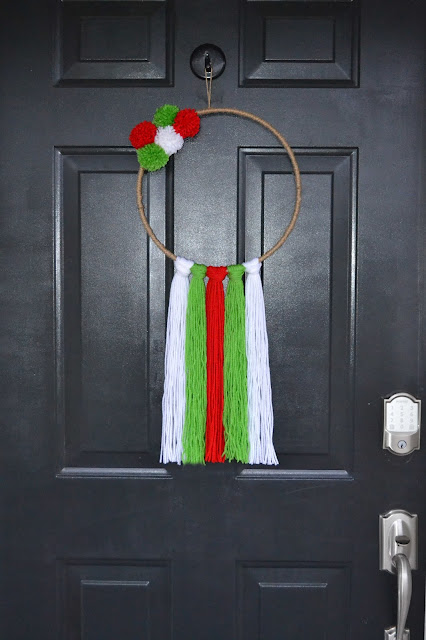
3) Yarn and Pom Pom Wreath - I love the simplicity of this red, white, and green wreath. The bottom is made with strips of yarn looped around a jute covered ring, and then pom poms are added to the top. Colours are totally customizable, and you don't need to be super-crafty to make this. It would be fun to make with a group of family or friends too! You can find all the step by step instructions here.
Are you a fan of boho decor? I think it's a fun and unique way to decorate for Christmas. Which of these three projects is your favourite? I think the tassel tree is mine, but I really do love them all!
Gnomes are super trendy right now, and what could be cuter than a"GNOME for the holidays"Christmas ornament? I love a good pun, and I am really loving the adorable gnome ornaments I made for my friends and family this year. Today, I'm sharing thestep by step instructions(and thetemplatesyou need) to make thissuper-cute felt Christmas ornament.
First, download and print the templates I created. Click on the photo below, right-click, and print it like a regular 8x10 photo. You can also insert it into a Word document and print it that way.
Cut a hat from red felt, a beard from white felt, a shirt from grey felt, and a nose from pink felt.
Then... (per the picture below) sew the beard to the to the shirt, and the hat to the beard. Finish the front of the gnome by sewing on the nose and button at the top.
To make the back of the gnome, trace the assembled pieces onto a piece of red felt, and cut out. Sew a hanger to the back piece, and then sew the front and back pieces together.
Isn't it adorable?
I can't wait to send out these darling gnomes with my Christmas cards this year. I hope you make a few for your friends and family too!
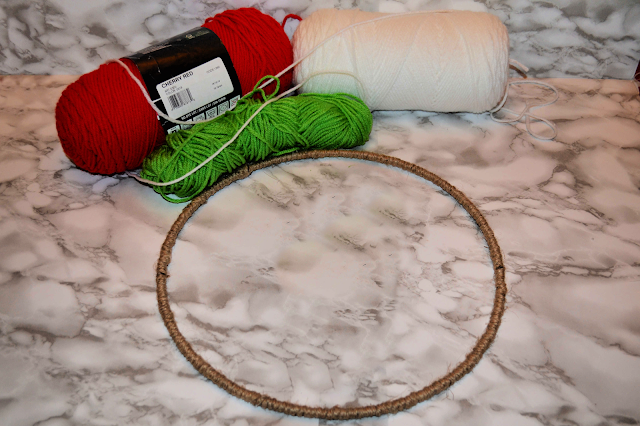
I love inexpensive seasonal decor,don't you? Earlier this year, I made fun Springand Fall "Boho" wreaths, and I knew I had to make another one using Christmas colours. When you see how easy this wreath is to make, you're going to immediately hop in your car to get the supplies you need to make it. Check out the photos and step by step instructions for this gorgeous BOHO Christmas yarn wreath below.
Start by getting the supplies you need: yarn in Christmas colours, a wire wreath frame, and twine.
Then:
1) Use a plain gold wire wreath frame, or wrap a wire wreath frame with twine (securing periodically with hot glue).
2) Wrap yarn around a piece of cardboard (the length that you want your hanging to be). My cardboard was 20 inches, and I wrapped it around 15 times.
3) Cut one end of the wrapped yarn and loop the strands over the wreath frame and pull through... per the photos below. Repeat 5 times with whatever colours you want to use.
4) Trim the bottom of the yarn with sharp scissors.
5) Embellish the top of the frame with pom poms. (I tied mine on, and then secured with hot glue.)
Note: If you have never made pom pom befores, you can check out the video here.
That's it! I just love how it turned out. Don't you?
I love a good DIY piece of home decor, and I love that you can customize this Boho yarn wreath using whatever colour yarn you desire. What colours will you use to make your own unique piece of Christmas decor?
Recently, I've seen a lot of macrame and boho home decor, and I am loving the simplicity of the style. I made cute boho wreaths for Spring and Fall, and I thought it would be fun to incorporate the style into a Christmas tree ornament. This diy boho Christmas ornament would be a great craft for adults, but it would be fun for kids too.
To make this ornament, you'll need: wooden rings (from the dollar store), red yarn, white yarn, and scissors.
1) Start by cutting a bunch of strips of yarn -- approx 30cm / 12 inches long. (I did 15 strands of red and 11 strands of white... but it will depend on the thickness of your yarn.)
2) Fold a yarn strand in half, and place the loop part inside the wooden circle.
3) Pull the ends of the yarn through the loop (and around the wood ring).
4) Pull the ends tight, and repeat until the entire ring is covered.
5) Tie the red strings together to form a hat. (Use the string you are tying with to make a hanger.)
6) Trim the pom pom and beard.
Isn't it cute?
In the past, I have made yarn hat ornaments with my kids' classes and friends, and they were a big hit. I think next time, I might make these ones.
What do you think? Are you a fan of this style or not?
♥ Gina (aka East Coast Mommy)
PS (You can find MORE ideas for easy and inexpensive Christmas family fun here.)
Homemade gifts are fantastic because they are unique, customizable, and budget-friendly. And, if you have a Cricut, you can easily make wonderful gifts that the recipient will love. Today, I'm sharing FIVE easy and inexpensive gifts you can make using a Cricut.
1) Christmas Ornaments - Personalized tree ornaments make great Christmas gifts. For my boys, I purchased hockey SVGs from Etsy, printed them out on permanent black vinyl, and added them to wood slices. I also added their hockey numbers with white vinyl.
Inserting a baby hat into a plastic bulb, and adding personal details with vinyl, is fantastic idea too!
2) Personalized Drinkware - Bottles and glasses are practical and useful, and they are really fun if they are personalized. I made water bottles for my son to give with his friends, and their names and the logo for his YouTube channel. It's also easy to customize wine glasses, beer mugs and coffee cups.
3) Home Decor - A Cricut allows you to create simple and inexpensive signs, wreaths, and other home decor items. Search Pinterest for ideas, gather some supplies from the dollar store, and get to work!
4) Gift Baskets - Personalized reusable containers filled with goodies make THE BEST gifts. I like to personalize popcorn bowls and s'more buckets. Cute, right?!?
5) Personalized Jars - Upgrading dollar store jars with a Cricut is a wonderful way to create a personalized and thoughtful gift. It's a lot of fun to make personalized cookie jars for the baker in your life. Memory jars are fantastic too!
Aren't homemade gifts the best? I love a unique gift, and the Cricut machine makes it extra easy. Which of these Cricut gifts are your favourite? I love them all!

.png)

.jpg)