Tiny Tooth Fairy Bag

Think about it... if you were a child, wouldn't you be afraid of a fairy coming into your room while you were sleeping????  This little tooth fairy bag is the perfect solution because it can be hung outside a child's room.  


It is a great size for a tooth and a coin or two, and it is quick and easy to make with scraps of felt and ribbon.

You can make your own using this tutorial as a guide, or you can buy one from me at Cute as a Button Designs.  Here is how I made it:

You will need:
  • a 6cm X 12cm piece of scrap felt
  • a small piece of white scrap felt (for a tooth)
  • a 19cm length of ribbon
  • thread and a needle
  • scissors
Directions:

Cut a small tooth shape out of a piece of white scrap felt and stitch it to the top section of the 6cm X 12 cm rectangle of felt.

Flip the felt over (so that the "wrong side" is facing up and the tooth is on the bottom) and stitch on the ribbon.

Fold the fabric in half (so that the tooth is on the front of the bag) and stitch the two sides closed -- leaving an opening at the top.

I made three blue ones for my boys.


Now everyone can sleep soundly knowing that the tooth fairy won't be going in anyone's room in the middle of the night {wink}!

♥ 
Gina Bell (aka East Coast Mommy)

PS (If you like this, you should also check out this post on how to make a "tooth taxi".)


* If you haven't already "liked" me on facebook, I would love to have you join me here.

5 Unique "Loot Bag" Ideas

Children love "Loot Bags", but as a parent they are something I struggle with.  I am always on the lookout for fun alternatives to the "traditional" loot bag. Today I am sharing five of my favorite easy party favor ideas.


Here are five things I think are easy, inexpensive, and unique:  
   
1)  Something Personal/Handmade:   
  • These cute "treat jars" {see below} can be easily put together using a picture of the birthday boy/girl, an old baby food jar, some paint, and some Modge Podge.  Super easy!
  • Frames can be painted/decorated, and a picture of the guest can be taken at the party and delivered at a later date.  {You could write something like.... "The content of this frame is currently hollow, but a really cute picture is certain to follow.  Thanks for coming to my party."}
  •  Bags can be filled with balls, and a tag can be attached that says "Thanks for coming.  I hope you had a BALL at my party."

2)   Something Practical:

Check out these personalized labels from Oliver's Labels.  What a fantastic idea!  For $4.99 (with a minimum order of 6), each party package contains: 5 original labels, 5 mini labels, 2 shoe labels, and a mini bag tag.  Fun and practical... it doesn't get much better than that.


3)  Something Yummy:

Who doesn't like cookies?  ... and these ones from Noelle's The Custom Cookie Company are delicious and fun!  For $5.25 each, you can get custom cookies to match the theme, colours, or decor of the party.  I love the idea of a number with the birthday boy/girl's name on it.  The Pirate happy faces are also adorable, and would be popular with my boys.

4) Something Girly:

Full disclosure... I make these Personalized Princess Wands {and sell them here}... but I had to include them because I think they are so really cute.  The Wands are $10 each, but you could make your own if you wanted to keep costs down.  I painted a dowel pink and added a hand-stitched felt star to the top. 


5)  Something Educational:

I love books, and so do my boys!  I really like the idea of letting the birthday boy/girl give out their favorite book to their friends.  


Now aren't each of these things better than a bag full of candy?  What are some of your favorite loot bag ideas?  

♥ 
Gina Bell (aka East Coast Mommy)

PS (I have a great list of 30 unique loot bags ideas that you can find here.)


Artwork Storage Solutions

Ever wonder what to do with all the artwork your kids bring home from school?  It is easy to become sentimental about it, and before long, it becomes overwhelming.  But don't worry, I am here to help.  :-)


Honestly, a lot of the artwork in this house ends up in the garbage.  (Shhhhh!  Don't tell my boys.)  I do, however, keep the more "special" pieces.... you know the ones... handprints, mother's day cards/drawings, and the ones the boys are "extra" proud of.

Here is a marble painting my 5 year old did in Art class. I framed it and hung it in his room.  He is really proud of his framed masterpiece.


Here are some other great ideas for the avalanche of artwork that kids create:
  1. Create a "made by me" gallery of framed artwork.  Switch out the artwork as the kids create new favorites.  (You could use frames or decorated clipboards.)    
  2. Get a file box for each child.  Create a file for each years' projects.
  3. Scan or photograph the artwork and keep electronic files -- they take up a lot less space.
  4. For the artwork that ends up on your fridge, why not make these easy and super cute magnets

What are some of your best Artwork Storage Solutions?

    ♥ 

    Gina (aka East Coast Mommy)

    PS (If you haven't already liked me on Facebook, you can do it here.  Don't miss out on any of the East Coast Mommy fun!  :-)

    Personalized Clipboards

    I am always looking for "on the go" projects/activities for the boys.  They love drawing, printing, and scribbling on paper, so I decided to make them some fun, colorful, personalized clipboards.  They are a big hit, and I think they will be great for car rides and trips to the grocery store.


    You'll Need:
    • colorful paper
    • a clipboard (I got mine at the dollar store)
    • Modge Podge
    • a paintbrush or sponge brush
    • a pencil
    • scissors
    • ribbon/embellishments (optional)
    Directions:

    Cut the paper out so that it is the same shape and size as the clipboard.  Cut out around the clip.  It is OK to use a couple of different pieces of paper.  Just remember that you want the writing surface to be as smooth as possible.


    Cover the surface of the clipboard with Mod Podge and apply paper.  Smooth out as best as you can.  (I used a bone folder, but this isn't necessary.  Many of the bumps will smooth out when the Mod Podge dries.)


    Cover the paper with a coat of Mod Podge for a glossy, polished finished.


    After it dries, you can repeat the same steps to apply paper to the back of the clipboard.  You can also add embellishments --  I added the boys' initials (with stickers) and used a ribbon to attach a colored pencil, but you can add whatever you want.

    I hope your boys and girls enjoy this project as much as mine!  :-)


    ♥ 
    Gina (aka East Coast Mommy
    PS {Don't miss out on any of the fun... if you haven't already "liked" me on facebook, you can do it here.}

    Felt Food - Carrot

    Looking for some more cute “pretend” food for your kids to play with? 

    As a follow up to yesterday's tutorial on how to make adorable felt eggs out of scraps of felt, here is one on how to make felt carrots.  My boys love having this cute felt food in their play kitchen.


    You’ll need:
    • Scraps of orange and green felt
    • Cotton balls or stuffing
    • A needle and thread (orange)
    • Scissors
    • Paper and pencil to make a template

    Directions:


    Cut two carrot shapes out of orange felt and one rectangle out of green felt.  (You can make a paper template first.  It makes it a little easier.)


    Stitch the green rectangle onto on of the orange pieces.  (See diagram for positioning.)


    Use scissors to "fringe" the green triangle.


    Place the second orange piece on top and stitch one side.  Add cotton, and finish stitching.


    That's it -- even the Easter Bunny would be impressed!


    ♥ 
    Gina Bell (aka East Coast Mommy)

    Felt Egg Tutorial

    Looking for some cute “pretend” food for your kids to play with? How adorable are these felt eggs made out of scraps of felt and leftover plastic Easter eggs? It's an easy project, and a perfect way to recycle dollar store eggs.


    You’ll need:
    • Scraps of white & yellow felt
    • Cotton balls or stuffing
    • A needle and thread (yellow & white)
    • Scissors
    • Paper and pencil (to make a template)

    Here's how easy they are to make:

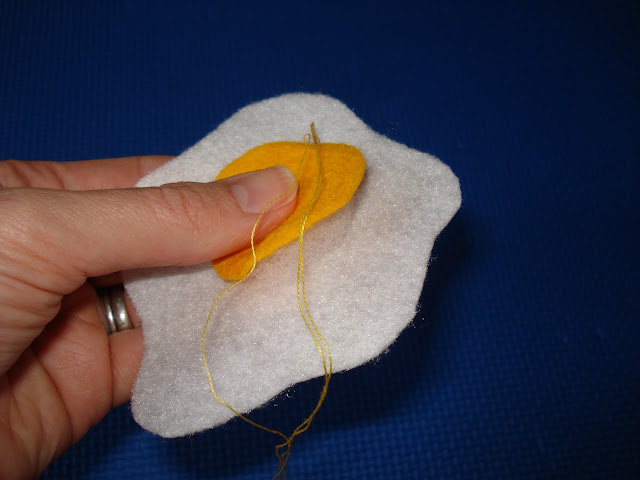
    Cut two eggs shapes out of white felt and one yolk shape out of yellow felt.  (You can make a paper template first.  It makes it a little easier.)


    Put a little cotton under the yellow “yolk” and stitch it to the top of one of the white pieces of felt.  Then stitch the two pieces of felt together, and you are finished!


    You could package these felt eggs in a plastic Easter eggs to make them extra special.  Cute, right?


    ♥ 
    Gina Bell (aka East Coast Mommy)


    You might also be interested in this post.

    Easter Egg Fillers

    Looking for some ideas to fill those plastic eggs for your Easter egg hunt?  I came up with a fantastic little list of inexpensive and unique Easter egg fillers. I have also included some fun DIY options!


    Happy Hunting!!
    • marbles
    • packages of fruit snacks
    • erasers
    • Magic Jelly Beans (click on the link for a free printable envelope)
    • cars/dinkies
    • hair bows/clips/elastics (buy them or make your own using the tutorials found here)
    • finger puppets (buy them or make your own using the tutorial found here)
    • dollar store watches (I found some really cute Toy Story ones for $2)
    • recycled crayons (DIY with the tutorial you can find here.)
    • silly bands
    • pieces of LEGO or LEGO minifigures
    • socks 
    • goldfish or raisins (great for little ones!)
    • playdough
    • bubbles
    • felt play food (click the link for a full tutorial)
    • craft supplies
    • Easter cookie decorations (e.g. sprinkles)
    • bookmarks
    • dollar store trinkets

    I would love to hear some of your ideas.  Let me know your favorite ideas for Easter egg fillers.

    ♥ 
    Gina Bell (aka East Coast Mommy)

    PS (If your little ones loves "Elf on the Shelf", you can download a free Elf on the Shelf Easter card here.)

    Don't miss any of the fun....