5 NEW high-end EASTER crafts... made using DOLLAR STORE supplies

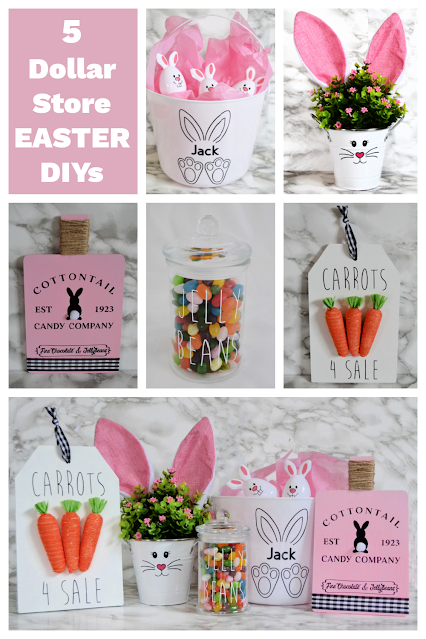
I have FIVE new high-end Easter crafts for you today... and they are ALL made using inexpensive dollar store supplies. You'll find all the instructions, and an easy-to-follow "how to" video, below. I'm obsessed with the candlestick project, but they are all easy to make... and super cute!


1) Tray of Giant Easter Eggs - The first project uses giant Easter eggs and clay pots from the dollar store. Start by painting the pots white, taping the bottom off with painter's tape, painting the rims of the pots in Easter colours, and peeling off the tape. Then, use jute twine and hot glue to cover the eggs -- just keep wrapping and gluing until the eggs are completely covered in twine.


You can leave the eggs plain, or you can embellish with wooden pieces and ribbon. It's totally up to you!

I displayed mine in a dollar store tin tray filled with colourful foam eggs.


2) Classy Carrot Cloche - I think this is my favourite project in this collection... and it's really simple to make. You'll need to grab a couple of dollar store supplies: a candle stick holder, a plastic cloche, and large foam carrots.


Paint the candle stick with white chalk paint, use the top of the cloche to top the candle stick, and insert carronts wrapped in twine. (I added a little wooden bunny embellishment from the dollar store... but this step is totally optional.)


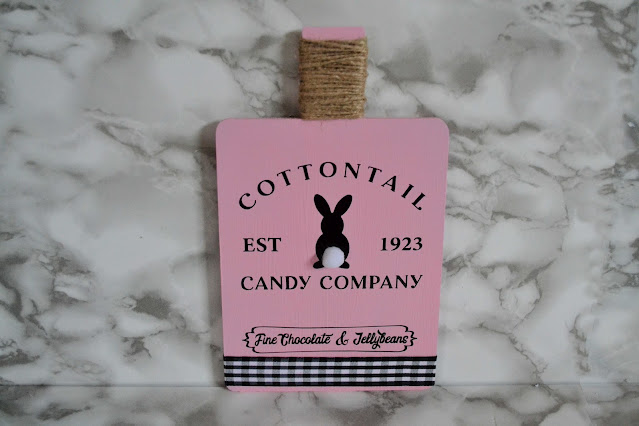
3) Easter Egg Picture - I love crafting with wooden frames from the dollar store, and these wooden white ones are my favourite. I covered the inside of the frame with dollar store contact paper, and painted wooden eggs (also from the dollar store) with craft paint in Easter colours. When the eggs were dry, I used Mod Podge to attach the eggs to the frame.


I love the simplicity of this piece of DIY artwork, and you can customize the colours to match your style and taste.


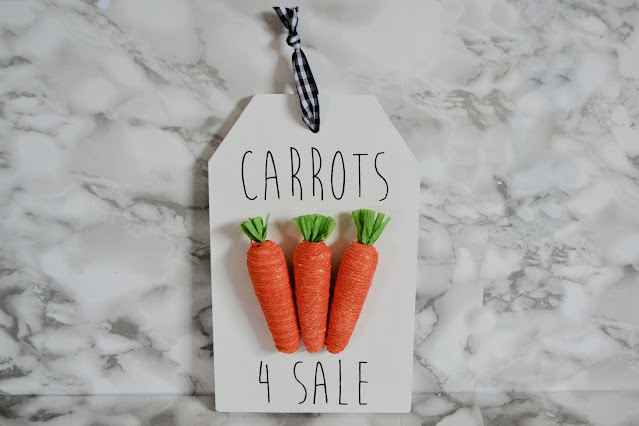
4) Neutral Farmhouse Artwork - This simple Easter picture is perfect if you love neutral farmhouse decor. Start with a wooden canvas from the dollar store, and stain the frame on the outside of the canvas. (I actually used watered down brown paint. It has the same effect as stain without the smell and mess.) Then, paint the inside of the canvas white, and use hot glue to attach rows of small dollar store carrots.


Adorable, right?!?


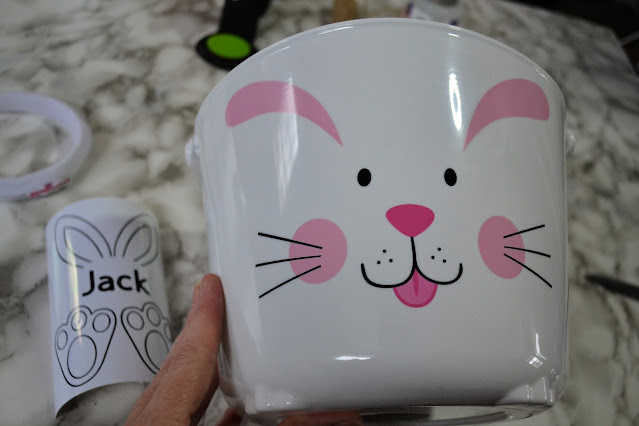
5) Twine-wrapped Bunnies - The last project uses the plastic cups and plastic bunny eggs that are for sale at the dollar store this time of year.


Use hot glue to wrap the plastic eggs in twine, and pop them into the plastic egg cups. Then, use hot glue to add googly eyes and pom poms. Finish by adding details with a Sharpie and craft paint.


This little cutie would be perfect for a tiered tray.


Are you a fan of neutral farmhouse Easter decor?


Or do you prefer a more traditional pastel pallette?


I actually really like all the colours and projects. No one will ever guess how easy (and inexpensive) they were to make!


For a closer look at how I made all these fantastic Easter DIYs, check out the video I made below.


Which was your favourite Easter craft? Leave me a comment, and let me know which cute project you are going to make first.

Happy Easter!


Gina Bell
 (aka East Coast Mommy)


Find MORE fun Easter ideas here.

5 Simple (and Adorable) DIY Easter Wreaths

I love an adorable holiday DIY, and I always enjoy having a cute wreath on my door for Easter. I always opt for "cheap and cheerful" options that are easy to make. Today, I am sharing 5 of my favourite simple (and adorable) DIY Easter wreaths.


*** Click on the links for all the step by step instructions and more pictures. ***


1) Burlap Bunny Wreath - This bunny wreath is made using embroidery hoops and burlap. It's delicate and delightful! Find the full instructions for making this burlap bunny wreath here.


2) Plastic Egg Easter Wreath - This colourful wreath is perfect for brightening up a front door after a long grey winter. The plastic eggs are from the dollar store, so it's an excellent budget friendly option. Find the full instructions for making this plastic egg Easter wreath here.


3) Simple Felt Flower Easter Wreath - This wreath uses handmade felt flowers (in fun Spring colours), and a simple dollar store "add on". You can also remove the centre to use the wreath after Easter has passed. Find the full instructions for this versitile felt flower Easter wreath here.


4) Simple Chick and Grapevine Easter Wreath - It doesn't get easier (or cheaper) than this simple wreath. This is the perfect DIY for people that aren't super-crafty. So simple and fun! Find the full instructions for the simple chick and grapevine Easter wreath here.


5) Chicks on a Branch - This simple wreath alternative is easy to make and super fun. It's a great project to get kids involved with too. Find the full step by step instructions for the "chicks on a branch" Easter wreath here.


BONUS: And isn't this bunny wreath the cutest? Check out how easy it is to make here.


And check out the easy-to-follow "how to" video here:


I love all these wreaths, don't you? There is something really special about creating your own unique holiday decor. I hope you take the time to make one of these easy wreaths to brighten up your space this year. 

Happy Easter!


Gina Bell
 (aka East Coast Mommy)


Find MORE fun Easter ideas here.

5 EGGcellent Easter DIYs 🐰 They look high end (but are made with dollar store supplies)

I love crafting with inexpensive materials... especially during the holidays. Today, I'm sharing five fantastic Easter DIYs you are going to love. They are easy to make, budget friendly, and super cute! No one will ever guess they only cost a few dollars to make.


1) Bunny topiary - I am obsessed with this adorable Easter craft. I added a bunny face to a dollar store tin bucket. I used my Cricut to make a vinyl decal, but if you don't have a Cricut, you can use sharpies, stickers, or paint. Then, pop a dollar store plant into the bucket, and insert bunny ears into the greenery... securing with hot glue. (Note: I used scissors to the cut the bunny ears from a headband.)


2) Easter cutting board - I purchased a dollar store cutting board turned it over, and painted the back (which is what I used as the new front) pink. 


Then, I used hot glue to attached a bit of checkered ribbon to the bottom and a bit of twine to the top. 


Add a cricut decal or paint, and that's it! I also added a pom pom tail to my bunny... but that's totally optional.


3) "Carrots 4 Sale" sign - I found this wi-fi password sign at my local dollar store, and I knew I could make it into something great. 


I flipped it over and painted the back white. (Again... the back becomes the front.)


Then, I added the words "carrots 4 sale" using a Cricut vinyl decal. (If you don't have a decal, you can use a marker, stickers, or paint.)

Finish by using hot glue to attach dollar store carrots, and tie a piece of ribbon through the hole at the top.


4) Personalized Easter basket - I found these adorable buckets at the dollar store, and I thought they would be even cuter if they were personalized.


I added a decal I made with my Cricut, attached it to the bucket, and added tissue paper and plastic bunny eggs (which were also from the dollar store). Cute, right?!?


5) Jelly bean jar - I used a Rae Dunn inspired font to create this decorative jelly bean jar. I found this lidded jar at the dollar store, filled it with dollar store jelly beans, and added the words "Jelly Beans" with my Cricut.


How cute are these 5 DIYs? I absolutely love them all, but the bunny topiary is my favourite. What do you think?


For a closer look at how I made these 5 Easter crafts, check out my YouTube instructional video here:


I hope you liked these easy and inexpensive Easter crafts. I hope I've inspired you to head to the dollar store, stock up on supplies, and make something great!

♥ 
Gina Bell (aka East Coast Mommy)

A quick and easy Easter DIY... made using dollar store supplies and a FREE print

What's better than a quick and easy Easter DIY? How about a quick and easy Easter DIY that comes with a FREE print? When you see how high-end this budget-friendly piece of decor looks, you are going to want to make it ASAP.


All you need is a dollar store clip board, some small fake flowers, and a bit of ribbon. I used adorable paper flowers I found at Dollarama, but you can use whatever you like.


Then, grab your hot glue gun, and (starting at the top), glue the flowers to the metal clip until the entire clip is covered.


You can leave it "as is", or you can use a bit of hot glue to add some ribbon to the bottom of the clipboard. I like the contrast between the light pink flowers and the black and white checkered ribbon... but you can create whatever suits your taste and decor.


To finish, just add the Easter print I designed.

To download the print (for FREE): click on the picture below, right-click, save it to your computer, and print it like a regular 8x10 photo.


Doesn't it look cute with the DIY frame?


And... if you don't want to make the clipboard frame, you can just pop it in a regular frame.


For a closer look at how I made the quick and easy Easter DIY artwork, check out the short (2 minute) video below.


I am absolutely obsessed with this little clipboard. I think it would be darling hanging on a wall too. I might add a little wooden bead hanger to mine. What do you think?

♥ 
Gina Bell (aka East Coast Mommy)

DIY Easter Picture... made using dollar store supplies

Who doesn't love a festive (and inexpensive) piece of home decor for the holiday? I am currently obsessed with some of the cute Easter crafting supplies available at the dollar store. The little carrots and plastic bunnies are my current favourites. Today, I am sharing an adorable little Easter picture I made for just a few dollars.


To make the picture I made, you'll need: twine, scrapbook paper, alphabet stickers, tiny clothespins, carrot, plastic bunnies, and a cheap frame. Most of these items items came from the dollar store, but some of them came from my crafting stash. If you can't find the exact items, don't worry, you can use my picture as inspiration, and put your own spin at it. There are no rules when it comes to crafting! 😄


Start by inserting the scrapbook paper into the frame. I put mine on top of the glass so I could repurpose the frame at some point in the future.


Then, split the bunny (plastic chocolate egg) into two pieces, and attach to the paper with hot glue.


Use stickers to spell out "Happy Easter". (If you have a Cricut, you can use that instead, but I liked these colourful stickers that I found for $1.99.)


Finish by stringing twine across the top of the frame and attaching foam carrots with tiny clothespins.


Isn't it adorable? I love how it adds a bit of fun and whimsey to my Easter decor... and it was soooo cheap!


I hope I've inspired you to DIY something this holiday season. Feel free to switch up the colours and embellishments. Have fun with it!

Happy Easter!

♥ 
Gina Bell (aka East Coast Mommy)

Don't miss any of the fun....