Showing posts with label art for kids. Show all posts

Rock Painting for Beginners

Painting rocks is a wonderful creative endeavor. It's a perfect easy and inexpensive activity that kids and adults can do together. It's also a fantastic way to add colour and kindness to the world. Today, I'm sharing some tips for painting rocks... and I've got some painted rock inspiration for you too!


To paint rocks:

1) Collect a variety of rocks.
2) Make sure the rocks are clean and dry.
3) Pick a simple design.
4) Choose bright colours.
5) Paint the rocks. (I mostly use acrylic paint from the dollar store, but using paint markers is fun too!)
6) Finish with a sealer (if they are going to be outside).


Here are some of the designs my boys came up with.


I particularly love these little penguins they painted.


And how cute are the Minion rocks?


And I painted these simple rocks. I'm not an artist, but I'm really happy with the way they turned out. 


And my kids made these cute ones!


Painted rocks make great decor, paperweights, and garden decorations. You can turn them into games (like Tic Tac Toe), and they are also a great way to spread kindness. You can leave them along trails and roads to brighten the days of people walking by. Fun, right?

Have you ever painted rocks? What kind of designs did you do? I'm always looking for new ideas and inspiration.

♥ 
Gina Bell (aka East Coast Mommy)


10 Fantastic Crafts for Tweens and Teens

The last couple of weeks, my family and I have been social distancing because of Covid-19. In order to keep everyone happy and entertained, I have been doing a different craft and activity with my boys every day. I am trying really hard to find crafts that appeal to my older kids, and today I am sharing 10 of the crafts and activities we have been doing together. I hope you enjoy them!


Click on the links (below) for more details and "how to" videos.


1) We made pom poms... and we used them to make other fun crafts... including these adorable pom pom chicks and pom pom flowers.

Find the full video tutorial for making pom poms here.


2) We made made felt finger puppets, and we learned how to sew on buttons.

Find the full "how to" hand sewing video here.


3) We made no-sew bags using old t-shirts and jerseys. It's a simple craft and a great way to recycle old pieces of clothing.

Find the full DIY recycled t-shirt bags video here.


4) We did two Simple science experiments. We made rainbows with Skittles and we used vinegar to make a bouncy egg


5) We did weaving using a toilet roll and popsicle sticks. My boys LOVED this craft, and spent hours making long scarves and snakes.


6) We made tassel bookmarks. My boys designed their own bookmarks, and we used yarn to add homemade yarn tassels to the tops.


7) We made God's eyes... a classic camp craft. We used popsicle sticks and yarn to make this super-cute and colourful ornaments.


You can find our God's eye video here


8) Painting rocks is a wonderful creative endeavor. It's a perfect easy and inexpensive activity that kids and adults can do together. It's also a fantastic way to add colour and kindness to the world. I have tips for painting rocks and painted rock inspiration here.


9) We made nest brownies. Using a few shortcuts, we crafted up some tasty treats.

Find the full brownie tutorial here.


10) We made 3D handprints. We used paper and markers to create simple drawings. My kids thought the 3D effect was pretty cool.

You can find our 3D handprint video here.


If you are looking for simple crafts and activities to entertain your kids, I highly recommend giving one of these a try. It is often hard to find crafts that aren't to "babyish" for tweens and teens... and these ten are sure to please kids of all ages.

If you give them a try, let me know how it goes. I'd love to hear your favourites!

Gina
(aka East Coast Mommy)


Don't miss out on any of the fun... follow me on social media here.


You might also like the ideas you can find here.

5 Simple Crafts and Activities for Tweens and Teens (and younger kids will love them too)

This week (as my family continues to social distance because of Covid 19), my boys and I made videos of the crafts that we did together. These activities and crafts are fantastic for older kids... but younger kids will love them too. I've included the links to our videos (with full instructions) below.


1) MONDAY we did two Simple science experiments. We made rainbows with Skittles and we used vinegar to make a bouncy egg


2) TUESDAY we did weaving using a toilet roll and popsicle sticks. My boys LOVED this craft, and spent hours making long scarves and snakes.


3) WEDNESDAY we made tassel bookmarks. My boys designed their own bookmarks, and we used yarn to add homemade yarn tassels to the tops.


4) THURSDAY we made God's eyes... a classic camp craft. We used popsicle sticks and yarn to make this super-cute and colourful ornaments.

You can find our God's eye video here


5) FRIDAY we made 3D handprints. We used paper and markers to create simple drawings. My kids thought the 3D effect was pretty cool.

You can find our 3D handprint video here.


If you are looking for simple crafts and activities to entertain your kids, I highly recommend giving one of these a try. It is often hard to find crafts that aren't to "babyish" for tweens and teens... and these five are sure to please kids of all ages.

If you give them a try, let me know how it goes. I'd love to hear your favourites!


Gina (aka East Coast Mommy)


You might also like the ideas you can find here.

3D Easter Sharpie Art

Making holiday art with kids is a wonderful way to spend time together and to create some wonderful keepsakes. My boys made 3D Easter Sharpie art recently, and I absolutely love the way it turned out. Today, I am sharing a step-by-step tutorial and video that will allow you to make this easy and inexpensive project with your children.
To make Easter Sharpie Art:

1) Cut a 4X6 rectangle from an old cereal box.
2) Draw an Easter egg shape, trace with glue, cover with yarn, and allow to dry.
3) Cut a piece of tin foil slightly larger than the cardboard, cover the dull side with glue from a glue stick, and place over the egg design.
4) Secure the tin foil to the picture with tape (on the back).
5) Smooth out the tin foil (and press into the yarn) with a piece of felt.
6) Decorate with Sharpies, allow to dry, and place the artwork in an inexpensive dollar store frame.


Want to see how we did it? Check out our video: 


Each of my boys made their own Easter art, and I put their creations in dollar store frames. I love our new Easter decor, don't you?


I think this Easter artwork is perfect for children of all ages. If you make this project with your kids, let me know how it turns out. I hope you love this 3D Sharpie art as much as my boys and I do.

Gina (aka East Coast Mommy)

DIY Hockey Canvas

As my active boys get older, it is getting more difficult to get them to sit still long enough to do something creative. However, the project I am sharing today is perfect for my hockey-loving sons. Check out this wonderful (and simple) DIY hockey canvas that kids can paint using their favorite team colours and dollar store supplies. It makes fantastic custom artwork for their rooms too!


To make the jersey artwork, start by painting a canvas a solid colour, and let it dry completely.


Then, add light coloured writing.


Finish by adding details/highlights in a darker colour.


I love that this project can be done inexpensively in any colours that the child chooses.

Check out the fantastic job my hockey-loving boys did on paintings for their rooms.


This is a great project to do on a rainy or snowy afternoon at home, and it would also be fun at an end-of-season team party or hockey-themed birthday party.

It would work for other sports too. The possibilities are endless! Do you have a sports fan that would love to make some artwork replicating their favorite jersey?


Gina
 (aka East Coast Mommy)

Sharpie Tinfoil Pendant

A few weeks ago I shared a cool technique that my boys and I used to create 3D Sharpie artwork. We enjoyed the project so much that I thought we could use a similar process to create Sharpie tinfoil pendants. These pendants can be used as necklace charms, keychains or backpack clips.


To make a Sharpie tinfoil pendant:

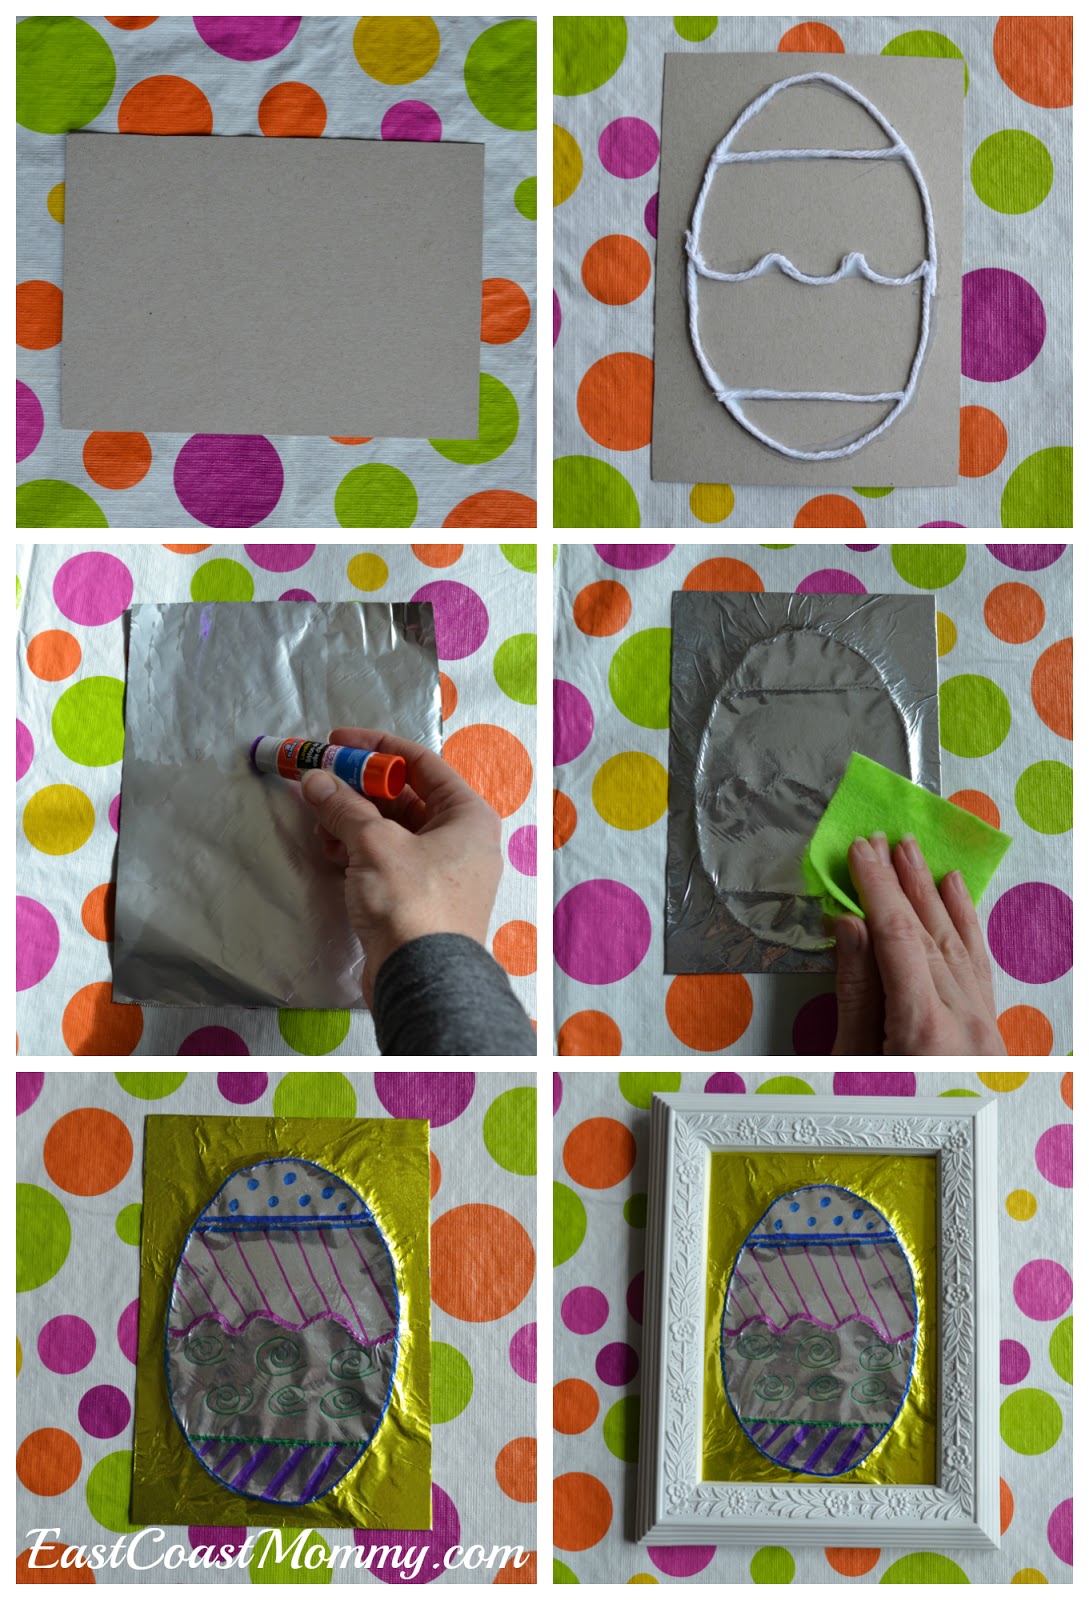
1) Cut a small (1 ½ inch) circle from an old cereal box. 
2) Cut a slightly bigger circle from tin foil. 
3) Draw a simple design on the cardboard, cover the outline of the design with glue and yarn, and set it aside to dry. 
4) Cover the dull side of the tin foil with a glue stick, wrap the tin foil around the cardboard containing the design, and secure the tinfoil with a piece of tape on the backside of the pendant.
5) Rub the tinfoil on the front of the pendant with a piece of felt to help the yarn design show through. 
6) Colour the design with Sharpies, and allow to dry.
7) Punch a hole in the top of the pendant, and add a pendant clasp. (These can be purchased inexpensively wherever craft supplies are sold, but a paper clip would work too.)


You could use a piece of yarn or ribbon, but I hung mine from a chain I had in my jewellery box. Cute, right?


I think this is a fantastic craft for kids of all ages. These Sharpie tinfoil pendants would make a fun homemade gift for Mother's Day too!


Gina (aka East Coast Mommy)

Sharpie 3D Artwork

My boys have always loved crafting, but as they get older, I like to challenge them with more sophisticated art projects. Last week, my oldest son came home raving about a 3D Sharpie art project that he did at school. I thought it would be fun to replicate it at home with my other boys.


This simple art technique uses: old cereal boxes, yarn, white glue, a glue stick, tin foil, felt, tape and Sharpies


1) Cut a "canvas" from an empty cereal box.
2) Draw a simple design, and cover the design with glue and yarn. Allow to dry.
3) Cover the dull side of a piece of tinfoil with glue (from a glue stick), and place on top of the yarn design.
4) Fold the edges of the tinfoil, and secure to the back of the canvas with tape.
5) Smooth the tinfoil with the piece of felt to make the design "pop".
6) Color with Sharpies. Allow to dry.


I was really impressed with the designs my boys came up with. Doesn't the combination of tin foil and Sharpies create a beautiful effect?

♥ 
Gina Bell (aka East Coast Mommy)

Don't miss any of the fun....