Showing posts with label crafting with recycled materials. Show all posts

3D Easter Sharpie Art

Making holiday art with kids is a wonderful way to spend time together and to create some wonderful keepsakes. My boys made 3D Easter Sharpie art recently, and I absolutely love the way it turned out. Today, I am sharing a step-by-step tutorial and video that will allow you to make this easy and inexpensive project with your children.
To make Easter Sharpie Art:

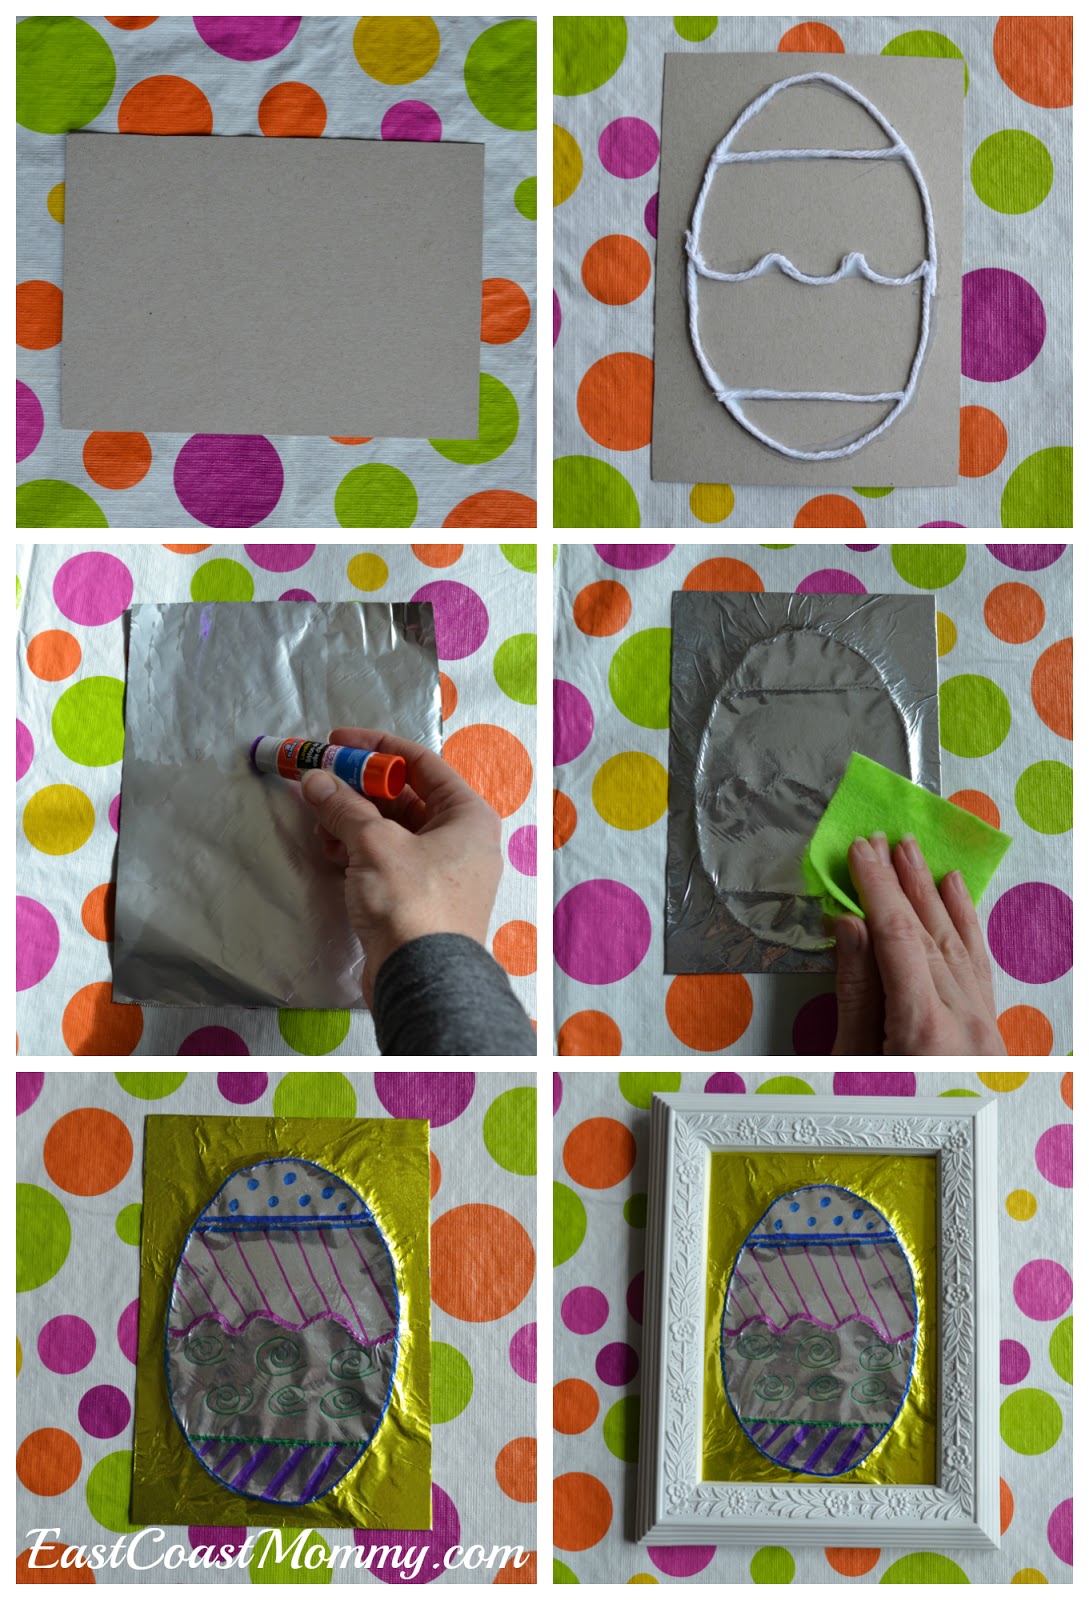
1) Cut a 4X6 rectangle from an old cereal box.
2) Draw an Easter egg shape, trace with glue, cover with yarn, and allow to dry.
3) Cut a piece of tin foil slightly larger than the cardboard, cover the dull side with glue from a glue stick, and place over the egg design.
4) Secure the tin foil to the picture with tape (on the back).
5) Smooth out the tin foil (and press into the yarn) with a piece of felt.
6) Decorate with Sharpies, allow to dry, and place the artwork in an inexpensive dollar store frame.


Want to see how we did it? Check out our video: 


Each of my boys made their own Easter art, and I put their creations in dollar store frames. I love our new Easter decor, don't you?


I think this Easter artwork is perfect for children of all ages. If you make this project with your kids, let me know how it turns out. I hope you love this 3D Sharpie art as much as my boys and I do.

Gina (aka East Coast Mommy)

Sharpie 3D Artwork

My boys have always loved crafting, but as they get older, I like to challenge them with more sophisticated art projects. Last week, my oldest son came home raving about a 3D Sharpie art project that he did at school. I thought it would be fun to replicate it at home with my other boys.


This simple art technique uses: old cereal boxes, yarn, white glue, a glue stick, tin foil, felt, tape and Sharpies


1) Cut a "canvas" from an empty cereal box.
2) Draw a simple design, and cover the design with glue and yarn. Allow to dry.
3) Cover the dull side of a piece of tinfoil with glue (from a glue stick), and place on top of the yarn design.
4) Fold the edges of the tinfoil, and secure to the back of the canvas with tape.
5) Smooth the tinfoil with the piece of felt to make the design "pop".
6) Color with Sharpies. Allow to dry.


I was really impressed with the designs my boys came up with. Doesn't the combination of tin foil and Sharpies create a beautiful effect?

♥ 
Gina Bell (aka East Coast Mommy)

Duct Tape Sled

I recently saw a post at Artzy Creations about making a sled out of a box and duct tape.  I instantly knew that this was an activity that my boys would love! Below, I explain how easy and inexpensive it is to recycle an old cardboard box into a super-fun (and fast) duct tape sled.


To make a duct tape sled, you'll need: a cardboard box, 3-4 rolls of duct tape, and scissors and/or an X-Acto knife. (I got my duct tape at the dollar store for $1.25 per roll.)


Start by cutting one side out of a box. We used a 5 cube moving box.

Then, fold one end of the box over, and cut a handle through the two layers. The extra layer of cardboard will make the handle stronger.

Finish by covering the entire sled with duct tape. Make sure to seal all the edges with duct tape, and overlap the tape to ensure that the cardboard will stay dry. You are also going to want to use the tape vertically as much as possible to increase the speed of the sled.


I think this duct tape sled is a fantastic way to recycle an old box. We had fun crafting, and we made a sled for less than $5! Pretty fun, right?


Gina (aka East Coast Mommy)

Alphabet Crafts - Letter G

This morning, my four year old and I had some fun with the letter G.  We made a guitar craft, and we did a little letter G printing practice.


My music loving boy loves this adorable craft made from recycled materials.

To make a tissue box guitar:

1)  Gather your supplies.  You'll need an empty tissue box, a strip of cardboard (from an old box), six buttons, six elastics, glue, a marker, and duct tape.

2)  Have the child draw strings on the neck of the guitar/strip of cardboard.  Then, have the child use white glue to decorate the top of the strip with buttons.

3)  Have the child wrap six elastics (of various sizes) around the tissue box.

4)  Attach the neck of the guitar to the tissue box with duct tape.


Cute, right?

After our craft, we did a little printing practice. If you want to practice printing the letter G with your little one, you can right-click on the picture below, save it to your computer, and print it.


We ended our crafting session with a little snack... because "G" is for goldfish, and all that crafting and printing can build up an appetite!


And if you are looking for more letter G crafts, why not try decorating a letter G with crayons and goldfish?


This adorable letter "G" gumball machine is sweet too! The "gumballs" are stickers.


And this handprint goldfish couldn't be cuter. Trace the child's hand to make the fish, and use white glue to add a googly eye and Cheerios air bubbles.


Next up, the letter "H".


Gina Bell (aka East Coast Mommy)

Find more alphabet crafts here.


Cereal Box Treat Holder

Don't you just love when something old is up-cycled into something new?  Check out the cereal box I turned into an adorable treat holder.


I think it is perfect for family movie night or a birthday party.  It can hold ice cream cones, and paper cones filled with popcorn or other treats.  Cute, right?

Here's how you can make one:


1) Make a template out of the side of a cereal box by dividing it into eight sections and cutting small holes in the centre of each rectangle.
2) Cover the sides of a cereal box with colored duct tape.  (Not the box you used to create the template.)
3) Use Mod Podge to glue a piece of scrapbook paper to the top of the cereal box.  Allow to dry completely, and then trim it as needed.
4) Use the template and an X-acto knife to cut holes in the top of the box.
5) Seal with a coat of Mod Podge.

I'd love to hear your "up-cycle" ideas/tips.  Please share them in the comments below.


Gina Bell (aka East Coast Mommy)

20 Earth Day Crafts and Activities

April 22 is Earth Day, and it is a great opportunity to teach children about recycling and respecting our planet. It is also a wonderful excuse to get outside and enjoy nature. Today I am sharing a fantastic collection of 20 {easy and inexpensive} Earth Day crafts and activities.


{Click on the links/titles below for full tutorials.}

1)  Make a cereal box notebook.

2)  Turn a babyfood jar into an earth day tealight.

3)  Decorate with a DIY earth day banner.

4)  Transform an old box into a beautiful tree full of butterflies.

5)  Read The Lorax, and enjoy a "tree-themed" snack.

6)  Use an empty egg carton to learn about how caterpillars turn into butterflies.

7)  Use empty jars and cans to create some adorable "grass-haired" friends.

8)  Enjoy some backyard bird-watching.

9)  Raid the recycling bin, and try creating some homemade toy boats.

10)  Craft some paper bag kites and head outside.

11-20)  Click here to check out the collection I posted last year (which includes:  


I hope you have a great Earth Day with your family!   


Gina Bell (aka East Coast Mommy)

{Grass-haired} Little Friends

A couple of weeks ago, my boys and I made what my 4 year old calls "crazy heads".  This project is cute, quick, and inexpensive.  {My favorite kind of project to do with the boys.}


First, gather up some old jars and cans, and let the kids decorate them with markers, googly eyes, pom poms, tissue paper, and/or felt {whatever you have lying around}.  After the glue has dried completely, let the kids fill the jars with potting soil.


Then, plant some grass seed in the jars, and let the kids use a spray bottle to water the seeds.  {I love letting the kids water with a spray bottle because it is easier to control how much water they give the plants.  I can actually tell them "how many squirts".}


In a week or two, you'll have hair {grass} long enough to cut.


Fun, right?  See how proud my boys are of their creations?


♥ 
Gina (aka East Coast Mommy

PS {Don't miss out on any of the fun... if you haven't already "liked" me on facebook, you can do it here.} 

Cereal Box Notebook

My boys love to draw pictures and write stories, so I thought I would make them some special books from an old cereal boxes.  {Another fun "recycling bin rescue".}


This is such an easy project -- you can whip up a bunch of notebooks in no time at all. 

First, cut covers for the book from the front and back of a cereal box.


Then, using a paper cutter {or scissors}, cut some scrap paper to fit inside the book.


Then, use a whole punch to cut holes in the pages and the covers.


And finally, use key rings to secure everything in place.


Now you are ready to let your little ones fill the pages with fantastic stories.  My six year old used his notebook to write a story about "a little girl with purple hair who tries to eat only red food in order to turn her hair red".  Don't you just love how creative little ones can be?  I wish I had that kind of imagination!  :-)

♥ 
Gina Bell (aka East Coast Mommy)

** If you haven't already "liked" me on facebook, I would love to have you join me here.

Backyard Birdwatching

Lately, my boys are totally into backyard birdwatching, so a couple of weeks ago I made us a new bird-feeder.  I took an old 2L pop bottle, cut some holes with an X-Acto knife, and stuck in a couple of wooden spoons.  {I also wrapped it in twine to make it a little fancier, but this step isn't really necessary.}


And, before long, we had a little visitor.  :-)


We started getting visits from a few varieties of birds, so we headed to the library for some books to help us identify our "new friends".  I highly recommend the two books we found:  A Kid's First Book of Birdwatching by Scott Weidensaul and Backyard Birds by Robert Bateman.


And, if you are looking for a special snack for your little birdwatchers, you could always whip up a batch of these bird nest cookies.  They are chocolate cookies with some leftover Easter Eggs on top. 


Fun, right?

♥ 
Gina Bell (aka East Coast Mommy)

PS (Don't miss out on any of the fun... if you haven't already "liked" me on facebook, you can do it here.)

{Mother's Day} Banner

May 13 {Sunday} is Mother's Day, so here is an adorable, easy, and inexpensive decoration you can make with the kids.  I love using banners to decorate for holidays, and this one is made using the pages of an old book{A great recycling project.}


Cute, right?  Here's how you do it:

First, use your computer to print out the letters you need to spell "MOMMY".  {I used "Rockwell" font, but you can use whatever you like.}  

Then, cut five pages out of a book, and cut a triangle out of the bottom of each page {per the photo below}.


Now, the kids are ready to decorate the letters.  {My boys just used crayons, but you could add glitter or stickers if you want.}


Help the kids to cut out the letters, and use double sided tape {or glue} to attach the letters to the book pages.


To finish, use a hole punch and some twine to string the pages together.


I love how the banner turned out, and my boys are very proud of the decoration they made for me.  Happy Mother's Day to all of you wonderful mothers out there!  I hope your special day is full of hugs, kisses, and homemade cards/gifts.  :-)


Gina Bell (aka East Coast Mommy)

** Don't miss out on any of the fun, if you haven't already "liked" me on facebook, you can do it here.**

Don't miss any of the fun....