Tips for Feeding a Young Athletes

I am not a nutritionist or an expert on feeding high performance athletes, but I am a mom of three very active boys (7, 9, and 11) who are always moving and constantly hungry. Generally, I try to feed my boys a healthy and balanced diet, and on game days we stay away from high fat and fried foods. This often means having "easy to grab" snacks in the fridge and packing a cooler when we are on the road.


My boys (like most people) are more likely to eat make healthy choices if tasty and nutritious foods are easily available to them. Here are the types I food I generally feed my boys when we are "on the go":
  • low sugar cereal (which they love as a bedtime snack after a late game)
  • chicken wraps (mayo, chicken, shredded cheese, and whole wheat tortillas)
  • peanut butter wraps or sandwiches (peanut butter and whole wheat tortillas/bread)
  • hard boiled eggs (cooked and peeled)
  • salad or raw veggies
  • fruit (washed and ready to eat)... and don't forget bananas
  • unsweetened applesauce (it travels well)
  • pasta (warm noodles and spaghetti in a thermos or cold noodles with an olive oil based salad dressing)
  • cheese or cheese strings
  • yogurt
  • snacks (pretzels, crackers and hummus, granola bars, etc...)
  • Don't forget to pack dishes, utensils and a refillable water bottle!

Recently, I was given the opportunity to work with Hans Dairy*, and I was really impressed with their all natural dairy products. They are a small dairy company (run by two sisters) that truly understands that quality trumps quantity every time. Hans Dairy makes ready-to-eat products such as smoothies, lassies, rice pudding, whipped butter, and yogurt in their traditional and time honoured small-scale operation. Hans Dairy products are free of artificial sugars, flavourings, colourings, and preservatives... wonderful high protein and healthy options for my little athletes.

You can also enter here to win a Hans Dairy* prize pack. 


The blueberry and strawberry smoothies were my boys' favourites.


It can definitely be a challenge to keep busy children happy and well fed... especially when busy schedules keep you "on the go". I hope you find my tips useful, and I hope you get the chance to try some of the wonderful Hans Dairy* products. Let me know what you think!


Gina (aka East Coast Mommy)


*Disclosure: I received compensation as part of my affiliation with Hans Dairy .... however (as always) the opinions on this blog are 100% my own... and my love for products that are 100% natural is real. I only ever promote products that my boys and I like and believe in.

Teaching Children to do Laundry... including a printable chore chart

Keeping up with my boys and their busy schedules is always a struggle, and the constant mountain of laundry they create doesn't help. I can't stop my hard-playing boys from getting sweaty and playing in the dirt... but I can teach them to help me get their clothes clean. Today, I am sharing some tips and tricks for teaching kids to help with the laundry, and I have created a handy laundry chore chart that breaks down tasks by age.


It's important to get kids involved early, and it is necessary to set them up for success by giving them age appropriate chores. Below, you will find a laundry chore chart that breaks down the laundry tasks (by age) in a way that allows children to build on their skills as they get older and more responsible.

To download a copy of this chore chart for free: right-click on the picture below, save it to your computer, and print it like a regular 8X10 photo.


Young children (age 3 to 5) enjoy helping, and it is a good time to get them involved in the laundry process. They can easily put their clothes in the hamper. Encourage them to get the laundry ready for the hamper... separate the pieces, make sure the clothes aren't inside out, and empty the pockets.

As children get older (age 6 to 9), they can start to take on more responsibility when it comes to doing laundry. They can decide what is dirty and what can be re-worn... i.e. not everything has to be thrown into the laundry hamper! They can also help by matching socks, learning to fold (even thought it may not be the neatest), and carrying their clothes to their room(s).


At around age 10, mature children can really start taking their laundry assistance to the next level. Lessons on sorting and washing can begin, and they can start learning to put away their laundry in an organized way. Writing out instructions on how to use the washer, and letting the kids use laundry pods makes the job a little easier.


Recently, I was given the opportunity to try out the NEW Arm & Hammer 3 in 1 Power Paks*. These Power Paks will are easy to use, and they will cut your chore time and your budget -- while doing the top performance job you'd expect.


Did you know?
  • The simple, effective, all-in-one triple chamber system features the freshening power of Arm & Hammer Baking Soda, the stain fighting strength of OxiClean, and a deep cleaning liquid laundry detergent to tackle tough stains and keep your clothes smelling fresher, longer.
  • Easy-to-use paks means no bulky bottles, spills or messes.
  • Cold water formula saves energy and money.
  • At just $0.19 per load versus $0.35 per load for other leading brands, this all-in-one detergent gives you the results you want at a fraction of the cost!
  • Arm & Hammer Plus OxiClean 3-in-1 Power Paks are available in Fresh Scent and Coldwater at mass drug and grocery retailers across Canada (including your local Loblaws store).

Do your kids help with the laundry? I'd love to hear your tips/tricks for getting them involved. Leave a comment below, or share your fresh experience with me online using #AHFreshPerspective.


Gina
(aka East Coast Mommy)

*Disclosure: I received compensation as part of my affiliation with Arm & Hammer .... however (as always) the opinions on this blog are 100% my own... and my love for products that save me time and money is real. I only ever promote products that my boys and I like and believe in.

Simple Dollar Store HACK for Organizing Kids' Games

When it comes to Spring cleaning, the dollar store can be your secret weapon. Inexpensive bins, baskets, and containers are perfect for organizing kids' stuff... especially in their playroom. And when it comes to the overwhelming task of getting organized, starting with small changes and projects is the key to success.

Recently, I noticed that my boys' card games were in boxes that were overstuffed and falling apart. I made a quick trip to the dollar store and picked up a couple of small containers that fit their games perfectly.


The containers stack perfectly too!


I love this simple solution for organizing my boys' games, and the games are now easier to take on the road too. It would work well for games with dice and small pieces too.

Do you use dollar store items to organize your kids stuff? You can read more about how I control the mountain of toys in my boys' playroom here.


Gina (aka East Coast Mommy)

Sock Puppets and Parenting Help... courtesy of Netflix

As parents, teaching our children important life skills and values is an important part of our job. Children are influenced by their friends, their teachers, and countless media sources (including TV, movies, apps, and games). Rather than trying to compete with all these outside influences, it can sometimes be easier to work with them. Watching TV together can spark conversations and inspire creative ideas for playing together. Recently, my boys and I made some DIY sock puppets inspired by popular Netflix* characters. We had a lot of fun creating a comedy show video together.


How cute are the puppets we made?


To make a Walter puppet: you'll need a blue sock for the body, clear wiggly eyes, black felt for the mouth, white felt for the teeth, blue pom poms for the belly, and a blue pipe cleaner for the antennas. You can use fabric or hot glue to attach everything.


To make a Kip puppet: you'll need an orange sock for the body, blue wiggly eyes, an orange pom pom for the nose, black felt for the mouth, white felt for the teeth, a tan felt circle for the belly, and orange felt for the ears. You can use fabric or hot glue to attach everything.


To make a Peri puppet: you'll need a tan sock for the body, black yarn for the hair, pink wiggly eyes, pearls for the necklace, and pink tulle for the skirt. You can use fabric or hot glue to attach everything.


Check out the puppet show my boys performed with their sock puppets. Don't you love when your kids tell jokes?


Do you use your kids' favourite shows as a way to communicate with them and spend time together? According to Common Sense Media, entertainment can be a strong tool for teaching empathy as it showcases strong, supportive bonds between characters of diverse backgrounds and perspectives, for example. Fuller House is a favourite with my boys, and it has helped us have conversations about the importance of family, compromise, and working together.


What are some of your kids' favourite shows and characters on Netflix? Have you used any of these shows/characters to talk to your kids about their values and/or teach them about important like skills? I hope you enjoy my boys' puppets and video. Perhaps you'll be inspired to spend some time creating your own Netflix production with your little ones.


Gina (aka East Coast Mommy)

*Disclosure: I receive special gifts and perks as part of my affiliation with Netflix.... however (as always) the opinions on this blog are 100% my own.

Simple Felt Finger Puppets

At the end of a busy day, I love winding down with my husband and watching a good show on TV. However, being idle makes me slightly anxious, so I like to find something to do while I am sitting. Sometimes I fold laundry, sometimes I do a little work, and sometimes I craft. Recently, I decided to design and make some simple finger puppets. I set a goal to make 50 puppets to donate to a local children's hospital*.


Given that I was making these finger puppets for children, I wanted to make the designs simple and colourful. Below you will find some close ups of (and instructions for) my cheerful designs.

How cute is this felt dinosaur finger puppet? I cut two dinosaur shapes (a top piece and a bottom piece) from a bright colour of felt. I cut teeth from a piece of white felt and stitched them in place. I stitched the top and bottom pieces together, stuffed a bit of cotton into the head, and used hot glue to attach googly eyes.


And, given that my three boys are huge Star Wars fans, I designed a cute felt R2D2 finger puppet. I started with two pieces of white felt (cut into the shape of R2D2). Then, I stitched on the blue details (which are simple shapes) and a red dot. I finished by stitching the front and back pieces together.


Next, I designed an adorable baby bird finger puppet. I cut two pieces (a front and back) from a piece of yellow felt. Then I stitched on a felt triangle orange beak and two colourful felt wings. I finished by gluing on two googly eyes.


This simple felt mouse finger puppet is another cute option. I started by cutting two pieces (a front and a back) from grey felt. Then, I stitched two pink pieces onto the ears. I used hot glue to attach two googly eyes, and used fabric paint to draw a nose, mouth and whiskers. I finished by stitching the front and back together.


This felt owl finger puppet is also fun, and it can be made using different colour combinations. I started by cutting two pieces of felt into the shape of an owl. I stitched two wings and a beak onto the front piece. Then, I stitched the front and back pieces together, and used hot glue to attach two googly eyes.


This Minion felt finger puppet is a simple design, and kids will love it. I cut two pieces (a front piece and a back piece) from yellow felt, I stitched a black band to the front piece, and I stitched the front and back pieces together. Then, I used hot glue to attach a googly eye, and I used fabric paint to draw a mouth. I finished by tying a thread of "hair" to the top.


Monkeys are always cute and loveable, so I adore this little felt monkey finger puppet. I cut two pieces from brown felt (a front and a back piece), I stitched a white face onto the front piece, and I stitched the front and back pieces together. Then, I used hot glue to attach two googly eyes and fabric paint to draw a nose and mouth.


This little bird is decorated on both sides, and is super-cute. I cut two bird shapes, stitched a wing on each side, stuck a beak in between the two sides, and then sewed the two sides together (leaving a space for a child to insert a finger). I finished by adding an eye on each side with fabric paint.


I made 50 finger puppets and sent them to a sick kids' hospital. It was a wonderful feeling to pop them in the mail, and I highly encourage you (or your children) to do the same. Here is where I sent mine:

Volunteer Resources
Level 2 - Women's Building
IWK Health Centre
5850/5980 University Avenue,
Halifax, NS B3K 6R8

*NOTE: Some hospitals (like the one I sent mine too) have rules about having detachable pieces (like eyes and buttons) attached to puppets, so if you are planning to donate the puppets, use fabric paint instead of googly eyes.


These finger puppets would also be wonderful for putting inside plastic Easter Eggs. They will last longer than chocolate... and they are healthier too! I think the little chick would be an adorable Easter option.


And wouldn't they be cute to give away as class treats or to use as loot bags / goodie bags?


Which of my simple felt finger puppet designs are your favourite? My boys love the R2D2, and I love the green dinosaur... but they are all sweet. 

These finger puppets are wonderful projects for moms and kids who are beginners when it comes to sewing. The designs are simple, and the felt is super-easy to work with. Happy stitching!


Gina (aka East Coast Mommy)


Update: I just sent another 30 to the hospital. These two designs are perfect because they don't have any small parts, buttons, etc...


Fun Way to Recycle Plastic Eggs

This is a super fun way to recycle the plastic eggs that are leftover after Easter. With plastic eggs, an empty egg carton, and a sharpie, you can easily create a fun matching game for Preschoolers.


Split the eggs apart, and use a sharpie to write a number on the top half of the egg. Then, use the sharpie to draw a corresponding number of dots on the bottom half of the eggs. 

I have 3 year olds in the weekly Preschool class that I teach, so I used matching tops and bottoms... but if you want to want to make it more difficult for older children, you can mix them up.


Cute, right? You could also use the eggs to help with alphabet recognition by writing an uppercase letter on the top of an egg and a corresponding lower case letter on the bottom of an egg.


This is a fantastic (and fun) way to teach number recognition and counting.


Do you have a little one that would enjoy this game that uses recycled plastic eggs? I love this simple way to teach Preschoolers about numbers!


Gina (aka East Coast Mommy)

Allergy-safe and Candy-free Easter Class Treats

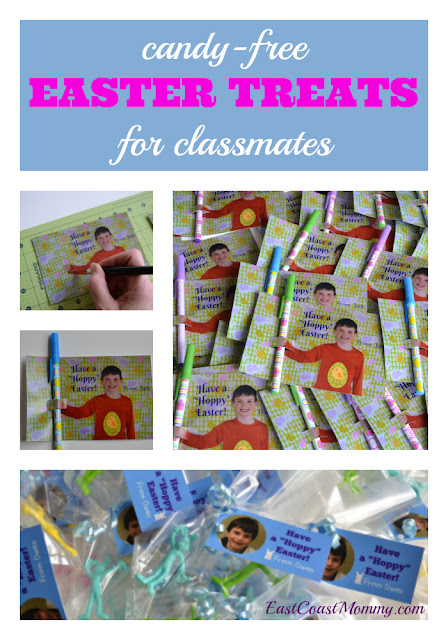
Bringing Easter treats to share with classmates is a fun tradition that my boys enjoy partaking in each year. Festive cookies and cupcakes are always a hit with little ones... but because my boys' schools have strict nutrition and allergy policies, they always bring fun "non food" items for their friends. This year we are using pictures to create some adorable Easter treats.
My youngest son found some Easter pens at the dollar store that he wanted to give his friends this year. To make the pens special, we are attaching them to special pictures of my son.

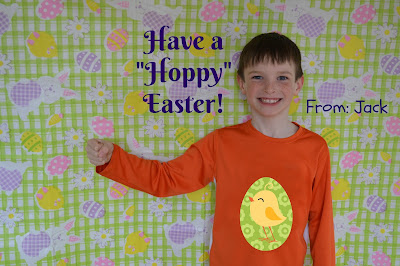
I started by taking a picture of my sweet boy standing in front of a tablecloth that we purchased at the dollar store. Then, I used Picmonkey.com to add an easter picture to the front of his shirt and to add a holiday greeting to the photo.


Then, I got the pictures developed, and I used an X-Acto knife to make a slit above and below my son's fist...


and I slipped a pen into the slots so that it looks like my son is holding the pen.


Cute, right? It was a simple treat to make, and my little guy is super-excited to share these photos with his friends.


My middle son selected some stretchy dollar store bunnies to share with his class. We created smaller tags using his photo and Picmonkey.com, and we attached the tags to the bunnies using clear bags and curling ribbon. I love this little treat too, don't you?


Are you making anything special for your kids to share with their friends and/or classmates? If you are looking for a candy-free Easter treat option, perhaps one of these ideas will work for you.

Happy Easter!


Gina Bell (aka East Coast Mommy)

Don't miss any of the fun....