DIY Thanksgiving Decor for Kids and Adults

Thanksgiving is a wonderful time to gather with family and friends. If you are hosting dinner this year, why not get the whole family involved in creating fun and inventing decor? Today, I'm sharing the best ideas for EASY and INEXPENSIVE DIY Thanksgiving decor.


How cute is this turkey wine bottle? Use a glue gun to attach a couple of dollar store leaves to the back. Then, use more hot glue to attach two googly eyes, a red felt wattle, and a yellow felt beak. It doesn't get much easier, and your guests will love seeing this whimsical bottle of wine on the table!


The wine is great for grown ups, but there should be something on the table for younger guests too. How about a fun turkey candy dish? The kids can help by tracing and cutting out their handprints from coloured card stock. Then, arrange the hands together, secure with tape, and use hot glue to attach the "feathers" to the back of a glass dish from the dollar store. Finish by using hot glue to attach googly eyes, a red felt wattle, and a yellow felt beak. You can fill the dish with any type of candy, but I love the colours of these Reese's Pieces.


Paper crafts are great for kids too. They add to the festive decor... and they keep the kids busy while you are making dinner. You can find the full step by step instructions for this stained glass paper turkey here


Kids can also use 1 inch squares of tissue paper (in fall colours) to make this paper plate Thanksgiving wreath. You can find the step by step instructions for this simple wreath here


And, of course, adults can make a wonderful wreath for the front door too. Don't you just love this cozy argyle fall wreath? If you can use a scissors and a glue gun, you can make this wonderful piece of Thanksgiving Day decor. Find the full step by step instructions for this Thanksgiving wreath here.


And I love this FREE Thanksgiving print. Download it here, and pop it in a dollar store frame. Cute, right?


Crafting a few unique pieces makes Thanksgiving a little extra special, don't you think?


How are you decorating for Thanksgiving this year? Are you making any fun crafts? I love the personal touch added by handmade items, don't you?


Gina
 (aka East Coast Mommy)


You might also like the adorable Thanksgiving party favours (and free printable tags here.


DIY Argyle Fall Wreath

I love an inexpensive Fall craft, don't you? And it's even better if you end up with a gorgeous piece of Fall decor. Today, I am sharing the instructions for this simple (and cozy) DIY argyle Fall wreath. You are going to want to make this one!


To make this wreath, you'll need some felt in Fall colours. I used a maple leaf cookie cutter to trace out Fall leaves in red, orange, and yellow.


Then, you need to wrap a wreath form in white yarn (securing periodically with hot glue).


Attach the leaves to the wreath with a bit of hot blue, and then wrap twine around the wreath to create an argyle pattern.

Finish by adding a piece of ribbon for hanging.


Cute, right?!? I love how this cozy wreath looks hanging on my black door.


It doesn't take a huge investment to transform your porch from summer to Fall. You just need a few inexpensive supplies and a little imagination.

Happy Fall!


Gina (aka East Coast Mommy)

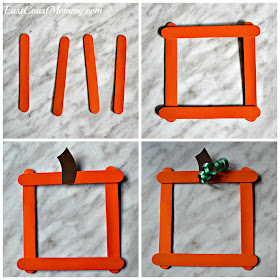
Popsicle Stick Pumpkin Frame

Fall is the perfect time for crafting with kids. What is cuter than scarecrows and pumpkins? Today, I'm sharing a simple craft children (and their parents) will love... a popsicle stick pumpkin frame.


To make this adorable frame:

1) Paint 4 craft sticks with orange craft paint.
2) Glue the popsicles into a frame.
3) Cut a stem from brown paper and glue to the top of the pumpkin.
4) Glue a piece of curling ribbon to the bottom of the stem.


This little frame is perfect for a picture taken in a pumpkin patch. It would be adorable for a Halloween snapshot too!


I put magnets on the back of mine to attach it to the fridge, but you could hang it from a ribbon too. Cute, right?!?


Gina (aka East Coast Mommy)

Custom DIY Fall Decor... for less than $10

I love decorating my porch for summer, but when the temperatures start to drop, I feel the need for a little seasonal update. I know my Fall decor will quickly be replaced by Halloween (and then Christmas) decorations, so I like to keep my updates easy and inexpensive. Today, I am sharing a piece of custom DIY Fall decor that I made for just $7! 


I started with a $4 frame from the dollar store, a piece of fall-themed scrapbook paper, some craft paint and a bit of scrap ribbon.


I painted the monogram red and set it aside to dry.


Then, I cut the scrapbook paper to fit my frame and inserted it behind the glass.


When the letter was completely dry, I used hot blue to attach it to the middle of the frame.


To finish, I used hot glue to attach brown ribbon (for hanging) to the frame .


Pretty cute for $7, right?!? Here's the cost breakdown for the monogram:

Dollar store frame: $4
Scrapbook paper: $1
Pressed wood letter: $2
Craft paint... had on hand
Ribbon... had on hand


I love this adorable piece of decor, and it was an super-easy DIY. How do you update your decor for Fall? I'm always looking for new inspiration!


Gina
 (aka East Coast Mommy)


You might also like this DIY wreath for Fall.


First Day of School Traditions... 2020 edition

The first day of school is an important milestone, and it provides a wonderful opportunity to celebrate with kids. We keep our back to school traditions simple, but I love them. Today, I am sharing our favorite first day of school traditions... and a few back to school photos of my handsome boys! 😀


We always start our day with a pancake breakfast... with pancakes in the shapes of the boys' new grades. As you can see, they aren't fancy, but my boys find them fun!


Then, we continue our "first day of school photo" tradition. The boys hold an 8x10 picture from the first day of school the previous year. It's so wonderful to watch how much they change from year to year. This year I had the boys take one photo wearing a mask... as a tribute to our new "covid" lifestyle.

Here are a couple photos of my oldest son...


Here's my middle son...


And here is my "baby"...


I also made them take a couple of pictures together. I'm so grateful that they humour me.


And, of course, we ended the day with a "welcome home" treat.


We have had the same "first day of school traditions" for over 10 years. I have always believed that traditions and rituals are the cornerstones of childhood memories, and I really hope I am creating sweet memories for my boys.

♥ 
Gina Bell 
(aka East Coast Mommy)

Tips for Organizing Kids Clothes for Fall... and our NEW Gongshow Gear

*sponsored post*

Switching seasons can be a pain when it comes to kids' clothes. When summer comes to an end, my growing boys never seem to have any pants or hoodies that fit. I wonder if their arms and legs will ever stop growing? lol Getting organized for heading back to school can be tough, but I have a few tips for organizing kids' clothes that you are going to make your life a little easier!

1) Get rid of what you don't need - Take everything out of your kids' drawers, try things on, and only put back things that still fit... and that they will wear. Anything left over can be donated or sold on a "buy and sell". 


2) Buy second hand - If you are looking for Fall / Winter clothes for kids, make sure to check out consignment shops and "buy and sell" sites. There are many opportunities to buy quality clothes at reduced prices. You can use the money you save to buy a few NEW high quality pieces.

3) Organize drawers - If drawers are organized, it is easier for kids to see what you have, and they are more likely to wear more than just a few of their favourites. I always fold my clothes this way (see below) so that my kids can see what they have without ripping everything out.


4) Buy what they like - There is no point spending money on clothes that kids are not going to wear. Get them involved in the buying process, and let them pick out the things they like. I prefer shopping online with my kids. It is much easier... and if they take a long time to make a decision, I don't go crazy! lol

Gongshow recently gave my boys the opportunity to check out their new Fall / Winter 2020 line, and my boys LOVE the items they received. The hockey themed clothing is a favourite in our house.


My youngest (who is a goalie) picked the Crease King Junior Hat. I love the smaller fit of these hats. They fit my 11 year old perfectly!


My middle son chose the Snow Shower Jr hoodie. I love the quality of this sweatshirt and the subtle tie dye design.


My oldest son chose the Jr Comfy Hour joggers. The material and style are both top shelf. I love the hockey lace detail too.


And, of course, no 2020 back to school wardrobe would be complete without the season's hottest accessory... the Gongshow adustable face mask


Are ready for the transition from summer to fall? We still have a bit of clearing out to do, but my boys are pretty happy with the new additions to the wardrobe. If you are looking for a few new quality pieces for your hockey fan, I highly recommend checking out the new Gongshow line.

♥ 
Gina Bell 
(aka East Coast Mommy)


*Disclosure - I was given GONGSHOW products for free in exchange for my honest review and promotion of the products. As always, the views expressed on this blog are 100% my own... and my boys genuinely loved everything they received.


You may also be interested in seeing how excited my boys were when they received their new clothes from Gongshow. 


Pantry Pancake Mix... with free printable tags

When it comes to cooking for my busy family, I love a good shortcut. It's always helpful to have ingredients for quick meals in my pantry, so this "make ahead" pancake mix is wonderful. It's great to have on hand for making a quick breakfast before school... and the leftover pancakes can be cut up and popped in a thermos for a simple school lunch.


To make pantry pancake mix:

Mix the following dry ingredients in a bowl, and use a funnel to put the mixture into a jar:

  • 2 cups all purpose flour
  • 1/4 white sugar
  • 2 tsp baking powder
  • 1 1/2 tsp baking soda
  • 3/4 tsp salt

Then, add a fun tag to the jar. 


To print the tags I designed: click on the picture below, right-click, save it to your computer, and print it like a regular 8x10 photo.


When you are ready to make the pancakes:

1) Dump the contents of the jar into a bowl.

2) Add:

  • 1/4 cup melted (cooled) butter.
  • 2 cups buttermilk (or 2 tbsp vinegar and enough milk to make 2 cups)
  • 2 eggs

3) Stir (just until most of the lumps are gone).

4) Add approximately 1/4 cup batter to a buttered/heated skillet.

5) Cook pancakes on one side until bubbles appear, and then flip.


6) Cook the other side until lightly browned.


We serve our pancakes with maple syrup and fruit, and they are delicious!


Pancakes are fantastic served fresh, but you can make them ahead of time and freeze them too. 

Let them cool, put them in a freezer bag, and place them in the freezer. When you are ready to eat them, pop them in the microwave for about 30 seconds or reheat them in the toaster.


I absolutely love having this homemade pancake mix in my pantry. It's simple to make and the pancakes are light and fluffy.


My kids love pancakes, and I love a good shortcut, so this pantry pancake mix is perfect for my family. What's in your pantry that you couldn't live without? Do you have any good mealtime shortcuts to share? I'm always looking for new ideas.


Gina (aka East Coast Mommy)