First Day of School Lunchbox Treat... with free printable tags

The first day of school is a special day that requires an extra special treat. This little lunchbox treat is perfect for a child's luncbox, and it is wonderful for kids to share with classmates too. I'm even sharing the "punny tag" for free for you to use below.


My kids love Fruit by the Foot, so I thought it was the perfect first day of school treat to include in their lunches this year. To add some extra cuteness, I designed a "Put Your Best FOOT Forward" tag to attach to the treat.


Seriously, isn't it cute? Who doesn't love a good pun?


To download the tags I designed for free: click on the picture below, right-click, save it to your computer, and print it like a regular 4x6 photo.


And it's simple to make a bunch to share with friends and classmates too!


Do you have a special first day of school lunchbox treat you like to share? I think these "Froot by the Foot" treats are simple and cute, don't you?


Gina (aka East Coast Mommy)

DIY Apple Stamped Banner / Bunting

Apple decor is perfect for Fall and for back to school... and it's even better if it's handmade. I am loving this adorable DIY apple stamped banner / bunting. It's fun to craft, and it makes a wonderful piece of custom decor for your home.


I found a pre-cut canvas banner for less than $2, but you can use cardstock instead (if you can't find inexpensive canvas)

Then, to make a banner: cut an apple in half, apply a light coat of red paint with a paint brush, and use the paint covered apple to stamp the bunting. 

Wait for the paint to dry, and then you can add details (seeds and a stem) with a brown Sharpie.


Then, use hot glue to attach a piece of twine or string to the back of each "flag".


This is what it looks like when it is all finished. Cute, right?


I think a DIY apple stamped banner / bunting is the perfect project for this time of year. It's great for Fall, and works well for the first day of school too.

Happy crafting!


Gina
 (aka East Coast Mommy)

First Day of School Cookie Bar

Who's looking for a special treat to serve to the kids on the first day of school? I love the idea of setting up a "You are one smart COOKIE!" bar, don't you? Here's one I made using my light box.


You could also download and print the sign below. Just click on the photo below, right click, save it to your computer, and print it like a regular 8x10 picture.


For my "one smart cookie" bar, I made two of my favourite cookie recipes.

You can find the recipe for my favourite chocolate chip cookies here.


And you can find the recipe for my chococolate cake mix cookies here.


I like the way the contrasting colours of the flavours look on the tray, but you could use any homemade or store bought cookies.

Discussing the first day of school over cookies and milk sounds like the perfect way to end the day, don't you think?

♥ 
Gina (aka East Coast Mommy)

5 Mask HACKS Every Family Needs

In this world of Covid 19, wearing non-surgical face masks has become part our daily lives. With five people living in my house, and the need for every family member to always have a clean mask, I quickly realized that I needed to put a few systems in place to control the mask chaos. Today, I'm sharing 5 mask hacks that every family needs to know about.


1) Have "clean" and "dirty" baskets by the door - I picked up these cheap plastic baskets at the dollar store, and I attached paper tags. Now, it is easy for everyone in my house to locate and grab a clean mask on the way out the door. And, when people come home, they drop them in the "dirty" basket, and when it's time to do a load of laundry, it's easy for me to grab the soiled masks and throw them in with the rest of the dirty clothes.


To print the tags I designed: click on the photo below, right-click, save it to your computer, and print it like a regular 4x6 photo.

2) Buy a lanyard - If you are going to be in a situation where you are taking a mask on and off, a lanyard is a great solution. Ideally, a clean mask would be used every time, and clean masks should be stored placed in a paper bag between uses, but for many, this isn't realistic. A lanyard keeps a mask close at hand, keeps it off the floor, and prevents it from getting lost. 

NOTE: Due to strangulation concerns, lanyards should only be worn by older kids and adults, and they should NEVER be worn while playing. Lanyards with "breakaway" options are best.

Alternatively, fanny packs are great for holding masks and small bottles of hand sanitizer.


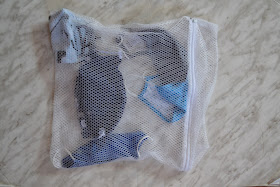
3) Wash masks in a lingerie bag - I picked up this lingerie bag at the dollar store, and it is perfect for washing masks. I throw the dirty masks in the bag and hang them to dry. I love that the lingerie bag keeps them all together so they are easy to grab (and hang to dry) when I am transferring the rest of the laundry into the dryer.


4) Have lots of masks in lots of places and label them - Making sure every person in my family has a mask when they need it is not easy. I put a clean bin of masks by the front door, but I also put clean masks in the car and in my purse. Using name labels (especially with kids) is super helpful too. Name labels prevent sharing and help keep masks from getting lost.


5) Try different styles and different colors of masks - In my house, different people prefer different styles of masks. Having a good fit makes mask wearing easier, and having different designs makes it more fun.


Do you have any tips for making "mask wearing" easier and/or more fun? I love all these mask HACKS... but the basket idea is my favourite. It has really organized my mask chaos. If you try it, let me know what you think!


Gina (aka East Coast Mommy)


Bonus tip here...

Tips for Planning a FAMILY Trip to Cape Breton

Normally, our summers are packed with organized sports and a family trip to Prince Edward Island with our family from Ontario, but this year (with Covid 19 restrictions in place), we decided to plan some "staycations" closer to home. One of our recent adventures included a wonderful 4 day trip to Cape Breton, Nova Scotia. Today, I sharing some highlights from our Cabot Trail vacation, and some tips that you can use when planning your own trip.

First, let me share our four day itinerary...


Day 1 - We started our Cape Breton adventure by driving from our home in Antigonish. We made a short stop in Baddeck to check out the Red Barn and the waterfront. We didn't have time to tour the Alexander Graham Bell Museum (which I hear is great), but we did find a statue of him and his wife on the waterfront.


Baddeck, NS

Red Barn, Baddeck, NS
Alexander Graham Bell Statue, Baddeck, NS

Then, we started our Cabot Trail adventure and we made our way to Ingonish, enjoying the beautiful scenery as we drove. In Ingonish, we enjoyed: beautiful Ingonish beach, Salty Rose's and the Periwinkle Cafe, the Groovy Goat Farm (where the kids were able to pet goats and I was able to buy some wonderful goat milk soap), the Bean Barn Cafe (which I would highly recommend for good food at a good price for families), a safe beach for swimming (down the Wharf Road... just past the Groovy Goat), and a quick round of golf at Highland links (6 at 6 special). We spent the night at Skyline Cabins, and we hit the road again the next morning.


Cabot Trail, Cape Breton, NS

Ingonish Beach, Cape Breton, NS
Salty Rose's and the Periwinkle Cafe, Ingonish, Cape Breton, NS
Groovy Goat Farm and Soap Company, Ingonish, Cape Breton, NS
Bean Barn Cafe, Ingonish, Cape Breton, NS
Beach (near the Groovy Goat), Ingonish, Cape Breton, NS
Highland Links golf course, Ingonish, Cape Breton, NS
SkyLine Cabins, Ingonish, Cape Breton, NS

Day 2 - On Day 2, we continued our drive around the Cabot Trail. We saw some great scenery along the way, stopped at Black Brook beach, and enjoyed a bowl of chowder in Meat Cove. Then, we stopped in Cheticamp to do the Skyline Trail (but it was too foggy so we opted to save the hike for another trip), we went for a swim at Gypsum Mines (a highlight for my boys), and hiked down to Egypt Falls (which was a really tough, steep hike... but totally gorgeous!). We made our way to Inverness, and stayed overnight at the Glenorra Distillery (which has a fantastic restaurant with live music).


Cabot Trail, Cape Breton, 
Black Brook Beach, Cape Breton, NS
Meat Cove, Cape Breton, NS
Meat Cove Chowder Hut, Cape Breton, NS
Gypsum Mines, Cheticamp, Cape Breton, NS

Gypsum Mines, Cheticamp, Cape Breton, NS
Egypt Falls, Cape Breton, NS
Glenora Distillery, Inverness, Cape Breton, NS

Day 3 - We spent the day exploring the beautiful town of Inverness. We collected sea glass at Inverness Beach, went to see the horse races (which the kids loved), and visited Chimney Corner beach.
Inverness Beach, Cape Breton, NS
Sea glass collected at Inverness Beach, Cape Breton, NS
Inverness Race Track, Cape Breton, NS
A "win" at Inverness Race Track, Cape Breton, NS
Chimney Corner Beach, Cape Breton, NS

Day 4 - It was time to head home, but we made a few stops along the way. We checked out, West Mabou beach, flew a kite at the beach in Port Hood, and stopped at Snow Queen Leisure World in Antigonish (for ice cream, mini golf, and a ride on the go carts).


West Mabou Beach, Cape Breton, NS
Port Hood Beach, Cape Breton, NS
Snow Queen Leisure World, Antigonish, NS


We had a fantastic vacation, and I would highly recommend a family trip to the beautiful island of Cape Breton. If you decide to take a similar road trip, here are some tips you might find helpful:


  • Have a plan. For our trip, we researched popular attractions, mapped out where we wanted to go and what we hoped to do (including travel time), and booked our accommodations. We weren’t afraid to deviate from our plan, but the framework we created kept us focussed and organized.
  • Make sure everyone is comfortable, hydrated, and well fed. We love stopping at popular local eateries, but we always have water bottles, snacks, and a well stocked cooler in our van. Healthy snacks and supplies to make sandwiches “on the go” are always accessible. 
  • Have entertainment for the passengers. Even beautiful scenery, like the Cabot Trail, only holds kids’ attention for short periods of time. Movies, music, podcasts, road trip scavenger hunts, and e-books/regular books are great options for passing the time. 
  • Stop often. Kids are not designed to spend endless hours trapped in a vehicle, so if the kids need a break, or you see something interesting on the side of the road, stop. The stops along the way really are what make a family road trip fun and memorable. 

Have you taken any fun road trips this year? Where did you go? I can't wait for our next one!


Gina (aka East Coast Mommy)


Don't miss out on any of the fun... follow me on social media here.