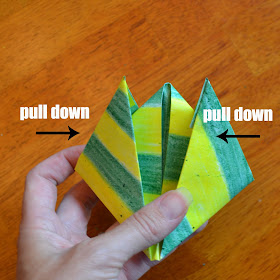
All you need to make your own paper boat is a piece of paper and a wax crayon. Pretty simple, eh?
Here's what you do:
 |
| 1) Color a sheet of paper {on both sides} with a wax crayon to waterproof. |
 |
| 2) Fold the paper in half {the long way}. |
 |
| 3) Fold both corners {down}, so that they meet in the center. |
 |
| 4) Turn up the bottom flap, and flip over and do the same on the other side. |
 |
| 5) Press the end folds together until the middle creases become the outside folds. |
 |
| 6) Tuck in the end flaps so that it lies flat. |
 |
| 7) Fold the bottom corner up to the top corner. Flip over, and do the same. |
 |
| 8) Like #5, press the end folds together so that the middle creases become the outside folds. |
 |
| 9) Hold the two outside points, and pull them away from the middle point. Press down the sides to finish the boat. |
Try it, and let me know how it goes. If you have any trouble, send me an email, and I will see if I can help.
♥
Gina (aka East Coast Mommy)


I just did this craft with my two year old! She is now sticking crayons in the boats. We haven't tried floating them yet, but with all of this rain on the West Coast we will later! Thank you for the simple craft!
ReplyDeleteFun! As long as it is well covered in crayon, it should float. All three of ours floated, and the boys were super excited.
DeleteThis looks fun! I know my daughter would love to make one to play with in the bath tub or the gutter!
ReplyDeleteThanks, Amy! My boys used our bath tub, and they loved it.
DeleteThank you very much for the information that has been conveyed
ReplyDelete