Snow Day Snack

A few days ago we had a "snow day", so the boys and I made some "snowman cookies".  They were inspired by some beautiful cookie pops made by Amy at The Idea Room.  My boys made our version, so they didn't turn out quite as fancy as Amy's.  :-)


Here is how we made our version:


1)  I melted some white chocolate baking squares in the microwave {2 minutes on medium in a small microwave safe bowl}.  Then, I let the boys stir the chocolate until it was completely melted and smooth.

2)  I let the boys dip Oreos in the melted chocolate, and then they laid the cookies on wax paper.

3)  Using candy corn and chocolate chips, the boys made snowman faces on the cookies, and then we left them to harden.


Fun, right?  The boys loved snacking on snowman cookies and hot chocolate after an afternoon of sledding.


What is your favorite winter time snack?

♥ 
Gina Bell (aka East Coast Mommy)

* You can find me on facebook here.

Giveaway {Peanut Butter Cheerios} - CLOSED

Thanks to all that entered.  The winner is:  

My 2 year would go crazy for these. She loves "pinga butter toast" but because her daycare is nut free with several children with a severe peanut allergies, real peanut butter (instead of wow butter) is a very special treat in our house. I think these would be a great addition to our very limited toddler routine and have been looking for them since I first saw your post but haven't been able to find a box. 


My boys love peanut butter and they love Cheerios.  So, when Life Made Delicious asked if I wanted to try new Peanut Butter Cheerios, I didn't hesitate to say yes.  {In fact, when I got the email, this is what my boys were eating for lunch.  lol}


My three adorable taste tasters are anxiously awaiting the arrival of our box of Peanut Butter Cheerios.  :-)


Do you want to try them too?  On February 4, a coupon will go live on the Life Made Delicious facebook page for a buy one get one free opportunity to try them {redeemable on March 16/17}.  There are only a limited number of coupons, so don't delay.

And... of course, I am giving you an opportunity to win a great prize package worth $50Just leave a comment below letting me know your favorite way to enjoy peanut butter... smooth, crunchy, with chocolate, etc...


This contest will run from January 31 to February 28th and is open to Canadian residents only.  (One winner will be chosen by random.org and will have 48 to respond/claim prize.)  You may enter across multiple blogs but may only win one prize.

Good luck!


Gina Bell (aka East Coast Mommy)


Disclosure – I am participating in the Life Made Delicious Ambassador Program by Mom Central Canada on behalf of General Mills. I received compensation as a thank you for participating and for sharing my honest opinion. The opinions on this blog are my own.

40+ {Unique} Loot Bag Ideas

Say good-bye to junky party favors.  I've got you covered with 40 unique loot bag / party favor ideas that are sure to please your little party guests. If you have ever assembling goodie bags for a child's party, you are going to want to read this!


{Here are 15 loot bag ideas for specific party themes and 15 loot bag ideas that can be used for any party.  And I have included lots of links to party details and tutorials.}  

15 loot bags ideas for specific party themes:


1) Art Party - Dollar store canvases, paints, and paint brushes. 

2) Baking Party - Containers filled with treats the children made at the party or packages of cookie mix with cute cookie cutters.  Also, guests can take home their very own homemade chef hats{Click on the link for a full tutorial.} 

3) Book-themed Party - When a party is planned around a child's favorite book or author, the loot bag can be a book that fits with that theme.  {e.g. Plan a party with a Dr. Seuss theme or A Hungry Caterpillar theme.}   

4) Circus/Carnival Party {Click on the link for all the fantastic Circus party DIY ideas.} - Clown noses, ring master mustaches on sticks, and face paints.   

5) First Birthday {e.g. a Monkey Party} - Loot bag ideas for "baby" guests:  bibs, rubber duckies and wash cloths, books, and stuffed animals.

6) Movie Party - Popcorn buckets full of popcorn and "movie" treats.

7) Music Party {Click on the link for all the fantastic music party DIY ideas.} -- Back stage passes, homemade instruments and/or dollar store instruments.   

8) Pirate Party {Click on the link for all the fantastic pirate party DIY ideas.} -- Handmade pirate treasure chests filled with treats or Pirate Booty (with cute printable tags you can find here).  


9) Pool Party - Cute beach towels or buckets and shovels.

10) Princess Party - Handmade princess wands.  {Just paint dowels pink and add hand-stitched felt stars to the top.}

11) Race Car Party - Driver's Licences {which you can see here} and matchbox cars.  {Click on the link for all the fantastic race car party DIY ideas.}

12) Sledding Party - "Make your own snowman" kits.  {Get all the supplies you need at the dollar store:  hats, scarfs, and some big buttons.}  Attach notes that say "Just add snow!" or... give out some Snowman Soup or Snowman Parts.


13) Sleepover Party - Homemade pillow cases, or chemical free nail polish.

14)  Star Wars Party {Click on the link for all the fantastic Star Wars party DIY ideas.} -- Pool noodle light sabres.  {They are really fun, easy to make, and you can find a full tutorial here.}  


15) Super Hero Party {Click on the link for all the fantastic Super Hero party DIY ideas.} -- Handmade no-sew super hero Capes & Masks.  {Click on the links for full tutorials.}

15 loot bags ideas that fit any party theme:


16) Homemade Playdough - You can find my favorite {no cook} recipe here.

17) Coloring Books, Crayons & Stickers -  You could even make your own crayons in shapes that go along with the party theme.  {You can find the tutorial for recycled crayons here.}

18) Personalized Clip Boards - You can use scrapbook paper to match the theme of the party, and you can find a full tutorial here.

19) Bubbles - You can give big bubble wands with recipes for homemade bubbles or give "make your own bubbles" kits that include everything they need to make their own bubbles.

20) Cupcakes - Individually packaged cupcakes are delicious and fun.  Adding trinkets {like plastic rings} just makes them better.


21) Cookies - Who doesn't like cookies?  Make your own or purchase them.  {Check out these ones from Noelle's The Custom Cookie Company.  They are super cute!} 

22) Frames - Guests can decorate frames, and pictures of guests can be taken at the party and delivered at a later date.  {You could write something like.... "The content of this frame is currently hollow, but a really cute picture is certain to follow.  Thanks for coming to my party."}

23) Balls - Bags can be filled with balls, and tags can be attached that say "Thanks for coming.  I hope you had a BALL at my party."

24) Labels - Who doesn't love a practical gift... like personalized name labels?  {"Loot bag" packages can be ordered from places like Olivers labels for around $5/person.}


25)  Cookie cutters - Cookie cutters that fit with the theme of the party make great loot bags when you package them with a favorite cookie recipe or cookie mix in a jar.

26) Homemade Hair Clips - Handmade gifts are always a little bit more special than stuff you buy.  Hair clips are easy and inexpensive to make.  {I have a great tutorial for monkey and frog clips that you can find here.}

27) Bookmarks with a picture of the birthday boy/girl - We made bookmarks for Valentine's Day, but they would work for a birthday too.  {You can find the tutorial here.}

28) Journals - Dress up plain journals with cute personalized labels.  {You can find an example of one we made here.}  You could also include homemade flower pens for an extra bit of fun.


29) "Make your own sidewalk paint" kit - Wrap up all the supplies needed to make sidewalk paint, and include paintbrushes and full instructions.  {You can find the "how to" here.}

30) Mugs and hot chocolate - Fill mugs with packages of hot chocolate and some marshmallows, and include notes that say, "It warms my heart to have a friend like you.  Thanks for coming to my party."

More:
click on the links for additional info and free printables...

31) spy kits for a spy party {click link for additional info}


32) LEGO cupcakes for a LEGO party {click link for additional info}


34) special treats for a pool party {click link for additional info}


35) hockey card prize punch for a hockey party {click link for additional info}


36) treats from Honeydukes sweet shop for a Harry Potter party {click link for additional info}


37) breakfast favor for a half sleepover {click link for additional info}


38) midnight kisses for a New Year's Eve party {click link for additional info}


39) bowling party favours {click link for additional info}


40) sock puppet kit party favors {click link for additional info}


41) NERF party favors {click link for additional info}


A fun party favor is a great way to end a party and show your guests how much you appreciate them attending. Do you have a favorite idea for an easy and inexpensive loot bag? I'd love to hear about it.


♥ 
Gina Bell (aka East Coast Mommy)


Don't miss out on any of the fun... follow me on social media here.


Star Wars Valentine

Recently, my 7 year old had a Star Wars themed birthday party, and we made some adorable invitations using glow stick bracelets from the dollar store.  I thought it would be fun to use the same picture to make a Star Wars Valentine.


Isn't it cute?  I took a picture of him making a fist and holding his arm out to the side.  Then, I did some editing in Picmonkey{I thought "The Force of our friendship is strong" was very clever.}

Then, I cut slits above and below his fist and inserted a glow stick with some black electrical tape wrapped around the end.

Pretty simple... and I think it is a really fun Valentine to pass out classmates.  Don't you?
 
♥ 
Gina Bell (aka East Coast Mommy)

* You can find me on facebook here.

{No Fail} Banana Bread

Everyone has a few "tried and true" family recipes that they use on a regular basis, and today I am sharing one of my favorites.  I always have bananas that go bad before my boys get a chance to eat them, so this banana bread is a staple in my house.  It is a simple recipe, and it always turns out moist and delicious.


When I moved out of my childhood home, my mom and dad gave me a binder full of my mom's favorite recipes, and this banana bread is one of them.  It is a family favorite, and I am so excited to share it with you today.


Here's how to make it:

1)  Preheat oven to 350 degrees, and grease a large loaf pan.
2)  Whisk together the following dry ingredients:
        2 cups of flour
        1/4 cup white sugar and 1/4 cup brown sugar
        3 tsp baking powder
        1/2 tsp baking soda
        1/2 tsp salt
        1/2 cup chocolate chips


3)  Beat together:
         1 egg
         3/4 cup milk
         1/4 cup melted butter (cooled)
         1 1/2 cup mashed ripe bananas  {And mashing bananas is a perfect job for little helpers.}


4)  Mix wet and dry ingredients thoroughly, and pour batter into prepared pan.  Bake in preheated oven for 60 to 70 minutes.


I highly encourage you to give this banana bread recipe a try.  It's even better with a cup of coffee or tea. Enjoy!

♥ 
Gina Bell (aka East Coast Mommy)


Here's a quick video showing how simple this treat comes together...
 

Felt Snowflake Wreath

I have wreaths for Christmas, Valentine's Day and Easter, but I am always looking for something I can hang on my front door when  holiday wreaths aren't appropriate.  So... I decided to make something for the winter months... a felt snowflake wreath.


Isn't it pretty?  I cut a snowflake shape out of foam core from the dollar store {using an x-acto knife}.  Then, I made a ton of felt roses and used a glue gun to attach the flowers to the snowflake.  I finished it off by attaching a silver ribbon for a little sparkle.

If you want to make one, here is a tutorial on how to make the flowers:

1)  Using a CD as a template, cut out a bunch of felt circles.  {The number you need will depend on the size of your snowflake.}


2)  Using sharp scissors, cut each circle into a "swirl".  {See the picture below.}


3)  Start on the outside of the "swirl" and wrap the felt until you form a flower.


4)  Apply some glue to the bottom of the flower, and secure the end of the felt "swirl".  {You can give the flower a little "trim" if you like, or you can leave it as it is.}


What do you put on your front door in between "holidays"?  Now that I have a winter wreath I like, I better get to work on one for Spring.  :-)

♥ 
Gina Bell (aka East Coast Mommy)

* You can find me on facebook here.

Note:  Because the base is made of foam core... make sure the wreath is sheltered from the elements.  Foam core does not hold up well if it gets really wet.

ECM Kids' Craft Club - #11 {Valentine's Day Crafts}

Welcome to the 11th edition of the {East Coast Mommy} Kids' Craft Club {an easy and inexpensive way for kids to have fun crafting and to experience the excitement of getting their very own mail}.  If you want to join the club, you can find more info here.  For everyone who is already a member... this month, we are making two great crafts that are perfect for Valentine's Day.


Are your supplies ready?


OK.  Let's start by making your Valentine flower...

1)  Glue the pink heart "petals" onto the green popsicle stick to make a flower.
2)  Glue the green heart "leaves" onto the green popsicle stick.
3)  Glue a button into the centre of the flower.


Next, let's make a Valentine for someone special...

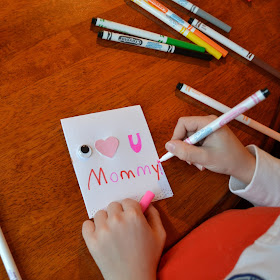
1)  Glue the googly eye and heart onto the front of the Valentine.  Then, add a "U" and the name of he person you are going to give it to.
2)  Draw a special picture or write a special message on the inside.


I hope you enjoyed making this craft and that you have a very HAPPY VALENTINE'S DAY.  {Don't forget to leave me a comment, or send me an email.  Your comments help me to improve the club, and I love hearing from you.} 

♥ 
Gina Bell (aka East Coast Mommy)

Remember... Assist young children when using scissors, and be careful of the small parts included with this kit, as they can be a choking hazard for children under three