FALL WREATH with DIY felt flowers

I have been on a mission to find an inexpensive, nice fall wreath ever since my husband painted our front door a few weeks ago.  (It was more difficult than I thought it would be to find what I wanted.)  Then... I found a plain 18" grapevine wreath for $4.97 at Walmart, I saw a beautiful wreath online, and I was able to make one I LOVE!  Here is my version:


So, are you excited to make one? I guarantee it is easy, and even a beginner crafter can do it.   

Here is how I made mine:

1)  Cut circles out of felt.  I used a CD as a template.  (My version uses 18 yellow flowers and 12 off white flowers -- so you will need 18 yellow circles and 12 white circles.) 

2)  Cut a "spiral" shape out of each felt circle.  

3)  Starting on the outside, wrap the felt until you form a flower.

4)  Secure the end with some hot glue. 

5)  Arrange the flowers on the wreath until you are happy with the how it looks.  Then, secure all the flowers using a hot glue gun.


Didn't it turn out great???  The beautiful fall colours even make me a little less sad that summer is over.

♥ 
Gina (aka East Coast Mommy)

Water Jug Pumpkins

Who doesn't love using recycled materials to create an adorable craft? Check out this super-easy Halloween craft I made with my boys -- Glow-in-the-Dark Pumpkins.  This craft was so simple, I plan to make a bunch with my boys to decorate our house on Halloween night.


All you need is:
  • an empty water bottle or milk jug (washed out)
  • a black Sharpie
  • Green paint and paint brush
  • Orange glow sticks
 
Here is how easy it is:

1)  Paint the cap green.  I just used regular old kid's craft paint.  

2)  Draw a jack-o-lantern face with a Black Sharpie.  (Note:  You might want to make your face scarier -- my five year old told me mine wasn't scary enough.  :-)


3)  Insert an orange glow stick.  I actually ended up adding a glow stick and two glow necklaces in order to get a really good "glowing" effect.


So easy, right???  Can't you just picture a bunch of these water jug pumpkins lining the path to your door on Halloween night?

♥ 
Gina (aka East Coast Mommy)

Googly Eye Vase

I saw a cute {googly eye covered} frame at A Diamond in the Stuff, and I knew I had to make something out of googly eyes with my four year old.  He just loves googly eyes and glue!


We decided to make a "spooky" vase for the flowers we grew together this summer.  So... we gathered our supplies:  a tin can (washed out), orange construction paper, glue, googly eyes, and tape.


Then....

1)  We cut a piece of orange construction paper big enough to cover the can, and we taped it in place.


2)  My son started gluing on tons of googly eyes.  {Bonus - This kept him busy and happy for 20 minutes!}


3)  We let it dry overnight, and filled it with flowers.

This was such an easy craft, and my son loves his "spooky" googly eye vase.  In fact, his older brother wants to make one using black construction paper this weekend.

♥ 
Gina (aka East Coast Mommy)


Want to Sponsor a Giveaway?

I love to review {and give away} great products that I know would be useful and/or fun for my readers. I have been getting a lot of questions lately about how my reviews/giveaways work, so here is the info:

I have two options for giveaways:

1)  Review/giveaway - I receive a product valued at $100 or more to review, and I receive an identical product to give away to one of my readers.*
2)  Giveaway - I receive a cash payment of $125 to run a giveaway.*
*Extra charges will apply if there are specific social media sharing or reporting requirements.

East Coast Mommy is a blog that is written by me (Gina Bell), and all opinions/views expressed on my blog are 100% my own. This is a PR friendly blog and no negative reviews will be posted, so…. if for any reason the product is not something I like or believe in, you will be contacted privately, and:
1.      No review will be published
2.      No giveaway will take place
If you have an item that my readers might be interested in, please email me at eastcoastmommy@gmail.com!

A few important points

For reviews - If I like the product, a full (positive) review will be posted within 4 weeks (or less) of my receipt of the review item.  At that time, I will run a contest, and you will provide a second (identical) item for me to give away to one of my readers.
  • Any items given for review will not be returned
  • All shipping/brokerage/customs fees will be paid for by you (the sponsor)
  • You (the sponsor) will be responsible for shipping the giveaway prize directly to the winner
If you have any further questions, please don’t hesitate to contact me at eastcoastmommy@gmail.com.  

Thanks!  

♥ 
Gina Bell (aka East Coast Mommy)

Fall Activity Tree

We just wrapped up our Summer Activity Checklist with a really fun "ice cream for supper" party.  It was a really great way to end the Summer.


Now school has started again, and the weather is getting cooler, so I decided we needed a Fall Activity Checklist.  I thought it would be fun to put each activity on a "leaf", and hang it on a cardboard cut out of a tree.  It isn't fancy {my boys did all the coloring and most of the cutting}, but here's how we did it:

1)  I drew a {rough} outline of a tree on a piece of white bristol board, the boys colored it brown, and I cut it out.


2)  I traced the outline of the boys hands on some colored paper to make"leaves".


3)  The boys cut out the leaves, and we wrote a fall activity on each one. 


5)  We hung up the tree and taped the "leaves" onto the branches.


Simple, right???  As we complete each activity, the leaf will fall to the bottom of the tree, and when all the leaves are gone, we'll start our "Winter" checklist.  :-)

PS - In case you are interested, here are the Fall Activities we included on our tree:

     1)  Bake an Apple Dessert.
     2)  Rake Leaves.
     3)  Jump in Leaves.
     4)  Make a Fall Craft.
     5)  Celebrate Thanksgiving.
     6)  Visit a Pumpkin Patch.
     7)  Carve a Pumpkin.
     8)  Decorate Halloween Cupcakes.
     9)  Go Trick or Treating.
     10)Attend a Remembrance Day Parade.

What are your family's favorite fall activities?

♥ 
Gina (aka East Coast Mommy)

First Day of School and Preschool... successfully completed!

Today was the first day of Grade One for my oldest, and the first day of Preschool for my middle son.  It was a very exciting and very exhausting day in this house... but everything went well, and the boys went to bed happy.  I guess we can't ask for much more than that.  :-)  Here's how our day went:

We started the day with a pancake breakfast


My First Grader holding a picture of himself on his first day last year


My Preschooler holding a picture of himself on the first day last year


Treats (Smarties) my First Grader brought for his new classmates


Ending the day with some bus cookie "lollipops" and milk

A good day, but a long day.  I miss summer already!  :-)

♥ 
Gina (aka East Coast Mommy)

5 Minute Felt Pumpkin

Fall is such a great season.  Who doesn't love the awesome weather, Thanksgiving and Halloween?  To get me in the "Fall" spirit, I made this adorable felt pumpkin in just five minutes.  


Cute, right?  Want to make one?

You'll need:
  • Orange felt
  • Some cotton batting
  • A little twig
  • Some green ribbon

And, here's what you do:

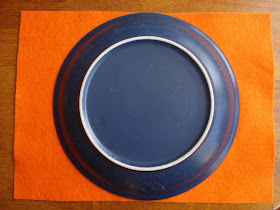
1)  Trace a circle onto a piece of felt, and cut it out.  (I used a plate as a template.)


2)  Draw some 1 cm lines (about 1.5 cm apart) around the perimeter of the circle.  Then, use scissors to cut out slits where you have made the lines.


3)  Weave ribbon in and out through the slits you have cut -- making sure both ribbon ends are outside of your circle when you are finished.


4)  Add some stuffing, insert the stick (stem), and pull the ribbons ends tight.


5)  Tie a bow to create a perfect little pumpkin.  (PS - How cute is my four year old little pumpkin?  :-)


These felt pumpkins are so quick and easy, you could easily whip up a pumpkin patch full! 

♥ 
Gina (aka East Coast Mommy)

Brother Labeller - Review and GIVEAWAY - CLOSED

Giveaway CLOSED.  The winner is Comment # 10
Amanda (ANCFraser@aol.com)

OK... I need to confess... I don't spend nearly enough time cleaning my house.  If you come visit me, you are likely to find toys all over my floor, and my beds may be unmade {gasp!}.  (I sure hope my mother doesn't read this.  :-)

However... I  am very organized, so when Brother Canada sent me a P-Touch PT-1100SBVP Labeller to review, I was super excited!

I tested it by labelling my son's school supplies, but I plan on using it to organize my craft room in the very near future.  It will also come in handy if I ever get around to some scrap-booking projects on my "to do" list because it comes with Acid Free Tape. 

The test:  I initially printed some labels on my home computer, but they started to peel off after a couple of hours.  So, I relabelled everything with my new labeller, and it was awesome.  Not only did they stick really well, but they had cute borders and designs that my son could choose from.  Check it out:

WITHOUT my new labeller
WITH my new labeller
One happy customer!
So... here is the best part.  I have one to give away to one of my readers.  Just comment below (with your email address if you aren't logged in), and let me know how you would use your new label maker.  Pretty easy, right?  Good luck!


Rules {I am a mom... I can't help it}:
  1. The winner of the contest will be chosen by the Random Number Generator.
  2. To enter the contest, you must leave me a comment telling me what you would do with your Brother labeller.  Contest is open to Canadian residents only.
  3. This contest is not being hosted or sanctioned in any way by facebook.
  4. Contest closes on September 11, 2011 at 11:59pm.
  5. Prize will be accepted as awarded.
  6. Winners will be contacted via email and will have 48 hours to respond.  After 48 hours the prize will be forfeited, and another winner will be selected.
Please note:  I was provided with this product (free of charge) for reviewing purposes only.  No monetary compensation was received, and all opinions are 100% my own.

For further information on the labeller, please visit brother.ca.


Gina (aka East Coast Mommy)

Decorating Walls with Memories

I love making my house feel like a home, and one of my favorite ways to do this is to fill my walls with pictures that are meaningful to me(And it is an inexpensive way to decorate -- definitely a BONUS! )  Here are five of my favorites:


1)  I took this picture of my boys feet when they were playing in the grass last summer.  I love looking at their little toes, and it will always remind me of how little they were.


2)  This is a piece of artwork my son did at school.  I framed it and hung it in his room.  It is special to both of us.


3)  When my boys were babies, I took pictures of them after their bath (wrapped in towels).  The pictures look sweet in my bathroom, and the boys love seeing themselves as babies.


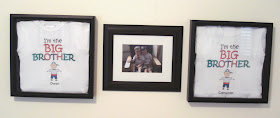
4)  I had special t-shirts made for my older boys to wear to the hospital to meet their new baby brother.  I put them in shadow boxes and hung them in their rooms alongside a picture of them wearing the shirts.  Such special keepsakes!  


5)  Every year, I take pictures of the boys with the Easter Bunny and Santa.  I frame them and only take them out at Easter and Christmas.  The pictures always make me smile, and they are a very special part of our holiday decorations.


Do you have special artwork in your house?  I would love to hear your ideas.

♥ 
Gina (aka East Coast Mommy)