5 Ways to Save Money on CHRISTMAS DECOR by DIYing Things you Already have in your Home

Who doesn't love saving money? And what better way to save money during the holiday season than using stuff you already have to decorate your home? Check out these 5 budget friendly DIYs!


1) Use glass vases/jars/containers/bowls - Everyone has a glass vessels in their home, and they are easy to transform into Christmas decor. I added Epson salts and glitter to this jar, and then I added bottle brush trees, mini lights, and a fun ornament. Cute, right?


2) Use greenery - We had a lot of fallen branches and trees in our back yard, and I harvested what I needed to make an arrangement. I added a few dollar store picks, and inserted everything in a pot of soil I had leftover from my Fall mom. I can't believe this gorgeous arrangement only cost me a few dollars!


3) Raid the recycling bin - How cute are these fake cookies? I cut house shapes from an old cardboard boxese, and I added "icing" with a white chalk marker. They look cute on a plate, but they also look nice strung up on a piece of twine.


4) Use existing artwork in your home - My walls are filled with artwork, so it's fun to add a Christmas spin to them. You can wrap them like presents, or change out the artwork to something with a Christmas theme. You can grab some free "Movie Quotes" that I designed here.


For a closer look (and more step by step instructions, check out the video below.


I love this these ideas, don't you? Let me know your favourite in the comments. 

♥ 
Gina Bell (aka East Coast Mommy)


You might also like the Christmas DIYs here.

Happy Birthday to my Oldest Son on his 17th Birthday

When my boys were little, I started a tradition of writing Christmas letters to my boys on their birthdays. My hope is that they can always find their letters on my blog and know how much I loved being their mom--at every stage of their lives. Today I share my letter to my oldest son on his 17th birthday.


Dear Cameron,

As you turn 17, and look forward to your graduation in June, I can't believe how fast the time has gone. It seems like I was just holding your hands as you learned to walk, and now you are driving yourself around. You are a very good driver, but it sure was scary seeing you pull out of the driveway on your own the first few times. 😊

I'm so proud of the young man you are becoming, and can't wait to see what the next chapter of your life brings for you. I know you'll do great! 

Here are some of the things that make you the special 17 year old that you are:

  • You aren't afraid to try something new. This year you joined the high school basketball team even though you have never played organized basketball before.
  • You still love hockey. You love watching it, playing it, talking about it, and reffing it. 
  • You are really starting to love golf. You got a job at the golf course and joined the golf team at school.
  • You love to spend time with your family, friends, and teammates. You especially love your summer vacations in PEI with your Ottawa cousins and your all your adventures with your Halifax cousins.
  • You are a fantastic student. I never see you stressed, and your time management skills are impressive. I can't wait to see how you apply these skills in university next year.
Even though you are almost ready to leave home, you will always be my baby, and I will cherish every day I have left with you under my roof. I love you to the moon and back!

Love,
Mom

FREE Holiday Prints for Christmas Movie Lovers (Elf, It's a Wonderful Life, The Polar Express, and The Santa Clause)

Last week, I shared a fun, FREE "Elf Movie" print, and so many people loved it that I decided to design a few more to share. I love that these are large pieces of artwork that you can print at a local copy store for about $1. Then, you can use dollar store frames... or frames you already have in your home. It doesn't get more budget-friendly than these FREE holiday prints for Christmas movie lovers!


Here's the one for "It's a Wonderful Life":


Here's the one for "Elf":


Here's one for "The Polar Express": 


And here's one for "The Santa Claus":


Aren't these great? I have all of my in dollar store frames, and my plan is to hang three on my wall, and change out the frames with new prints with the change of holidays / seasons.


To download your 11x14" prints FOR FREE: click on the photo you want (below), right-click, save it to your computer, and print it like a regular photo.


What's your favourite Christmas movie? 

I just love budget-friendly holiday decor, don't you?

♥ 
Gina Bell (aka East Coast Mommy)


You might also like the Christmas DIYs here.

FREE Holiday Print (for ELF Movie fans!)

I recently found a large frame at the Dollar Store, and I knew I wanted to use it to create a large decor piece for the holidays. I am thrilled with how the print I designed turned out, and YOU can download your own copy FOR FREE below.


To download a copy of this "ELF" inspired print: click on the picture below, right-click, save it to your computer, and print it like a regular 11x14 print.


I printed mine at my local copy store for less than $1, and it looks great in my dollar store frame. It's a fantastic piece of Christmas artwork for only a few dollars!!!


Take a closer peek at my print (and a few of my other NEW dollar store DIYs and finds) here:


What do you think? Are you planning to download a copy of this Elf Movie print? I hope you like it as much as I do!

♥ 
Gina Bell (aka East Coast Mommy)


You might also like the Christmas DIYs here.

TWO quick and easy Halloween treat ideas (you are going to want to try TONIGHT!)

Seriously... who doesn't love a quick, easy, and YUMMY Halloween treat?!? Today, I'm sharing two of my favourites.


Check out this video for the FULL instructions!


What did you think? Are you team "mug cake"?


Or team "witch hat"?


Cute, right?!?!


Happy Halloween!!!


Gina Bell (aka East Coast Mommy)


You may also be interested in the Halloween ideas here.


NEW high-end Halloween decor (DOLLAR STORE finds and DIYs)

I love high end holiday decor, but I don't like the price tag. So... I like to search out dollar store finds and come up with my own DIYs. Today, I have FIVE fantastic items to share with you. You'll never believe what I made from a dollar store car cleaning cloth!

PS (Don't forget to check out the step by step instruction video on YouTube here... or at the end of the post.)


1) I am in love with this DIY. I found these fuzzy car cleaning cloths at my local dollar store, and I knew they'd be perfect for making a no-sew ghost pillow. They come 6 to a pack... so one package is enought to make 3 ghosts.


Cut a ghost shape from one of the cloths, use the ghost shape as a template to create an identical shape from another one of the cloths, use hot glue to attach the shapes together (leaving an opening for stuffing), turn it inside out, stuff the pillow with polyfill, close the opening with hot glue, use hot glue to attach a face made of felt.


2) I love a holiday wreath, and with a little DIY, it's easy to make something fun and unique for Halloween. For this wreath, I used: a dollar store wreath form, dollar store yarn, and a dollar store wooden cut out.


I wrapped a wreath form with black yarn (securing with hot glue periodically). Then, I cover with cat with some scrap fabric I had in my craft stash. To finish, I used hot glue to attach the cat to the wreath and added a bit of ribbon.

I think it's a wonderful piece of neutral, farmhouse decor for Halloween. What do you think?


3) There is nothing better than a super-easy DIY, and it doesn't get easier than this photo display. I found a cute black and gold clipboard, and it is the perfect vessel for displaying seasonal artwork.


I used mine with this adorable Halloween water colour picture I designed. You can grab your own copy (FOR FREE) here.


4) I love the seasona dollar store mats, and this one is perfect for Halloween. I love to layer it with a larger mat for a high end look.


And don't forget to pick up some Halloween goodies at great prices. 😁


5) These candle holders are one of my favourite things to buy from my local dollar store. They are perfect for making tiered trays, but I also like using them to elevate and display decor.


Here I painted one with white chalk paint and one with matte black spray paint. Don't they look great in this black and white Halloween display?


For a closer look at all these ideas for high-end Halloween decor, check out the YouTube video below.


Do you have a favourite dollar store find or DIY for Halloween? Happy Halloween!!!!


Gina Bell (aka East Coast Mommy)


You may also be interested in the Halloween ideas here.


11 HOCUS POCUS Crafts, DIYs, and Treat Ideas

Movie nights are a staple in my home, and I love watching Hocus Pocus with my boys every Halloween. With Hocus Pocus 2 being released this year, I thought it was the perfect time to share my favourite HOCUS POCUS inspired crafts, DIYs and treat ideas.


1) Binx Candy Dish - Paint a wooden dollar store cat black, glue it to a tray, and fill it with dollar store treats. It's the perfect inexpensive centrepiece for a viewing party food table.


2) Hocus Pocus mugs - Add the words "Hocus Pocus" to black dollar store mugs, and you have the perfect vessels for serving hot chocolate to enjoy during the movie. Easy peasy!


3) Witch hat chocolates - These are the perfect snack to enjoy during a Hocus Pocus screening. Top Reese Peanut Butter Cups with a dollap of icing and a Hershey kiss. That's it!


4) Simple DIY Hocus Pocus Spell book - Cover an old book with faux leather (or paint it brown), add a plastic eyeball cut in half, add details with hot glue, and cover the glue with brown paint. Simple and fun!


5) Hocus Pocus banner - Add glittery gold letters to card stock pennants, and string with a piece of twine. It's a simple way to add a bit of fun to a Hocus Pocus movie night!


6) Broom parking - A dollar store over-the-door coat rack makes a fun Halloween vignette. Use it to hang a witch cape, hat and brooms. It's super fun!!!


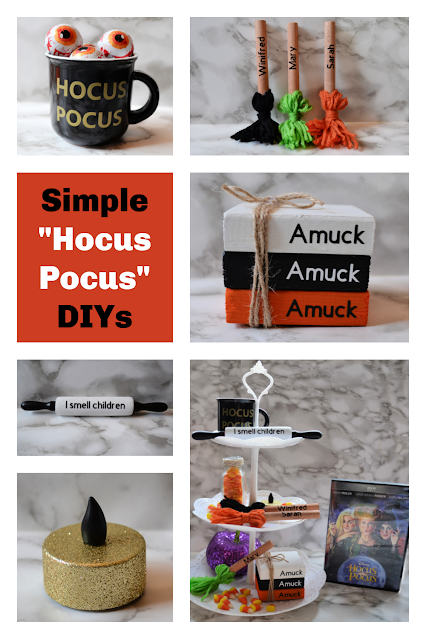
7-11) Hocus Pocus tiered tray DIYs - A Hocus Pocus tiered tray is a fun way to create an adorable Halloween vignette, and I have 5 simple tiered tray DIY ideas here. (The tiny little brooms are my favourite!)


You can get a closer look at how I made ALL ELEVEN Hocus Pocus crafts in the video below.


Which is your favourite Hocus Pocus craft/DIY/treat? I think they are all easy, inexpensive, and fun!

♥ 
Gina (aka East Coast Mommy)


PS (These pretzel brooms are cute too! Package pretzels with a paper straws and tie them with ribbons. Pretty cute, eh?)

Don't miss any of the fun....