Halloween 2015

Just a quick post to wish everyone a very Happy Halloween... and to share a couple of pictures of my cute little goblins and their costumes.


As you can see, I had a ninja, a police officer, and a vampire. My boys had very specific ideas of what they wanted to wear. 

My oldest was obsessed with finding a perfect vampire medallion (which I couldn't find), so I crafted a simple one for him. I printed a picture from the internet, glued it to a piece of a cereal box, and cut it out. Then, I added a scrapbook embellishment, a jewel sticker (from the dollar store), and a piece of red ribbon. You know what they say.... necessity is the mother of invention! :-)


My oldest wanted to be a ninja with red trim and a ninja star belt. I fashioned him exactly what he wanted out of an old shirt and duct tape. You can read all about it here.


And my youngest went with a store bought costume we had in our dress up box. Pretty simple!

The boys had 3 hockey practices and a hockey game today... so after supper, we quickly carved a pumpkin, got dressed and headed out the door.


Needless to say, it was a pretty successful night at our house. It took the boys 40 minutes to do our street, and they came home with way more candy than they need!


I hope you and your little ones had a spooktacular night. Happy Halloween!!

♥ 
Gina Bell (aka East Coast Mommy)

Encouraging Boys to Read... with a little help from Star Wars

Getting boys to read can be a challenge, but over the years I have found the secret... find books about things they are interested in. All my boys love Star Wars, so when I was sent a bunch of books (from DK Publishing) to review, there was a lot of excitement in our home. Today, I am sharing the details on their favorites!
I love the Star Wars books from DK publishing because there are a variety of books that appeal to kids at various reading levels. All my boys were able to find books that they really enjoyed.


You can find the full Star Wars Boutique here, but each of my boys chose a favorite, and here is what they selected:

My 6 year old (who is an emerging reader) loved the easy readers... especially Star Wars: Ultimate Duels. He was also a big fan of Star Wars: The Force Awakens Stickerscapes (which allows you to create your own amazing Star Wars scenes with over 1000 stickers).

My 8 year old (who finds it hard to sit still long enough to read a book) was captivated by the Star Wars Character Encyclopedia. It has a bunch of information on over 200 Star Wars heroes, villains and other characters. He also really liked Star Wars Rebels: Visual Guide: Epic Battles.

My 9 year old (who loves to read) was most interested in Star Wars: Absolutely Everything You Need to Know: Journey to Star Wars: The Force Awakens. It's a 200 page reference book filled with Star Wars facts and trivia.


It makes me happy to find books that my boys are enthusiastic about reading. I encourage you to check out this Star Wars collection. Christmas is coming... and I am sure your little ones would enjoy finding some of these fantastic books under the tree.


Gina (aka East Coast Mommy)

Disclosure: I was provided with these products (free of charge) for reviewing purposes. No monetary compensation was received, and all opinions are 100% my own. 

This post contains affiliate links. If you click a link, and purchase a product, you will be supporting this blog. Thank you!

DIY Costumes Made from Old T-Shirts

Homemade costumes are original, fun, and a lot cheaper than store-bought alternatives. Today, I am sharing a collection of DIY costumes made from old shirts (or new shirts from the dollar store). You just need a pair of scissors and a little imagination.


Superhero Cape - My boys and I love these superhero capes made from dollar store t-shirts. I cut them, and my boys decorated them with stickers. Soooo easy and cute! Find the full tutorial here.


Mad Scientist - A white t-shirt becomes a lab coat when you cut it down the middle. Check out all the elements of this fun costume here


Doctor - A white t-shirt can easily become a doctor's coat with a pair of scissors and a Sharpie. Check it out here.


Ninja - The secret to this t-shirt transformation is duct tape! You can find all the DIY details here


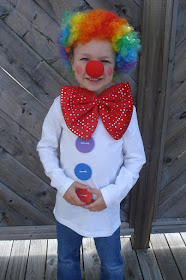
Clown - A white shirt becomes a perfect clown costume with the addition of colourful foam circle buttons paired with dollar store accessories. Cute, right?


Peter Pan - A green t-shirt becomes a perfect Peter Pan tunic with a few simple cuts. I absolutely love this simple costume, and you can find the step-by-step tutorial here


These DIY costumes are fantastic options for Halloween, but they are also wonderful (and easy) additions to dress up bins. Is there anything better than seeing a child "pretend" and use his/her imagination?


Gina (aka East Coast Mommy)


PS - You can find more easy and inexpensive Halloween ideas here.


Easy Black Ninja Costume (no sewing required)

Last year my middle son decided that he wanted to be the white ninja from LEGO Ninjago, and this year he wants to be a black ninja. In order to give him the look he desired, I used duct tape to create a simple no-sew black ninja costume.


Didn't it turn out cute?


To make the ninja shirt, I took one of my old black shirts and I added red duct tape (see below). Then, I drew a ninja star onto an old cereal box, cut it out, and covered it with grey duct tape. I used hot glue to attach the ninja star to a piece of red ribbon to create a belt.


To make the hood, I used the same method I used when my son was a white ninja.

1) I started with a plain black turtleneck. 

2) I pulled the turtleneck over my son's head until it was covering his ears and nose.

3) I pulled the back of the shirt up over his forehead.

4) I tied the arms around the back of his head.

5) I adjusted the hood until it had the desired look.


I love a simple DIY costume, and this one was really inexpensive and easy to make. My 8 year old is super-excited about his black ninja costume, and I am happy that he is so pleased with it... and that I didn't have to sew anything!

♥ 
Gina Bell (aka East Coast Mommy)


You can find more no-sew costume ideas here.


Halloween Paper Crafts

I love paper crafts because they are easy to make, and you always have all the supplies you need. Today I am sharing three adorable and simple Halloween paper crafts that are perfect for preschoolers (and fun for older kids too)!


To make a torn paper pumpkin:

1) Draw a circle on a piece of card stock.
2) Rip orange construction paper into pieces.
3) Glue the torn pieces of paper onto the paper until the circle is filled. (I used a glue stick, but white glue would work too.)
4) Cut out a stem and face (from construction paper), and glue the pieces onto the pumpkin.


To make the spider headband:

1) Download the spider template here
2) Color and cut out the spider, and glue on googly eyes.
3) Make a headband by taping 1 inch strips of paper together.
4) Attach spider to the headband with tape.


To make a spooky name plate:

1) Write and color the child's name.
2) Decorate with Halloween stickers.


And how cute are these simple paper puppets? Simply draw some Halloween shapes (pumpkins, ghosts, and bats) on cardstock, decorate, and tape popsicle sticks to the back.


All of these Halloween paper crafts are delightful, fun, and easy to make. They are fantastic for working on fine motor skills, and a great way to celebrate Halloween. Enjoy!


Gina Bell (aka East Coast Mommy)


PS - If you like simple paper Halloween crafts, you might want to check out these older posts too!

Ghost Mask - Get the FREE template here.


Pumpkin Headband - See the step-by-step tutorial here.

5 Years of "booing" the Neighbours

"Booing" our neighbours has been a tradition in our house for many years. If you aren't familiar with "booing", here's how it works... you wait until after dark, sneak up to your neighbours' houses, and try and leave treats without getting caught. 


This year, we decided to make different types of treats and deliver them at different times... to prevent our neighbours from figuring out the source of the "booing". We made some Halloween Candy Bark and some Ginger Halloween Cookies.


If you have never tried "booing", you totally should! It really is a fantastic Halloween activity. Here's a look back at the fun my boys have had over the last few years:

2011 - This was the first year my boys tried "booing". They were super-cute and super-excited, and you can read all about it here.


2012  - We found adorable ghost buckets at the dollar store, and filled them with mini chocolate bars. You can read all about it here.


2013 - We got creative and designed a new version of the "you've been BOO'ed" printables, which you can download here. We switched it up and "boo'ed" the neighbours with Kinder Surprises. It was lots of fun, and you can read all about it here.


2014 - We stepped it up with a new design and some adorable packaging. You can read all about it, and download the printables for FREE, here.


"Booing" has created a lot of memories for my boys, and I know it will be part of our Halloween celebrations for many years to come.


Gina (aka East Coast Mommy)

Halloween Candy Bark

I have been baking almond bark at Christmas (for many years) because it is easy to make, and it always tastes great. This year, I decided to "switch it up", and I made some Halloween Candy Bark... and it was DELICIOUS!


The only supplies needed for Halloween Candy Bark are: wax paper, white baker's chocolate, and an assortment of Halloween candy.


To make the Halloween Candy Bark:

1) Melt the chocolate according to package directions (break up pieces of chocolate, microwave on medium for 1-2 minutes, and stir until smooth).

2) Pour the melted chocolate onto a piece of waxed paper, and spread it out (gently with a wooden spoon).

3) Place bits of chocolate and candy on top of the melted chocolate.

4) Allow to cool and harden, and then break up the chocolate.

My boys ate some of our bark, and we packaged the rest of it up to share with our neighbours.


The Halloween Candy Bark was a big hit at our house, and the boys have already requested that I make it again. I know what I'll be doing with our leftover Halloween candy!


Gina (aka East Coast Mommy)

Ginger Halloween Cookies

It is always fun to make fun cookies for special occasions... and these Ginger Eyeball Cookies are perfect for Halloween. I guarantee that if you "scare" up a batch, you will not be disappointed!


To make these deliciously simple cookies, you start with my favorite ginger molasses cookie recipe.

2 cups all purpose flour
2 tsp ground ginger
1 tsp ground cinnamon
1/2 tsp ground all spice
1 tsp baking soda
1 tsp baking powder
1/2 tsp salt
2/3 cup vegetable oil
3/4 cup white sugar (+ 1/2 cup for rolling)
1/4 cup light brown sugar
1 egg
1/3 cup fancy molasses
1 tsp vanilla

Preheat oven to 375 degrees.

In a large bowl, whisk together:  flour, ginger, cinnamon, all spice, baking soda, baking powder, and salt.

In a medium bowl, whisk together:  oil, white sugar, brown sugar, egg, molasses, and vanilla.  Keep whisking until all the ingredients are well mixed.  Add to flour mixture, and stir with a wooden spoon until combined.

Roll into 1 inch balls, coat each ball with sugar, and place 1 inch apart on a parchment lined cookie sheet.

Bake for 8-10 minutes (until crisp around the edges and cracked on top). 


Then, while the cookies are cooling, you insert candy eyeballs into the tops of the cookies. My 6 year old loved helping me with this part.


We ate some of the cookies, we put some in the freezer for lunches, and we packaged up some to share with our neighbours. They really are one of my favorite cookies, and now they are perfect for Halloween!


Gina (aka East Coast Mommy)